서론


이번 포스팅에서는 JPA에 Cache 적용방법에 대해서 다루어보겠습니다. 먼저 Cache 선정 기준 및 패턴에 대한 소개 및 적용 방법을 설명합니다. Cache로는 Ehcache3을 적용하며, Spring Actuator를 통해서 캐시 Metric 변화도 함께 살펴보겠습니다.


1. Cache 적용 기준


캐시란 간단하게 말해서 Key와 Value로 이루어진 Map이라고 볼 수 있습니다.

하지만 일반 Map과는 다르게 만료 시간을 통해 freshness 조절 및 캐시 제거 등을 통해서 공간을 조절할 수 있는 특징이 있습니다.


그렇다면 캐시 적용을 위해 고려해야할 척도는 무엇이 있을까요?


1. 얼마나 자주 사용하는가?


출처 : https://ko.wikipedia.org/wiki/%EA%B8%B4_%EA%BC%AC%EB%A6%AC


위 그림은 파레토 법칙을 표현합니다. 즉 시스템 리소스 20%가 전체 전체 시간의 80% 정도를 소요함을 의미합니다. 따라서 캐시 대상을 선정할 때에는 캐시 오브젝트가 얼마나 자주 사용하는지, 적용시 전체적인 성능을 대폭 개선할 수 있는지 등을 따져야합니다.


2. HitRatio


HitRatio는 캐시에 대하여 자원 요청과 비례하여 얼마나 캐시 정보를 획득했는지를 나타내며, 계산 식은 다음과 같습니다.


HitRatio = hits / (hits + misses) * 100


캐시공간은 한정된 공간이기 때문에, 만료시간을 설정하여 캐시 유지시간을 설정할 수 있습니다. misses가 높다는 것은 캐시공간의 여유가 없어 이미 캐시에서 밀려났거나, 혹은 자주 사용하지 않는 정보를 캐시하여 만료시간이 지난 오브젝트를 획득하고자할 때 발생할 수 있습니다. 따라서 캐시를 설정할 때는 캐시 공간의 크기 및 만료 시간을 고려해야합니다.


2. Cache 패턴


이번에는 캐시에 적용되는 패턴에 대해서 알아보도록 하겠습니다.


1. No Caching


말 그대로 캐시없이 Application에서 직접 DB로 요청하는 방식을 말합니다. 별도 캐시한 내역이 없으므로 매번 DB와의 통신이 필요하며, 부하가 유발되는 SQL이 지속 수행되면 DB I/O에 영향을 줍니다.


2. Cache-aside


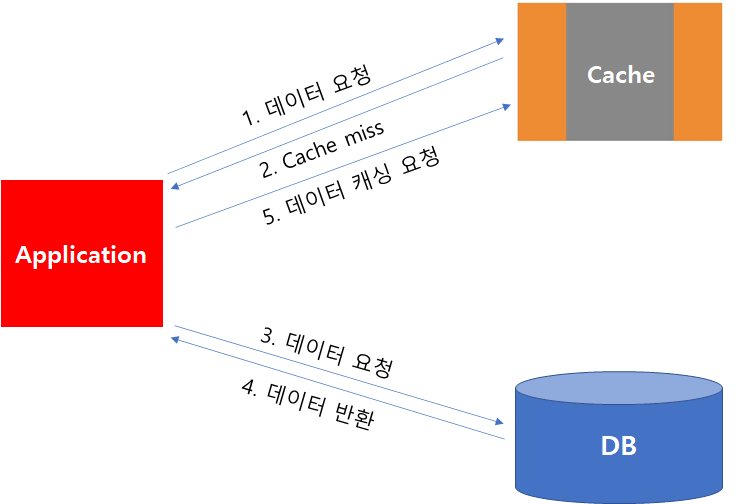
Application 기동시 캐시에는 아무 데이터가 없으며, Application이 요청시에 Cache Miss가 발생하면, DB로부터 데이터를 읽어와 Cache에 적재합니다. 이후에 동일한 요청을 반복하면, 캐시에 데이터가 존재하므로 DB 조회 없이 바로 데이터를 전달받을 수 있습니다.


해당 패턴은 Application이 캐시 적재와 관련된 일을 처리하므로, Cache Miss가 발생했을 때 응답시간이 저하될 수 있습니다.


3. Cache-through


캐시에 데이터가 없는 상황에서 Miss가 발생했을 때, Application이 아닌 캐시제공자가 데이터를 처리한 다음 Application에게 데이터를 전달하는 방법입니다. 즉 기존에는 동기화의 책임이 Application에 있었다면, 해당 패턴은 캐시 제공자에게 책임이 위임됩니다.


Cache-through 패턴은 다음과 같이 세분화할 수 있습니다.


Read-through


데이터 읽기 요청시, 캐시 제공자가 DB와의 연계를 통해 데이터를 적재하고 이를 반환합니다.


Write-through


데이터 쓰기 요청시, Application은 캐시에만 적용을 요청하면, 캐시 제공자가 DB에 데이터를 저장하고, Application에게 응답하는 방식입니다. 모든 작업은 동기로 진행됩니다.


Write-behind


데이터 쓰기 요청시, Application은 데이터를 캐시에만 반영한 다음 요청을 종료합니다. 이후 일정 시간을 간격으로 비동기적으로 캐시에서 DB로 데이터를 저장요청합니다. 이 방식은 Application의 쓰기 요청 성능을 높일 수 있으나 만약 캐시에 DB에 저장하기 전에 다운된다면, 데이터 유실이 발생합니다.


3. EhCache


Ehcache는 Java에서 주로 사용하는 캐시 관련 오픈소스이며, Application에 Embedded되어 간편하게 사용할 수 있는 특징을 지니고 있습니다. EhCache3에서는 JSR-107에서 요구하는 표준을 준수하여 만들어졌기 때문에 2 버전과 3 버전 설정 방법이 다릅니다. 


Ehcache에서는 이전에 설명한 캐시 패턴을 모두 적용할 수 있습니다. 그 중 Cache-through 전략은 CacheLoaderWriter 인터페이스 구현을 통해서 적용할 수 있으나 해당 내용에 대해서는 다루지 않겠습니다.


자세한 설명은 공식 홈페이지를 참고바랍니다.


출처 : https://www.ehcache.org/documentation/3.2/caching-concepts.html


공식 메뉴얼에 따르면, 캐시 중요도에 따라 세군데 영역으로 나뉘어 저장할 수 있습니다. 먼저 Heap Tier는 GC가 관여할 수 있는 JVM의 Heap영역을 말합니다. 반면, Off Heap은 GC에서 접근이 불가능하며 OS가 관리하는 영역입니다. 해당 영역에 데이터를 저장하려면, -XX:MaxDirectMemorySize 옵션 설정을 통해 충분한 메모리를 확보해야합니다. 마지막 영역은 Disk 영역으로 해당 설명은 Skip 하겠습니다.


그럼 지금부터 지금까지 JPA 포스팅하면서 다룬 예제를 확장하여 EhCache를 적용하겠습니다. 예제 프로그램은 Cache-Aside 패턴을 통해 구현하며, 그외 나머지 패턴은 다루지 않겠습니다.


1. EhCache3 적용


build.gradle

...(중략)...
dependencies {
    ...(중략)...
    
    //cache
    implementation 'org.springframework.boot:spring-boot-starter-cache'
    implementation group: 'javax.cache', name: 'cache-api', version: '1.1.1'
    implementation group: 'org.hibernate', name: 'hibernate-jcache', version: '5.4.19.Final'
    implementation group: 'org.ehcache', name: 'ehcache', version: '3.8.1'
}
...(중략)...


application.yaml

spring:
  jpa:
    properties:
      javax:
        persistence:
          sharedcache:
            mode: ENABLE_SELECTIVE
      hibernate:
        cache:
          use_second_level_cache: true
          region:
            factory_class: org.hibernate.cache.jcache.internal.JCacheRegionFactory
        temp:
          use_jdbc_metadata_defaults: false
        format_sql: true
        show_sql: true
        use_sql_comments: true
    hibernate:
      ddl-auto: none
    database-platform: org.hibernate.dialect.Oracle10gDialect


JPA와 관련된 캐시 설정을 합니다. 설정 내용 중 캐시와 관련된 옵션을 살펴보겠습니다.


먼저 SharedCache는 캐시모드를 설정할 수 있는 옵션으로 enable_selective는 @Cacheable이 설정된 엔티티에만 캐시를 적용함을 의미합니다. 만약 모든 엔티티에 적용하려면 all 옵션을 줄 수 있습니다.


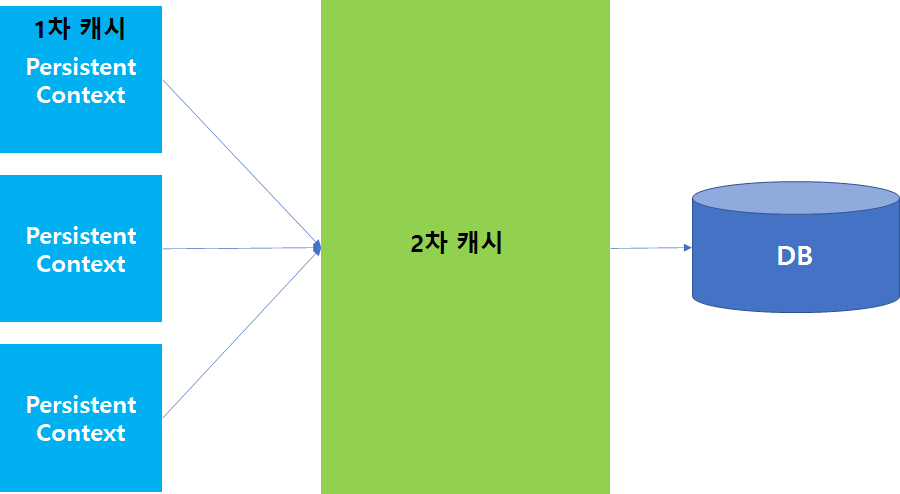
use_second_level_cache는 2차 캐시 활성화 여부를 지정합니다. JPA에서 1차 캐시는 PersistentContext를 의미하며, 각 세션레벨에서 트랜잭션이 진행되는 동안에 캐시됩니다. 반면 2차 캐시는 SessionFactory 레벨에서의 캐시를 의미하며 모든 세션에게 공유되는 공간입니다. 해당 옵션을 통해서 2차 캐시 설정 여부를 지정합니다.


factory_class는 캐시를 구현한 Provider 정보를 지정합니다. Ehcache3는 JSR-107 표준을 준수하여 개발되었기 때문에 JCacheRegionFactory를 지정합니다.


2. Configuration 설정


@Configuration
public class CachingConfig {
    public static final String DB_CACHE = "db_cache";

    private final javax.cache.configuration.Configuration<Object, Object> jcacheConfiguration;

    public CachingConfig() {
        this.jcacheConfiguration = Eh107Configuration.fromEhcacheCacheConfiguration(CacheConfigurationBuilder.newCacheConfigurationBuilder(Object.class, Object.class,
                ResourcePoolsBuilder.newResourcePoolsBuilder()
                        .heap(10000, EntryUnit.ENTRIES))
                .withSizeOfMaxObjectSize(1000, MemoryUnit.B)
                .withExpiry(ExpiryPolicyBuilder.timeToIdleExpiration(Duration.ofSeconds(300)))
                .withExpiry(ExpiryPolicyBuilder.timeToLiveExpiration(Duration.ofSeconds(600))));
    }

    @Bean
    public HibernatePropertiesCustomizer hibernatePropertiesCustomizer(javax.cache.CacheManager cacheManager) {
        return hibernateProperties -> hibernateProperties.put(ConfigSettings.CACHE_MANAGER, cacheManager);
    }

    @Bean
    public JCacheManagerCustomizer cacheManagerCustomizer() {
        return cm -> {
            cm.createCache(DB_CACHE, jcacheConfiguration);
        };
    }
}


Cache Config 클래스를 작성합니다. 먼저 생성자를 통해 캐시의 기본 설정을 구성했습니다. 위 구성은 테스트를 위해 임의로 지정하였으며, 커스터마이징하여 작성 가능합니다.


지정된 옵션 설명은 다음과 같습니다.

총 10000개의 Entity를 저장할 수 있으며, 각 오브젝트 사이즈는 1000 Byte를 넘지 않도록 제한하였습니다. Object는 최초 캐시에 입력후 600초 동안 저장되며, 만약 마지막으로 캐시 요청이후에 300초동안 재요청이 없을 경우 만료되도록 지정하였습니다.


자세한 설정 방법은 공식 문서를 참고 바랍니다.


@Entity
@Table
@Getter
@Cacheable
@org.hibernate.annotations.Cache(region = CachingConfig.DB_CACHE, usage = CacheConcurrencyStrategy.READ_ONLY)
public class Customer {
    @Id
    @GeneratedValue
    @Column(name = "id")
    private Long customerId;
    @Column(name = "name")
    private String customerName;
}


SharedCache 모드를 enable_selective로 지정하였으므로, @Cacheable 어노테이션을 추가하여 해당 엔티티를 캐시할 수 있도록 설정하였습니다. 캐시 제공자내에는 여러 캐시가 존재할 수 있으며, 캐시마다 이름이 부여되어있으므로 region영역에는 캐시내에서 참조할 캐시이름을 지정합니다.


usage는 캐시와 관련된 동시성 전략을 지정할 수 있습니다. 지정할 수 있는 옵션으로는 NONE, READ_ONLY, NONSTRICT_READ_WRITE, READ_WRITE, TRANSACTIONAL 총 5가지 입니다. 예제 프로그램에서는 읽기 전용으로만 지정하기 위해서 READ_ONLY 옵션을 부여했습니다.


@Service
@Slf4j
public class CustomerService {
   ...(중략)...

    public CustomerDTO getCustomer(Long id) {
        log.info("getCustomer from db ");
        Customer customer = repository.findById(id).orElseThrow(IllegalAccessError::new);
        return CustomerDTO.of(customer);
    }
}


@RestController
@RequiredArgsConstructor
@RequestMapping("/customers")
public class CustomerController {
    ...(중략)...

    @GetMapping("/{id}")
    public CustomerDTO getCustomer(@PathVariable Long id) {
        return service.getCustomer(id);
    }
}


테스트를 위해 Service 및 Controller에 관련 메소드를 생성합니다.


2020-08-05 23:09:30.493  INFO 1872 --- [nio-8080-exec-1] c.e.paging_demo.service.CustomerService  : getCustomer from db 
Hibernate: 
    select
        customer0_.id as id1_0_0_,
        customer0_.name as name2_0_0_ 
    from
        customer customer0_ 
    where
        customer0_.id=?
2020-08-05 23:09:40.278  INFO 1872 --- [nio-8080-exec-2] c.e.paging_demo.service.CustomerService  : getCustomer from db 
2020-08-05 23:09:51.598  INFO 1872 --- [nio-8080-exec-3] c.e.paging_demo.service.CustomerService  : getCustomer from db 
2020-08-05 23:09:52.384  INFO 1872 --- [nio-8080-exec-4] c.e.paging_demo.service.CustomerService  : getCustomer from db 


실행 후 로그 출력 결과입니다. 최초 요청시에는 SQL 수행결과가 로그에 기록되었지만, 그 이후에는 SQL이 수행되지 않고 2차 캐시에서 정상적으로 가져온 것을 확인할 수 있습니다.


3. DTO 레벨 캐시 추가 설정


이번에는 테스트 목적으로 Entitiy 뿐만 아니라 DTO에도 캐시를 적용해보겠습니다. 테스트를 위해 두 대상은 다른 캐시영역에 저장되며, 두 캐시영역간 설정에 차이를 두겠습니다.


@Configuration
public class CachingConfig {
    public static final String DB_CACHE = "db_cache";
    public static final String USER_CACHE = "user_cache";

    ...(중략)...

    @Bean
    public JCacheManagerCustomizer cacheManagerCustomizer() {
        return cm -> {
            cm.createCache(DB_CACHE, jcacheConfiguration);
            cm.createCache(USER_CACHE, Eh107Configuration.fromEhcacheCacheConfiguration(CacheConfigurationBuilder.newCacheConfigurationBuilder(Long.class, CustomerDTO.class,
                    ResourcePoolsBuilder.newResourcePoolsBuilder()
                            .heap(10000, EntryUnit.ENTRIES))
                    .withSizeOfMaxObjectSize(1000, MemoryUnit.B)
                    .withExpiry(ExpiryPolicyBuilder.timeToIdleExpiration(Duration.ofSeconds(10)))
                    .withExpiry(ExpiryPolicyBuilder.timeToLiveExpiration(Duration.ofSeconds(20)))));
        };
    }
}


새로운 캐시를 추가하기 위해서 위와같이 Configuration 클래스를 수정했습니다. 신규로 추가하는 USER_CACHE는 만료시간을 훨씬 짧게하여 최장 20초간만 캐시에 저장되도록 설정하였습니다.


@Service
@Slf4j
public class CustomerService {
    ...(중략)...

    @Cacheable(value = CachingConfig.USER_CACHE, key ="#id")
    public CustomerDTO getCustomer(Long id) {
        log.info("getCustomer from db ");
        Customer customer = repository.findById(id).orElseThrow(IllegalAccessError::new);
        return CustomerDTO.of(customer);
    }
}
@RestController
@RequiredArgsConstructor
@RequestMapping("/customers")
@Slf4j
public class CustomerController {
    ...(중략)...

    @GetMapping("/{id}")
    public CustomerDTO getCustomer(@PathVariable Long id) {
        log.info("Controller 영역");
        return service.getCustomer(id);
    }
}


Service 클래스에 @Cacheable 어노테이션을 추가하여 캐시를 지정합니다. 이때 key는 파라미터로 전달받은 id를 지정하며, SPEL을 사용할 수 있습니다.


Controller 클래스에는 별다른 로직 추가 없이 로그만 남기도록 수정했습니다. 이제 어플리케이션을 재기동 후 결과를 보겠습니다.


2020-08-05 23:18:53.012  INFO 13244 --- [nio-8080-exec-1] c.e.p.controller.CustomerController      : Controller 영역
2020-08-05 23:18:53.055  INFO 13244 --- [nio-8080-exec-1] c.e.paging_demo.service.CustomerService  : getCustomer from db 
Hibernate: 
    select
        customer0_.id as id1_0_0_,
        customer0_.name as name2_0_0_ 
    from
        customer customer0_ 
    where
        customer0_.id=?
2020-08-05 23:18:57.093  INFO 13244 --- [nio-8080-exec-2] c.e.p.controller.CustomerController      : Controller 영역
2020-08-05 23:18:57.821  INFO 13244 --- [nio-8080-exec-3] c.e.p.controller.CustomerController      : Controller 영역
2020-08-05 23:19:03.127  INFO 13244 --- [nio-8080-exec-4] c.e.p.controller.CustomerController      : Controller 영역
2020-08-05 23:19:29.327  INFO 13244 --- [nio-8080-exec-6] c.e.p.controller.CustomerController      : Controller 영역
2020-08-05 23:19:29.329  INFO 13244 --- [nio-8080-exec-6] c.e.paging_demo.service.CustomerService  : getCustomer from db 


최초 기동 후에는 모든 캐시에 정보가 없으므로 Controller -> Service -> DB 순으로 호출되어 데이터가 캐싱되었음을 확인할 수 있습니다.


이후에는 Service Layer의 DTO 또한 캐시되었으므로 지속 호출시에 Controller 로그는 출력되나 Service 레벨 메소드는 호출되지 않습니다. 


20초가 지난 이후에는 Service Layer에 지정된 DTO 캐시가 만료되므로 Entity에 접근하나 해당 캐시는 아직 유효하므로 별도 DB 통신 없이 캐시에서 데이터를 반환하는 것을 확인할 수 있습니다.


지금까지 캐시 적재에 대해서만 살펴봤는데, 만약 수정, 삭제등으로 인해 캐시를 삭제해야한다면 @CacheEvict 어노테이션을 통해 삭제할 수 있습니다. 


4. Actuator 적용


Spring Actuator 프로젝트를 사용하게되면, 모니터링에 필요한 유용한 Metric 뿐만 아니라 HealthCheck 및 Dump 생성 그리고 Reload 등이 가능합니다. Spring Actuator를 통해서 Cache와 관련된 Metric을 활용해 Prometheus & Grafana 대시보드로 시각화 또한 가능합니다.


이번에는 Actuator 적용 후 URL 호출을 통해 Metric을 확인하는 방법에 대해서 살펴보겠습니다.


1. Actuator 설정


build.gradle

...(중략)...
dependencies {
    ...(중략)...
    implementation 'org.springframework.boot:spring-boot-starter-actuator'
}    


먼저 actuator 관련 의존성을 추가합니다.


application.yaml

management:
  endpoints:
    health:
      show-details: always
    web:
      exposure:
        include: "*"
  metrics:
    cache:
      instrument: true


해당 설정을 통해 actuator 기능을 활성화합니다.


2. 적용 확인


프로그램 기동 후 ip:port/actuator URL을 호출하면 위와 같이 상세 정보를 볼 수 있는 URL이 제공됩니다. 


Cache 관련 정보는 metrics 하위에 위 표시된 영역으로 정보를 확인할 수 있습니다.


위 그림은 gets과 관련된 metric 정보이며, 총 7번의 get 요청이 있었음을 확인할 수 있습니다. 그 밖에 다른 정보들도 제공되는 URL을 통해 정보 확인이 가능합니다.


마치며


이번 포스팅에서는 JPA 캐시 적용에 대해서 알아봤습니다. 일반적으로 코드성 데이터나 공지사항과 같이 수정/삭제가 거의 없고 자주 사용되는 데이터에 대해서 캐시를 적용하면, 좋은 효과를 볼 수 있습니다. 하지만 무턱대고 적용했다가는 오히려 성능 저하가 발생될 수 있으니 전략 수립이 필요합니다.


이번 포스팅에서는 각 Application 내부에서만 유효한 Local Cache에 대해서 다루었습니다. EhCache가 Clustering을 지원하지만, Application Scale Out에 영향을 주기때문에 개인적으로는 가급적 Local Cache로써 사용하고 캐시 무효화 시간을 짧게 가지는 것이 좋다고 생각합니다. 만약 캐시간의 동기화가 필요하다면 Clustering을 고려하거나 Redis와 같은 Third 캐시를 추가로 두는 것을 고려해볼 수 있습니다.

'JAVA > JPA' 카테고리의 다른 글

3. JPA Hateoas 적용하기  (8) 2020.08.01
2. JPA Sort 조건 개선  (2) 2020.07.30
1. JPA 페이징 쿼리 개선  (0) 2020.07.29

서론


이번 포스팅에서 왜 Hateoas를 적용해야하는지에 대해서 다루지 않습니다. 이와 관련된 자세한 이응준님의 그런 REST API로 괜찮은가 발표 세션을 꼭 보시기를 권장드리며, 해당 내용을 알고 계시다는 전제하에 포스팅을 작성하겠습니다.


이번에 다룰 내용은 Rest API 작성을 위해 필요한 Hateoas를 기존에 생성한 Page 객체에 적용하는 방법과 PagedResourceAssembler를 Customizing하는 방법을 알아보겠습니다.


1. 기존 Page 객체 이슈


위 그림은 이전 포스팅에서 예제 프로그램 API 호출 결과입니다. 해당 API는 원하는 요청에 대한 결과를 확인할 수 있습니다. 하지만 데이터를 통해서 어떠한 행위들이 가능한지 혹은 메시지가 정확히 어떠한 의미를 포함하고 있는지는 API 결과를 통해 알 수 없습니다.


다시말해 해당 API 결과를 보고서는 customer_id를 통해 어떠한 API를 추가적으로 호출할 수 있는지 어떤 상태 변화가 가능한지 알 수 없습니다.


그렇다면 Hateoas가 적용된 API의 모습은 어떨까요?


[
  {
    "id": 1,
    "node_id": "MDU6SXNzdWUx",
    "url": "https://api.github.com/repos/octocat/Hello-World/issues/1347",
    "repository_url": "https://api.github.com/repos/octocat/Hello-World",
    "labels_url": "https://api.github.com/repos/octocat/Hello-World/issues/1347/labels{/name}",
    "comments_url": "https://api.github.com/repos/octocat/Hello-World/issues/1347/comments",
    "events_url": "https://api.github.com/repos/octocat/Hello-World/issues/1347/events",
    "html_url": "https://github.com/octocat/Hello-World/issues/1347",
    "number": 1347,
    "state": "open",
    "title": "Found a bug",
    "body": "I'm having a problem with this.",
    "user": {
      "login": "octocat",
      "id": 1,
      "node_id": "MDQ6VXNlcjE=",
      "avatar_url": "https://github.com/images/error/octocat_happy.gif",
      "gravatar_id": "",
      "url": "https://api.github.com/users/octocat",
      "html_url": "https://github.com/octocat",
      "followers_url": "https://api.github.com/users/octocat/followers",
      "following_url": "https://api.github.com/users/octocat/following{/other_user}",
      "gists_url": "https://api.github.com/users/octocat/gists{/gist_id}",
      "starred_url": "https://api.github.com/users/octocat/starred{/owner}{/repo}",
      "subscriptions_url": "https://api.github.com/users/octocat/subscriptions",
      "organizations_url": "https://api.github.com/users/octocat/orgs",
      "repos_url": "https://api.github.com/users/octocat/repos",
      "events_url": "https://api.github.com/users/octocat/events{/privacy}",
      "received_events_url": "https://api.github.com/users/octocat/received_events",
      "type": "User",
      "site_admin": false
    },
    "labels": [
      {
        "id": 208045946,
        "node_id": "MDU6TGFiZWwyMDgwNDU5NDY=",
        "url": "https://api.github.com/repos/octocat/Hello-World/labels/bug",
        "name": "bug",
        "description": "Something isn't working",
        "color": "f29513",
        "default": true
      }
    ],
    "assignee": {
      "login": "octocat",
      "id": 1,
      "node_id": "MDQ6VXNlcjE=",
      "avatar_url": "https://github.com/images/error/octocat_happy.gif",
      "gravatar_id": "",
      "url": "https://api.github.com/users/octocat",
      "html_url": "https://github.com/octocat",
      "followers_url": "https://api.github.com/users/octocat/followers",
      "following_url": "https://api.github.com/users/octocat/following{/other_user}",
      "gists_url": "https://api.github.com/users/octocat/gists{/gist_id}",
      "starred_url": "https://api.github.com/users/octocat/starred{/owner}{/repo}",
      "subscriptions_url": "https://api.github.com/users/octocat/subscriptions",
      "organizations_url": "https://api.github.com/users/octocat/orgs",
      "repos_url": "https://api.github.com/users/octocat/repos",
      "events_url": "https://api.github.com/users/octocat/events{/privacy}",
      "received_events_url": "https://api.github.com/users/octocat/received_events",
      "type": "User",
      "site_admin": false
    },
    "assignees": [
      {
        "login": "octocat",
        "id": 1,
        "node_id": "MDQ6VXNlcjE=",
        "avatar_url": "https://github.com/images/error/octocat_happy.gif",
        "gravatar_id": "",
        "url": "https://api.github.com/users/octocat",
        "html_url": "https://github.com/octocat",
        "followers_url": "https://api.github.com/users/octocat/followers",
        "following_url": "https://api.github.com/users/octocat/following{/other_user}",
        "gists_url": "https://api.github.com/users/octocat/gists{/gist_id}",
        "starred_url": "https://api.github.com/users/octocat/starred{/owner}{/repo}",
        "subscriptions_url": "https://api.github.com/users/octocat/subscriptions",
        "organizations_url": "https://api.github.com/users/octocat/orgs",
        "repos_url": "https://api.github.com/users/octocat/repos",
        "events_url": "https://api.github.com/users/octocat/events{/privacy}",
        "received_events_url": "https://api.github.com/users/octocat/received_events",
        "type": "User",
        "site_admin": false
      }
    ],
    "milestone": {
      "url": "https://api.github.com/repos/octocat/Hello-World/milestones/1",
      "html_url": "https://github.com/octocat/Hello-World/milestones/v1.0",
      "labels_url": "https://api.github.com/repos/octocat/Hello-World/milestones/1/labels",
      "id": 1002604,
      "node_id": "MDk6TWlsZXN0b25lMTAwMjYwNA==",
      "number": 1,
      "state": "open",
      "title": "v1.0",
      "description": "Tracking milestone for version 1.0",
      "creator": {
        "login": "octocat",
        "id": 1,
        "node_id": "MDQ6VXNlcjE=",
        "avatar_url": "https://github.com/images/error/octocat_happy.gif",
        "gravatar_id": "",
        "url": "https://api.github.com/users/octocat",
        "html_url": "https://github.com/octocat",
        "followers_url": "https://api.github.com/users/octocat/followers",
        "following_url": "https://api.github.com/users/octocat/following{/other_user}",
        "gists_url": "https://api.github.com/users/octocat/gists{/gist_id}",
        "starred_url": "https://api.github.com/users/octocat/starred{/owner}{/repo}",
        "subscriptions_url": "https://api.github.com/users/octocat/subscriptions",
        "organizations_url": "https://api.github.com/users/octocat/orgs",
        "repos_url": "https://api.github.com/users/octocat/repos",
        "events_url": "https://api.github.com/users/octocat/events{/privacy}",
        "received_events_url": "https://api.github.com/users/octocat/received_events",
        "type": "User",
        "site_admin": false
      },
      "open_issues": 4,
      "closed_issues": 8,
      "created_at": "2011-04-10T20:09:31Z",
      "updated_at": "2014-03-03T18:58:10Z",
      "closed_at": "2013-02-12T13:22:01Z",
      "due_on": "2012-10-09T23:39:01Z"
    },
    "locked": true,
    "active_lock_reason": "too heated",
    "comments": 0,
    "pull_request": {
      "url": "https://api.github.com/repos/octocat/Hello-World/pulls/1347",
      "html_url": "https://github.com/octocat/Hello-World/pull/1347",
      "diff_url": "https://github.com/octocat/Hello-World/pull/1347.diff",
      "patch_url": "https://github.com/octocat/Hello-World/pull/1347.patch"
    },
    "closed_at": null,
    "created_at": "2011-04-22T13:33:48Z",
    "updated_at": "2011-04-22T13:33:48Z",
    "repository": {
      "id": 1296269,
      "node_id": "MDEwOlJlcG9zaXRvcnkxMjk2MjY5",
      "name": "Hello-World",
      "full_name": "octocat/Hello-World",
      "owner": {
        "login": "octocat",
        "id": 1,
        "node_id": "MDQ6VXNlcjE=",
        "avatar_url": "https://github.com/images/error/octocat_happy.gif",
        "gravatar_id": "",
        "url": "https://api.github.com/users/octocat",
        "html_url": "https://github.com/octocat",
        "followers_url": "https://api.github.com/users/octocat/followers",
        "following_url": "https://api.github.com/users/octocat/following{/other_user}",
        "gists_url": "https://api.github.com/users/octocat/gists{/gist_id}",
        "starred_url": "https://api.github.com/users/octocat/starred{/owner}{/repo}",
        "subscriptions_url": "https://api.github.com/users/octocat/subscriptions",
        "organizations_url": "https://api.github.com/users/octocat/orgs",
        "repos_url": "https://api.github.com/users/octocat/repos",
        "events_url": "https://api.github.com/users/octocat/events{/privacy}",
        "received_events_url": "https://api.github.com/users/octocat/received_events",
        "type": "User",
        "site_admin": false
      },
      "private": false,
      "html_url": "https://github.com/octocat/Hello-World",
      "description": "This your first repo!",
      "fork": false,
      "url": "https://api.github.com/repos/octocat/Hello-World",
      "archive_url": "http://api.github.com/repos/octocat/Hello-World/{archive_format}{/ref}",
      "assignees_url": "http://api.github.com/repos/octocat/Hello-World/assignees{/user}",
      "blobs_url": "http://api.github.com/repos/octocat/Hello-World/git/blobs{/sha}",
      "branches_url": "http://api.github.com/repos/octocat/Hello-World/branches{/branch}",
      "collaborators_url": "http://api.github.com/repos/octocat/Hello-World/collaborators{/collaborator}",
      "comments_url": "http://api.github.com/repos/octocat/Hello-World/comments{/number}",
      "commits_url": "http://api.github.com/repos/octocat/Hello-World/commits{/sha}",
      "compare_url": "http://api.github.com/repos/octocat/Hello-World/compare/{base}...{head}",
      "contents_url": "http://api.github.com/repos/octocat/Hello-World/contents/{+path}",
      "contributors_url": "http://api.github.com/repos/octocat/Hello-World/contributors",
      "deployments_url": "http://api.github.com/repos/octocat/Hello-World/deployments",
      "downloads_url": "http://api.github.com/repos/octocat/Hello-World/downloads",
      "events_url": "http://api.github.com/repos/octocat/Hello-World/events",
      "forks_url": "http://api.github.com/repos/octocat/Hello-World/forks",
      "git_commits_url": "http://api.github.com/repos/octocat/Hello-World/git/commits{/sha}",
      "git_refs_url": "http://api.github.com/repos/octocat/Hello-World/git/refs{/sha}",
      "git_tags_url": "http://api.github.com/repos/octocat/Hello-World/git/tags{/sha}",
      "git_url": "git:github.com/octocat/Hello-World.git",
      "issue_comment_url": "http://api.github.com/repos/octocat/Hello-World/issues/comments{/number}",
      "issue_events_url": "http://api.github.com/repos/octocat/Hello-World/issues/events{/number}",
      "issues_url": "http://api.github.com/repos/octocat/Hello-World/issues{/number}",
      "keys_url": "http://api.github.com/repos/octocat/Hello-World/keys{/key_id}",
      "labels_url": "http://api.github.com/repos/octocat/Hello-World/labels{/name}",
      "languages_url": "http://api.github.com/repos/octocat/Hello-World/languages",
      "merges_url": "http://api.github.com/repos/octocat/Hello-World/merges",
      "milestones_url": "http://api.github.com/repos/octocat/Hello-World/milestones{/number}",
      "notifications_url": "http://api.github.com/repos/octocat/Hello-World/notifications{?since,all,participating}",
      "pulls_url": "http://api.github.com/repos/octocat/Hello-World/pulls{/number}",
      "releases_url": "http://api.github.com/repos/octocat/Hello-World/releases{/id}",
      "ssh_url": "git@github.com:octocat/Hello-World.git",
      "stargazers_url": "http://api.github.com/repos/octocat/Hello-World/stargazers",
      "statuses_url": "http://api.github.com/repos/octocat/Hello-World/statuses/{sha}",
      "subscribers_url": "http://api.github.com/repos/octocat/Hello-World/subscribers",
      "subscription_url": "http://api.github.com/repos/octocat/Hello-World/subscription",
      "tags_url": "http://api.github.com/repos/octocat/Hello-World/tags",
      "teams_url": "http://api.github.com/repos/octocat/Hello-World/teams",
      "trees_url": "http://api.github.com/repos/octocat/Hello-World/git/trees{/sha}",
      "clone_url": "https://github.com/octocat/Hello-World.git",
      "mirror_url": "git:git.example.com/octocat/Hello-World",
      "hooks_url": "http://api.github.com/repos/octocat/Hello-World/hooks",
      "svn_url": "https://svn.github.com/octocat/Hello-World",
      "homepage": "https://github.com",
      "language": null,
      "forks_count": 9,
      "stargazers_count": 80,
      "watchers_count": 80,
      "size": 108,
      "default_branch": "master",
      "open_issues_count": 0,
      "is_template": true,
      "topics": [
        "octocat",
        "atom",
        "electron",
        "api"
      ],
      "has_issues": true,
      "has_projects": true,
      "has_wiki": true,
      "has_pages": false,
      "has_downloads": true,
      "archived": false,
      "disabled": false,
      "visibility": "public",
      "pushed_at": "2011-01-26T19:06:43Z",
      "created_at": "2011-01-26T19:01:12Z",
      "updated_at": "2011-01-26T19:14:43Z",
      "permissions": {
        "admin": false,
        "push": false,
        "pull": true
      },
      "allow_rebase_merge": true,
      "template_repository": null,
      "temp_clone_token": "ABTLWHOULUVAXGTRYU7OC2876QJ2O",
      "allow_squash_merge": true,
      "delete_branch_on_merge": true,
      "allow_merge_commit": true,
      "subscribers_count": 42,
      "network_count": 0
    }
  }
]


위 API는 Github의 Issue API 결과입니다. 주요 데이터에 대하여 자신의 URL과 다음 상태 변이에 대한 URL 링크를 같이 제공하여 Hateoas를 준수하고 있습니다. 따라서 Client는 서버로부터 받은 링크를 통해 상태를 변화할 뿐 Client 소스에 하드코딩되어 있을 필요가 없습니다.


Spring에서는 Hateoas 기능을 손쉽게 적용가능하기 위한 Spring Hateoas 프로젝트가 있습니다. 해당 프로젝트를 적용하여, 기존 프로그램 예제를 확장해보도록 하겠습니다.


2. Hateoas 적용


build.gradle


(...중략...)
dependencies {
    implementation 'org.springframework.boot:spring-boot-starter-hateoas'
    (...중략...)
}


위와같이 dependency에 hateoas를 추가합니다.


2-1. Controller


@RestController
@RequiredArgsConstructor
public class CustomerController {
    private final CustomerService service;
    private final PagedResourcesAssembler<CustomerDTO> assembler;

    @GetMapping("/customers")
    public ResponseEntity<PagedModel<EntityModel<CustomerDTO>>> getCustomer(PageableDTO pageableDTO){
        Page<CustomerDTO> customers = service.getCustomer(pageableDTO);
        PagedModel<EntityModel<CustomerDTO>> entityModels = assembler.toModel(customers);
        return ResponseEntity.ok(entityModels);
    }
}


Controller에서 Page 모델을 기본적으로 제공되는 PagedResourcesAssembler를 통해 PagedModel 객체로 변환하는 코드를 추가하였습니다.


2-2. 실행 결과


PagedResourcedAssembler 적용 후 결과를 보면, self 링크를 포함하여 다음 상태 전이를 위한 API가 기본적으로 제공되는 것을 확인할 수 있습니다.


하지만 위 API에서는 각각의 customerDTO 각 원소에 대한 상태 변이 URL은 제공되지 않았습니다. 이를 추가해보겠습니다.


3. PagedModelUtil


public class LinkResource<T> extends EntityModel<T> {
    public static <T> EntityModel<T> of(WebMvcLinkBuilder builder, T model, Function<T,?> resourceFunc){
        return EntityModel.of(model, getSelfLink(builder, model, resourceFunc));
    }

    private static<T> Link getSelfLink(WebMvcLinkBuilder builder, T data, Function<T, ?> resourceFunc){
        WebMvcLinkBuilder slash = builder.slash(resourceFunc.apply(data));
        return slash.withSelfRel();
    }
}


EntityModel을 생성할 때, Link를 주입하도록 LinkResource 클래스를 생성합니다.


public class PagedModelUtil {
    public static <T> PagedModel<EntityModel<T>> getEntityModels(PagedResourcesAssembler<T> assembler,
                                                                 Page<T> page,
                                                                 Class<?> clazz,
                                                                 Function<T, ?> selfLinkFunc ){
        WebMvcLinkBuilder webMvcLinkBuilder = linkTo(clazz);
        return assembler.toModel(page, model -> LinkResource.of(webMvcLinkBuilder, model, selfLinkFunc::apply));
    }

    public static <T> PagedModel<EntityModel<T>> getEntityModels(PagedResourcesAssembler<T> assembler,
                                                                 Page<T> page,
                                                                 WebMvcLinkBuilder builder,
                                                                 Function<T, ?> selfLinkFunc ){
        return assembler.toModel(page, model -> LinkResource.of(builder, model, selfLinkFunc::apply));
    }
}


LinkResource를 기반으로 전체 Page 모델을 순회하면서 Link를 주입하고, 이를 PagedModel 객체로 컨버팅하는 Util 클래스를 생성합니다.


@RestController
@RequiredArgsConstructor
public class CustomerController {
    private final CustomerService service;
    private final PagedResourcesAssembler<CustomerDTO> assembler;

    @GetMapping("/customers")
    public ResponseEntity<PagedModel<EntityModel<CustomerDTO>>> getCustomer(PageableDTO pageableDTO){
        Page<CustomerDTO> customers = service.getCustomer(pageableDTO);

        PagedModel<EntityModel<CustomerDTO>> entityModels = PagedModelUtil.getEntityModels(assembler, customers,
                linkTo(methodOn(this.getClass()).getCustomer(null)),
                CustomerDTO::getCustomerId);
        return ResponseEntity.ok(entityModels);
    }
}


Controller 클래스에서는 해당 Util 클래스 함수 호출을 통해 PagedModel로 변경하도록 코드를 변경헀습니다.

여기서 두번째 및 세번째 인자가 각 DTO별로 호출할 메소드 및 ID 값에 해당합니다.


위 예제에서는 getCustomer 메소드를 두번째 인자로 전달했기 때문에 @GetMapping 어노테이션으로 전달한 customers 가 URL에 추가가 될 것입니다. 또한, customers URL 뒤에올 ID 값으로 customerDTO에 속한 id 값을 넘겨줌으로써 URL이 완성될 것입니다.


따라서, 위 코드를 통해서 각 DTO 별로 추가되는 URL은 http://localhost:8080/customers/{id}가 될 것입니다.


@RestController
@RequiredArgsConstructor
public class CustomerController {
    private final CustomerService service;
    private final PagedResourcesAssembler<CustomerDTO> assembler;

    @GetMapping("/customers")
    public ResponseEntity<PagedModel<EntityModel<CustomerDTO>>> getCustomer(PageableDTO pageableDTO){
        Page<CustomerDTO> customers = service.getCustomer(pageableDTO);

        PagedModel<EntityModel<CustomerDTO>> entityModels = PagedModelUtil.getEntityModels(assembler, customers,
                linkTo(methodOn(this.getClass()).getCustomer(null)),
                v-> v.getCustomerName() + "/" + v.getCustomerId());
        return ResponseEntity.ok(entityModels);
    }
}


만약 URL을 변경하고 싶다면, 위와같이 두번째 인자 및 세번째 Function을 새로 정의하여 변경 가능합니다.


4. PagedResourceAssembler 커스터마이징


지금까지 Hateoas 적용과 각 DTO 별로 Self 링크를 적용하는 방법에 대해서 살펴봤습니다. 기본적으로 제공되는 PagedResourceAssembler에는 첫페이지, 이전 페이지, 현재 페이지, 다음 페이지 및 마지막 페이지 정보가 담겨있습니다.


이는 해당 API가 게시판에 노출되는 API라면 위와 같은 모습에 사용될 수 있는 Link 정보를 담고 있습니다.


만약 사용자가 원하는 게시판의 형태가 위와 같다면, 기본 제공되는 PagedResourcesAssembler는 이를 표현할 수 없습니다. 따라서 Customizing이 필요합니다.


4-1. CustomPagedResourceAssembler


public class CustomPagedResourceAssembler<T> extends PagedResourcesAssembler<T> {
    private final HateoasPageableHandlerMethodArgumentResolver pageableResolver;
    private final Optional<UriComponents> baseUri;
    private final int PAGE_SIZE;
    private final int DEFAULT_PAGE_SIZE = 10;

    public CustomPagedResourceAssembler(HateoasPageableHandlerMethodArgumentResolver pageableResolver, @Nullable  Integer pageSize) {
        super(pageableResolver,null);
        this.pageableResolver = pageableResolver;
        baseUri = Optional.empty();
        this.PAGE_SIZE = pageSize == null ? DEFAULT_PAGE_SIZE : pageSize;
    }

    @Override
    public PagedModel<EntityModel<T>> toModel(Page<T> entity) {
        return toModel(entity, EntityModel::of);
    }

    @Override
    public <R extends RepresentationModel<?>> PagedModel<R> toModel(Page<T> page, RepresentationModelAssembler<T, R> assembler) {
        Assert.notNull(page, "Page must not be null!");
        Assert.notNull(assembler, "ResourceAssembler must not be null!");

        List<R> resources = new ArrayList<>(page.getNumberOfElements());

        for (T element : page) {
            resources.add(assembler.toModel(element));
        }

        PagedModel<R> resource = createPagedModel(resources, asPageMetadata(page), page);
        return addPaginationLinks(resource, page, Optional.empty());
    }

    private PagedModel.PageMetadata asPageMetadata(Page<?> page) {

        Assert.notNull(page, "Page must not be null!");
        int number = page.getNumber();
        return new PagedModel.PageMetadata(page.getSize(), number, page.getTotalElements(), page.getTotalPages());
    }

    private <R> PagedModel<R> addPaginationLinks(PagedModel<R> resources, Page<?> page, Optional<Link> link) {

        UriTemplate base = getUriTemplate(link);
        boolean isNavigable = page.hasPrevious() || page.hasNext();

        int currIndex = page.getNumber();
        int lastIndex = page.getTotalPages() == 0 ? 0 : page.getTotalPages() - 1;
        int baseIndex = (currIndex / this.PAGE_SIZE) * this.PAGE_SIZE;
        int prevIndex = baseIndex - this.PAGE_SIZE;
        int nextIndex = baseIndex + this.PAGE_SIZE;
        int size = page.getSize();
        Sort sort = page.getSort();

        if(lastIndex < currIndex)
            throw new IndexOutOfBoundsException("Page total size must not be less than page size");

        if (isNavigable) {
            resources.add(createLink(base, PageRequest.of(0, size, sort), IanaLinkRelations.FIRST));
        }

        Link selfLink = link.map(it -> it.withSelfRel()).orElseGet(() -> createLink(base, page.getPageable(), IanaLinkRelations.SELF));

        resources.add(selfLink);

        if (prevIndex >= 0) {
            resources.add(createLink(base,
                    PageRequest.of(prevIndex, size, sort),
                    IanaLinkRelations.PREV));
        }

        for(int i = 0; i < this.PAGE_SIZE; i++){
            if(baseIndex + i <= lastIndex){
                resources.add(createLink(base, PageRequest.of(baseIndex + i, size, sort), LinkRelation.of("pagination")));
            }
        }

        if(nextIndex < lastIndex){
            resources.add(createLink(base, PageRequest.of(nextIndex, size, sort), IanaLinkRelations.NEXT));
        }

        if (isNavigable) {
            resources.add(createLink(base, PageRequest.of(lastIndex, size, sort), IanaLinkRelations.LAST));
        }

        return resources;
    }

    private UriTemplate getUriTemplate(Optional<Link> baseLink) {
        return UriTemplate.of(baseLink.map(Link::getHref).orElseGet(this::baseUriOrCurrentRequest));
    }

    private String baseUriOrCurrentRequest() {
        return baseUri.map(Object::toString).orElseGet(CustomPagedResourceAssembler::currentRequest);
    }

    private static String currentRequest() {
        return ServletUriComponentsBuilder.fromCurrentRequest().build().toString();
    }

    private Link createLink(UriTemplate base, Pageable pageable, LinkRelation relation) {
        UriComponentsBuilder builder = fromUri(base.expand());
        pageableResolver.enhance(builder, getMethodParameter(), pageable);
        return Link.of(UriTemplate.of(builder.build().toString()), relation);
    }
}


위 코드는 기존 PagedResourcesAssembler를 상속받아 구현하였습니다. 가장 핵심이 되는 부분은 addPaginationLinks 메소드이며, 해당 메소드를 통해 페이지의 인덱스 정보를 pagination 링크아래에 배치하도록 표현했습니다.


@Configuration
public class AppConfig implements WebMvcConfigurer {

    ...(중략)...

    @Bean
    public CustomPagedResourceAssembler<?> customPagedResourceAssembler(){
        return new CustomPagedResourceAssembler<>(new HateoasPageableHandlerMethodArgumentResolver(),10);
    }
}


이후 해당 클래스를 Bean으로 등록시켜 줍니다. 생성자의 두번째 파라미터는 Page 사이즈를 결정하며, 해당 값의 변경을 통해 노출되는 URL 크기가 달라집니다.


4-2 Controller 


@RestController
@RequiredArgsConstructor
public class CustomerController {
    private final CustomerService service;
    private final CustomPagedResourceAssembler<CustomerDTO> assembler;

    @GetMapping("/customers")
    public ResponseEntity<PagedModel<EntityModel<CustomerDTO>>> getCustomer(PageableDTO pageableDTO){
        Page<CustomerDTO> customers = service.getCustomer(pageableDTO);

        PagedModel<EntityModel<CustomerDTO>> entityModels = PagedModelUtil.getEntityModels(assembler, customers,
                linkTo(methodOn(this.getClass()).getCustomer(null)),
                CustomerDTO::getCustomerId);
        return ResponseEntity.ok(entityModels);
    }
}


Bean으로 등록한 CustomPagedResourceAssembler로 주입받도록 코드를 수정했습니다.


4-3 결과


애플리케이션 구동 후 해당 URL을 호출하면, 정상적으로 페이지 URL이 표시되는 것을 확인할 수 있습니다.


마치며


Page 객체에 Hateoas를 적용하는 방법에 대해서 살펴봤습니다. Rest API 설계를 위해서는 Hateoas 적용뿐만 아니라 Self-descriptive-messages를 적용하기 위해 IANA 등록 혹은 Profile 링크를 추가해야합니다.


Profile 링크를 적용하기 위해서 RestDocs 혹은 Swagger 등을 활용할 수 있으니 참고 바랍니다.


'JAVA > JPA' 카테고리의 다른 글

4. JPA Cache 적용하기  (0) 2020.08.05
2. JPA Sort 조건 개선  (2) 2020.07.30
1. JPA 페이징 쿼리 개선  (0) 2020.07.29

서론


이전 포스팅에서 다룬 예제를 확장하여 진행하겠습니다. 이번 포스팅에서는 JPA Sort에 대해서 다루도록 하겠습니다.


문제상황


http://localhost:8080/customers?page=3&size=10&sort=customerId,asc


예제 프로그램 수행후 다음과 같은 URL을 호출하면 page, size, sort 파라미터가 Pageable 객체로 컨버팅 되어 정상적으로 프로그램이 페이징과 정렬이 수행되는 것을 확인할 수 있습니다.


http://localhost:8080/customers?page=3&size=10&sort=customerId,asc&sort=customerName,desc


만약 여러 Column의 정렬을 수행하고 싶다면, 위와 같이 여러개의 sort 파라미터를 추가하면 정상 수행되는 것을 확인할 수 있습니다.


하지만 위 sort 조건은 @Entity 클래스에 정의한 필드명과 정확히 동일해야합니다. 만약 예제와 같이 동일 컬럼에 대하여 리턴 값은 SnakeCase인 customer_id 일경우 Client 로직에서는 전달받은 값 이외에 @Entitiy 클래스 필드명을 관리해야합니다. 만약 Entitiy에 정의되어있지 않은 필드명을 전달하게된다면, 에러가 발생합니다.


Client 로직에서 도메인 객체 필드명에 의존하는 것은 바람직해 보이지 않습니다. 따라서 Enum과 DTO를 활용해서 Sort 조건이 도메인 객체와 직접연관되지 않도록 설정해봅시다.


Pageable 구현


기존에는 파라미터 객체를 Pageable로 Controller 파라미터로 주입받았습니다. 이때 도메인 객체 필드명을 Sort 인자에 정확히 명시해야하는 문제가 있었습니다. 따라서 방법을 바꾸어 별도 PageableDTO에 파라미터 인자를 주입받고 이를 처리하겠습니다.


1. Pair 클래스


@Getter
@Builder(access = AccessLevel.PRIVATE)
@ToString
public class Pair<T, U> {
    private T first;
    private U second;

    public static <T, U> Pair of(T first, U second) {
        return Pair.builder()
                .first(first)
                .second(second)
                .build();
    }
}


먼저 컬럼명과 정렬 상태를 담을 Pair 클래스를 생성합니다.


2. Sort 상태를 표현하는 Enum 구현


public enum SortOption {
    ASC,
    DESC
}


3. PageableDTO


@Getter
@Builder
@ToString
@NoArgsConstructor
@AllArgsConstructor
public class PageableDTO {
    private Integer page;
    private Integer size;
    private Integer totalElements;
    private List<Pair<String, SortOption>> sorts;
}


Page 관련 정보와 Sort 정보를 담을 DTO를 선언합니다.


4.  HandlerMethodArgumentResolver 클래스 구현


public class PageableArgumentResolver implements HandlerMethodArgumentResolver {
    private final String PAGE = "page";
    private final String SIZE = "size";
    private final String TOTAL_ELEMENTS = "total_elements";

    @Override
    public boolean supportsParameter(MethodParameter parameter) {
        return parameter.getParameterType().equals(PageableDTO.class);
    }

    @Override
    public Object resolveArgument(MethodParameter parameter, ModelAndViewContainer mavContainer, NativeWebRequest webRequest, WebDataBinderFactory binderFactory) throws Exception {
        List<Pair<String, SortOption>> sorts = new ArrayList<>();
        final var sortArr = webRequest.getParameterMap().get("sort");

        if(sortArr != null){
            for(var v : sortArr){
                String[] keywords = v.split(",");
                sorts.add(Pair.of(keywords[0], (keywords.length < 2 || keywords[1].equals("asc")) ? SortOption.ASC : SortOption.DESC));
            }
        }

        return PageableDTO.builder()
                .page(getValue(webRequest.getParameter(PAGE)))
                .size(getValue(webRequest.getParameter(SIZE)))
                .totalElements(getValue(webRequest.getParameter(TOTAL_ELEMENTS)))
                .sorts(sorts)
                .build();
    }

    private Integer getValue(String param) {
        return param != null ? Integer.parseInt(param) : null;
    }
}


@Configuration
public class AppConfig implements WebMvcConfigurer {

    @Override
    public void addArgumentResolvers(List<HandlerMethodArgumentResolver> resolvers) {
        resolvers.add(new PageableArgumentResolver());
    }
}


위 클래스는 Custom HandlerMethodArgumentResolver입니다. 별도로 이를 구현한 이유는 PageableDTO에 정렬 정보를 담기 위해서는 배열형태로 넘어오는 Sort 정보를 @ModelAttribute를 통해 주입받을 수 없기 때문입니다. 


따라서, 별도 HandlerMethodArgumentResolver를 구현하여 파라미터 값에서 관심있는 값들을 가져와 가공하여 DTO를 생성받아 주입할 수 있도록 구현하여 기존 resolver 목록에 추가했습니다.


만약 HandlerMethodArgumentResolver를 사용하고 싶지 않다면, MultiValueMap을 통해 주입받은 후 별도 Factory 메소드를 사용해 DTO를 코드상에서 변경시키는 것도 한 방법입니다.


5. 도메인 컬럼 매핑 Layer 구현


public class MetaModelUtil {
    public static String getColumn(Path<?> path){
        return path.getMetadata().getName();
    }
}


public enum CustomerMetaType {
    CUSTOMER_ID(getColumn(customer.customerId)),
    CUSTOMER_NAME(getColumn(customer.customerName));

    private String name;
    CustomerMetaType(String name) {
        this.name = name;
    }

    public String getName() {
        return name;
    }
}


Client에서 존재하는 SnakeCase의 컬럼명과 실제 @Entity 클래스 컬럼명을 매핑하기 위하여 Enum을 사용했습니다. @Entity로 부터 생성되는 컬럼명을 얻어오기 위해서는 QueryDsl의 Q클래스를 활용하거나 JPA Meta모델을 활용하는 방법이 있습니다.


대개 JPA를 쓰면서 QueryDsl을 같이 쓰기 때문에 별도 JPA Meta모델을 추출하기 보다는 QueryDsl의 MetaModel을 활용하여 매핑하였습니다.


6. DomainSpec 클래스 구현


6-1 Sort 전략 클래스 생성


public interface SortStrategy<T extends Enum<T>> {
    Sort.Order getSortOrder(T domainKey, SortOption order);
}
public class CustomerSortStrategy implements SortStrategy<CustomerMetaType> {
    @Override
    public Sort.Order getSortOrder(CustomerMetaType domainKey, SortOption order) {
        Sort.Order sortOrder = null;
        switch (domainKey){
            case CUSTOMER_ID:
            case CUSTOMER_NAME:
                final var column = domainKey.getName();
                sortOrder = (order == SortOption.ASC) ? Sort.Order.asc(column) : Sort.Order.desc(column);
        }
        return sortOrder;
    }
}


엔티티별로 정렬을 구현할 전략을 설정할 수 있는 객체를 생성합니다. 위 switch 구문에서 CUSTOMER_ID를 제거하면 Client로부터 넘어오는 customer_id는 해당되지 않으므로 Null이 반환되고 에러가 발생하게 될 것입니다. 따라서 Strategy에 지정한 구문여부에 따라서 정렬 대상을 한정할 수 있습니다.


6-2. DomainSpec 클래스 생성


public class DomainSpec<T extends Enum<T>, U> {
    private final Class<T> clazz;
    @Getter @Setter
    private int defaultPage = 0;
    @Getter @Setter
    private int defaultSize = 20;
    private SortStrategy<T> sortStrategy;

    public DomainSpec(Class<T> clazz, SortStrategy<T> sortStrategy) {
        this.clazz = clazz;
        this.sortStrategy = sortStrategy;
    }

    public DomainSpec(Class<T> clazz, SortStrategy<T> sortStrategy, int defaultPage, int defaultSize) {
        this.clazz = clazz;
        this.defaultPage = defaultPage;
        this.defaultSize = defaultSize;
        this.sortStrategy = sortStrategy;
    }

    public void changeSortStrategy(SortStrategy<T> sortStrategy) {
        this.sortStrategy = sortStrategy;
    }

    public Pageable getPageable(PageableDTO dto) {
        Integer page = dto.getPage();
        Integer size = dto.getSize();
        Pageable pageable;

        if (dto.getSorts().size() < 1) {
            pageable = PageRequest.of(page == null ? defaultPage : page, size == null ? defaultSize : size);
        } else {
            List<Sort.Order> sorts = getSortOrders(dto.getSorts());
            pageable = PageRequest.of(page == null ? defaultPage : page, size == null ? defaultSize : size, Sort.by(sorts));
        }

        return pageable;
    }

    private List<Sort.Order> getSortOrders(List<Pair<String, SortOption>> sorts) {
        Assert.notNull(this.sortStrategy,"There is no sort strategy");

        List<Sort.Order> orders = new ArrayList<>();
        for (var o : sorts) {
            T column;
            try {
                column = Enum.valueOf(this.clazz, o.getFirst().toUpperCase());
            } catch (IllegalArgumentException e) {
                throw new IllegalArgumentException("Sort option error");
            }

            final Sort.Order order = sortStrategy.getSortOrder(column, o.getSecond());
            Assert.notNull(order, "sort option error");

            orders.add(order);
        }
        return orders;
    }
}


정렬을 포함한 Pageable 객체를 얻어오기 위한 클래스입니다. SortStrategy를 통해 전달받은 구현체에 정렬 방법을 위임합니다.


7. Service 구현


@Service
public class CustomerService {
    private final CustomerRepository repository;
    private DomainSpec<CustomerMetaType, Customer> spec;

    public CustomerService(CustomerRepository repository) {
        this.repository = repository;
        this.spec = new DomainSpec<>(CustomerMetaType.class, new CustomerSortStrategy());
    }

    public Page<CustomerDTO> getCustomer(PageableDTO pageableDTO) {
        final var pageable = spec.getPageable(pageableDTO);

        final var customers = repository.findAll(pageable, pageableDTO.getTotalElements());
        return customers.map(CustomerDTO::of);
    }
}


정렬 조건을 포함한 Pageable 객체를 CustomerSpec에서 가져올 수 있도록 구성하였습니다.


8. Controller 구현


@RestController
@RequiredArgsConstructor
public class CustomerController {
    private final CustomerService service;

    @GetMapping("/customers")
    public ResponseEntity<Page<CustomerDTO>> getCustomer(PageableDTO pageableDTO){
        Page<CustomerDTO> customers = service.getCustomer(pageableDTO);
        return ResponseEntity.ok(customers);
    }
}


Pageable 객체를 바로 전달받는 것이 아니라, HandlerMethodArgumentResolver를 통해 PageableDTO를 주입받아 이를 서비스 객체로 넘기도록 코드를 수정하였습니다.


9. 실행 결과


프로그램을 실행시키면, 기존과는 다르게 customer_name과 같이 도메인 엔티티 컬럼명에 종속적이지 않고 컬럼명을 지정할 수 있습니다. 또한, 컬럼 정렬 대상을 제한하여 보다 무분별한 정렬이 발생되지 않도록 강제할 수 있습니다. 


마치며


이번 포스팅에서는 JPA에서 정렬 조건을 제한하는 방법과 엔티티 컬럼명에 의존하지 않도록 매핑 Layer를 두는 방법에 대해서 알아봤습니다.


위 구조를 조금 확장하면, Specification이나 BooleanBuilder 등을 활용하여 SQL Where 조건절에 추가하는 도메인 코드 로직을 구성할 수 있습니다.


hellozin님 블로그님 포스팅에 이와 관련된 내용이 있으니 참고하면 좋을 것 같습니다.


JPA Specification으로 쿼리 조건 처리하기

해당 코드는 Github에서 확인할 수 있습니다. Spring Data에서 Specification은 DB 쿼리의 조건을 Spec으로 작성해 Repository method에 적용하거나 몇가지 Spec을 조합해서 사용할 수 있게 도와줍니다. 간단한 예

velog.io


'JAVA > JPA' 카테고리의 다른 글

4. JPA Cache 적용하기  (0) 2020.08.05
3. JPA Hateoas 적용하기  (8) 2020.08.01
1. JPA 페이징 쿼리 개선  (0) 2020.07.29

서론


Pageable 객체를 사용하면 JPA에서 손쉽게 페이징 처리를 할 수 있습니다. 하지만 기본적으로 제공되는 findAll 메소드를 통해 페이징 처리를 요청하면, 매 요청시마다 전체 갯수를 구하기 위한 Count SQL이 수행되는 것을 볼 수 있습니다.


조회 조건이 달라지지 않는 이상 매번 동일한 결과 건수가 보장될텐데, 매번 Count SQL이 수행되는 것은 꽤나 비효율 적입니다. 더불어 Count SQL을 수행하면, 페이징되는 데이터 뿐만 아니라 전체 데이터를 DBMS 메모리에 로딩해서 집계 해야하기 때문에 반복 수행시 성능 이슈가 발생할 수 있습니다. 

 
물론 한번 메모리에 데이터가 로딩되면 그 이후에는 Count SQL 속도가 처음보다는 빠릅니다. 하지만 RDBMS(Oracle 기준)는 DMA(Direct Memorry Access)로 데이터에 즉시 접근할 수 없고 Latch를 획득해야하는 과정이 수반되기 때문에 여전히 Overhead가 존재합니다.

이번 포스팅에서는 CustomRepository 구현을 통해 전체 개수를 알고 있는 상황이라면, Count SQL을 요청하지 않도록 findAll 메소드를 구현하겠습니다.


1. Entity


@Entity
@Table
@Getter
public class Customer {
    @Id
    @GeneratedValue
    @Column(name = "id")
    private Long customerId;
    @Column(name = "name")
    private String customerName;
}


예제를 위해 엔티티는 위와같이 간단히 설정하였습니다. 조회를 위해 사전에 해당 테이블에 100건의 데이터 입력 하였다고 가정하고 진행하겠습니다.


2. 반환 DTO


@Builder(access = AccessLevel.PRIVATE)
@Getter
@JsonNaming(PropertyNamingStrategy.SnakeCaseStrategy.class)
public class CustomerDTO {
    private Long customerId;
    private String customerName;

    public static CustomerDTO of(Customer customer){
        return CustomerDTO.builder()
                .customerId(customer.getCustomerId())
                .customerName(customer.getCustomerName())
                .build();
    }
}


반환되는 DTO는 위와같이 구현했습니다. 


3. Repository 구현


@NoRepositoryBean
public interface BaseRepository<T, ID extends Serializable> extends JpaRepository<T,ID> {
    Page<T> findAll(Pageable pageable, Integer totalElements);
    Page<T> findAll(Specification<T> spec, Pageable pageable, Integer totalElements);
    Page<T> findAll(Specification<T> spec, Pageable pageable, Integer totalElements, Sort sort);
}


CustomRepository 구현을 위해 JpaRepository를 상속받는 새로운 Repository를 생성합니다. 

여기서 totalElements는 조건에 해당되는 전체 레코드 갯수로 Client가 전체 레코드 갯수를 파라미터로 전달하게 되면, 해당 값을 Page 객체에 삽입 후 Count SQL을 수행하지 않습니다. 반면 값이 전달되지 않으면 Count SQL을 수행합니다.


따라서, Count SQL 수행 여부는 파라미터로 전달되는 totalElements의 유무에 따라 결정됩니다.


public class BaseRepositoryImpl<T,ID extends Serializable> extends SimpleJpaRepository<T, ID> 
        implements BaseRepository<T,ID> {

    public BaseRepositoryImpl(JpaEntityInformation<T, ?> entityInformation, EntityManager entityManager) {
        super(entityInformation, entityManager);
    }

    @Override
    public Page<T> findAll(Pageable pageable, Integer totalElements) {
        return findAll(null, pageable, totalElements, Sort.unsorted());
    }

    @Override
    public Page<T> findAll(Specification<T> spec, Pageable pageable, Integer totalElements) {
       return findAll(spec, pageable, totalElements, Sort.unsorted());
    }

    @Override
    public Page<T> findAll(Specification<T> spec, Pageable pageable, Integer totalElements, Sort sort) {
        TypedQuery<T> query = getQuery(spec, sort);

        int pageNumber = pageable.getPageNumber();
        int pageSize = pageable.getPageSize();

        if(totalElements == null){
            return findAll(spec, pageable);
        }

        if(pageNumber < 0){
            throw new IllegalArgumentException("page number must not be less than zero");
        }

        if(pageSize < 1){
            throw new IllegalArgumentException("pageSize must not be less than one");
        }

        if(totalElements < pageNumber * pageSize){
            throw new IllegalArgumentException("totalElements must not be less than pageNumber * pageSize");
        }

        int offset = (int) pageable.getOffset();
        query.setFirstResult(offset);
        query.setMaxResults(pageable.getPageSize());

        return  new PageImpl<>(query.getResultList(), PageRequest.of(pageNumber, pageSize), totalElements);
    }
}


위 코드는 실제 Repository 구현 코드입니다. 전달받은 파라미터에 대하여 유효성 검증 후 로직에 따라 처리합니다.

만약 totalElements 값이 null이 아니라면 마지막 줄과 같이 Page 객체에 전달받은 값을 그대로 넣습니다.


public interface CustomerRepository extends BaseRepository<Customer, Long> {}


실제 사용하는 Repository에는 JpaRepository가 아닌 CustomRepository를 상속받도록 지정합니다.


@SpringBootApplication
@EnableJpaRepositories(repositoryBaseClass = BaseRepositoryImpl.class)
public class PagingDemoApplication {
    public static void main(String[] args) {
        SpringApplication.run(PagingDemoApplication.class, args);
    }
}


마지막으로 등록한 Repository를 사용하기 위해서는 Configuration 클래스에 @EnableJpaRepositories 어노테이션으로 CustomRepository를 등록합니다.


Service


@Service
@RequiredArgsConstructor
public class CustomerService {
    private final CustomerRepository repository;

    public Page<CustomerDTO> getCustomer(Pageable pageable, Integer totalElements) {
        Page<Customer> customers = repository.findAll(pageable, totalElements);
        return customers.map(CustomerDTO::of);
    }
}


CustomRepository의 메소드를 호출하며, 리턴된 페이지객체에 대해서 DTO로 변환하는 로직을 추가하였습니다.


Controller


@RestController
@RequiredArgsConstructor
public class CustomerController {
    private final CustomerService service;

    @GetMapping("/customers")
    public ResponseEntity<Page<CustomerDTO>> getCustomer(Pageable pageable,
                                                         @RequestParam(required = false, name = "total_elements")Integer totalElements){
        Page<CustomerDTO> customers = service.getCustomer(pageable, totalElements);
        return ResponseEntity.ok(customers);
    }
}


파라미터로 Pageable 객체이외에 totalElements를 전달받아 Service로 전달하는 역할을 수행합니다.


결과


1. totalElements 인자를 입력하지 않았을 경우


위와 같이 Count SQL이 수행되는 것을 확인할 수 있습니다.


2. totalElements 입력 결과


페이징 처리 SQL 수행 후 리턴받은 Page 객체에 전달받은 totalElements 값이 추가되었음을 확인할 수 있습니다.


마치며


이번 포스팅에서 JPA 페이징 수행시 Count SQL을 제거하는 방법에 대해서 살펴보았습니다. 기존에는 매번 Count SQL을 수행하여 Index가 벗어났는지 등을 Server에서 확인하였다면, 지금은 totalElements에 대한 책임이 Client 측에 일부 있습니다. 따라서 조회 조건이 달라진다면, totalElements 값을 전달하지 않는 처리가 Client에서 구현되어야 합니다.


약간의 복잡함은 있지만 비효율적인 Count SQL을 반복수행하는 것을 줄임으로 성능 향상을 꾀할 수 있습니다.


다음 포스팅에서는 Sort와 조회조건처리 관련하여 다루도록 하겠습니다.

'JAVA > JPA' 카테고리의 다른 글

4. JPA Cache 적용하기  (0) 2020.08.05
3. JPA Hateoas 적용하기  (8) 2020.08.01
2. JPA Sort 조건 개선  (2) 2020.07.30

+ Recent posts