1. 서론

지난 포스팅에서 Command Application에 대한 전반적인 구현을 마무리했습니다. 하지만 해당 프로그램은 근본적인 문제점을 안고 있습니다. 이번 포스팅에서는 발생되는 문제점과 이를 해결하기 위한 방법에 대하여 살펴보겠습니다.


2. 문제점 도출

아래 테이블은 계정 생성 Command를 실행했을 때 EventStore에 저장되는 데이터 중 일부를 발췌한 것입니다.


글로벌 인덱스 Payload 

Payload 종류

발생 시간 Aggregate 식별자 시퀀스 번호 타입
1   com.cqrs.events.HolderCreationEvent 2019-12-29T05:34:49.2527378Z 70f956e3-069c-4666-b0f4-324dfb0a807e 0 HolderAggregate


공간 부족으로 위 데이터에서 Payload 데이터만 따로 뽑아보면 다음과 같습니다. 


<com.cqrs.events.HolderCreationEvent>
  <holderID>70f956e3-069c-4666-b0f4-324dfb0a807e</holderID>
  <holderName>kevin</holderName>
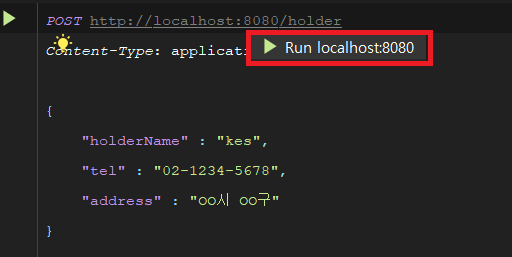
  <tel>02-1234-5678</tel>
  <address>OO시 OO구/address>
</com.cqrs.events.HolderCreationEvent>

Payload에는 Event 내용이 담겨있습니다. 따라서 EventSourcing 및 Event Handler에서는 Payload 내용을 기준으로 Event를 처리합니다.


계정 생성만 완료된 상황에서 추가로 계좌 생성 > 계좌 입금(300원) > 인출 5회(1원씩)을 진행한 후 EventStore를 살펴보면 다음과 같습니다.


글로벌 인덱스

Payload 종류

Aggregate 식별자 시퀀스 번호 타입
1 com.cqrs.events.HolderCreationEvent 70f956e3-069c-4666-b0f4-324dfb0a807e 0 HolderAggregate
2 com.cqrs.events.AccountCreationEvent c65f80c3-9c44-4ca6-a977-72983a675203 0 AccountAggregate
3 com.cqrs.events.DepositMoneyEvent c65f80c3-9c44-4ca6-a977-72983a675203 1 AccountAggregate
4 com.cqrs.events.WithdrawMoneyEvent c65f80c3-9c44-4ca6-a977-72983a675203 2 AccountAggregate
5 com.cqrs.events.WithdrawMoneyEvent c65f80c3-9c44-4ca6-a977-72983a675203 3 AccountAggregate
6 com.cqrs.events.WithdrawMoneyEvent c65f80c3-9c44-4ca6-a977-72983a675203 4 AccountAggregate
7 com.cqrs.events.WithdrawMoneyEvent c65f80c3-9c44-4ca6-a977-72983a675203 5 AccountAggregate
8 com.cqrs.events.WithdrawMoneyEvent c65f80c3-9c44-4ca6-a977-72983a675203 6 AccountAggregate

(※ 공간 부족으로 Payload 및 이벤트 발생 시간 등은 제외하였습니다.)


만약 이러한 상황에서  c65f80c3-9c44-4ca6-a977-72983a675203 식별자를 지닌 AccountAggregate 에서 1원을 인출하는 명령이 발생된다면 내부적으로는 어떠한 과정을 거칠까요?


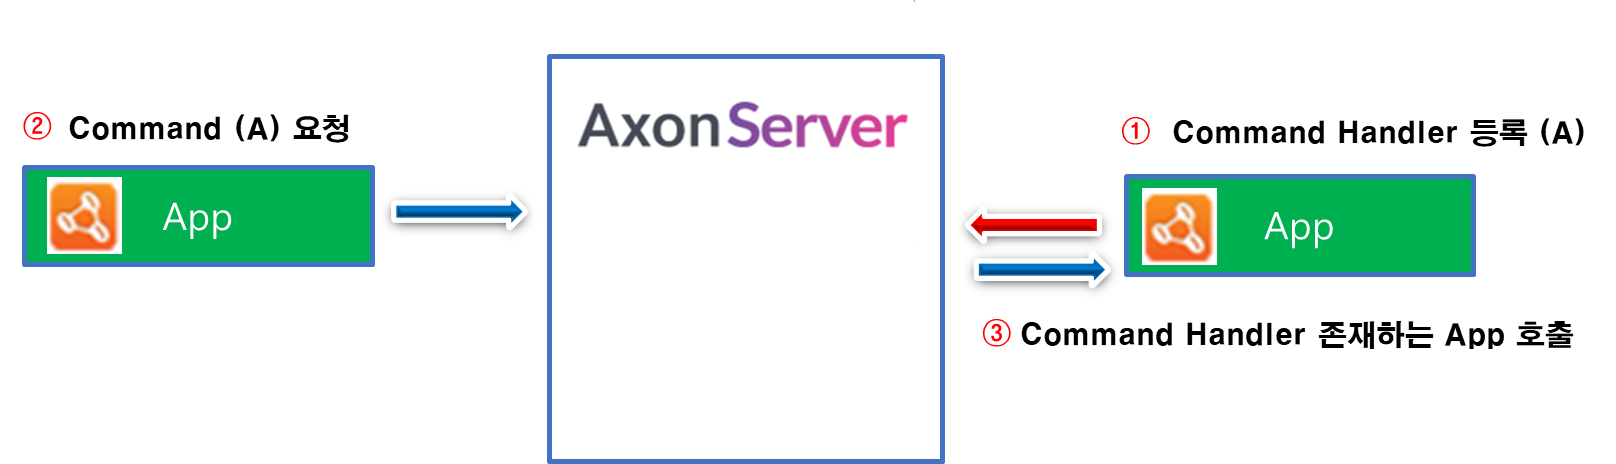
Command 어플리케이션 구현 - 1 포스팅에서 소개한 Command 이벤트 수행 내부 흐름도입니다. 당시 4번 과정에 대해서 다음과 같이 소개했습니다.


4. UnitOfWork 수행합니다. 이 과정에서 Chain으로 연결된 handler 들을 거치면서 대상 Aggregate에 대하여 EventStore로부터 과거 이벤트들을 Loading 하여 최신 상태로 만듭니다. 이후 해당 Command와 연결된 Handler 메소드를 Reflection을 활용하여 호출합니다.


즉 새로운 명령을 수행하기 위해서는 c65f80c3-9c44-4ca6-a977-72983a675203 식별자를 지닌 Aggregate를 대상으로 기존에 발행된 7개의 이벤트를 EventStore에서 읽어와 Loading하는 작업이 선행됩니다. 그 결과 최신 상태로 Aggregate를 만든 이후에 새 Command 적용 및 Event를 발생시킵니다.


o.a.commandhandling.SimpleCommandBus     : Handling command [com.cqrs.command.commands.WithdrawMoneyCommand]
c.c.command.aggregate.AccountAggregate   : applying AccountCreationEvent(holderID=70f956e3-069c-4666-b0f4-324dfb0a807e, accountID=c65f80c3-9c44-4ca6-a977-72983a675203)
c.c.command.aggregate.AccountAggregate   : applying DepositMoneyEvent(holderID=70f956e3-069c-4666-b0f4-324dfb0a807e, accountID=c65f80c3-9c44-4ca6-a977-72983a675203, amount=300)
c.c.command.aggregate.AccountAggregate   : balance 300
c.c.command.aggregate.AccountAggregate   : applying WithdrawMoneyEvent(holderID=70f956e3-069c-4666-b0f4-324dfb0a807e, accountID=c65f80c3-9c44-4ca6-a977-72983a675203, amount=1)
c.c.command.aggregate.AccountAggregate   : balance 299
c.c.command.aggregate.AccountAggregate   : applying WithdrawMoneyEvent(holderID=70f956e3-069c-4666-b0f4-324dfb0a807e, accountID=c65f80c3-9c44-4ca6-a977-72983a675203, amount=1)
c.c.command.aggregate.AccountAggregate   : balance 298
c.c.command.aggregate.AccountAggregate   : applying WithdrawMoneyEvent(holderID=70f956e3-069c-4666-b0f4-324dfb0a807e, accountID=c65f80c3-9c44-4ca6-a977-72983a675203, amount=1)
c.c.command.aggregate.AccountAggregate   : balance 297
c.c.command.aggregate.AccountAggregate   : applying WithdrawMoneyEvent(holderID=70f956e3-069c-4666-b0f4-324dfb0a807e, accountID=c65f80c3-9c44-4ca6-a977-72983a675203, amount=1)
c.c.command.aggregate.AccountAggregate   : balance 296
c.c.command.aggregate.AccountAggregate   : applying WithdrawMoneyEvent(holderID=70f956e3-069c-4666-b0f4-324dfb0a807e, accountID=c65f80c3-9c44-4ca6-a977-72983a675203, amount=1)
c.c.command.aggregate.AccountAggregate   : balance 295
org.axonframework.messaging.Scope        : Clearing out ThreadLocal current Scope, as no Scopes are present
c.c.command.aggregate.AccountAggregate   : handling WithdrawMoneyCommand(accountID=c65f80c3-9c44-4ca6-a977-72983a675203, holderID=70f956e3-069c-4666-b0f4-324dfb0a807e, amount=1)
c.c.command.aggregate.AccountAggregate   : applying WithdrawMoneyEvent(holderID=70f956e3-069c-4666-b0f4-324dfb0a807e, accountID=c65f80c3-9c44-4ca6-a977-72983a675203, amount=1)
c.c.command.aggregate.AccountAggregate   : balance 294


위 코드는 Application에서 수행된 로그 중 일부를 발췌한 내용입니다.

이를 통해 알 수 있는 사실은 동일 Aggregate에 대해서 Event 갯수가 늘어날 수록 새로운 Command를 적용하는데 오랜 시간이 소요된다는 점입니다.


3. 개선 방안(Snapshot)

EventSourcing 패턴을 적용하는 Application에는 이전 단계에서 확인한 근본적인 문제점을 안고 있습니다. 따라서 이를 완화하기 위해서 일정 주기별로 Aggregate에 대한 Snapshot을 생성해야합니다.


Snapshot이란 특정 시점의 Aggregate의 상태를 말합니다. 일반적으로 EventStore에는 Aggregate의 상태를 저장하지 않고 이벤트만 저장합니다. 하지만 특정 시점의 Aggregate의 상태를 저장하여 Loading 과정에서 Snapshot 이후 Event만 Replay하여 빠르게 Aggregate Loading이 가능합니다.


AxonFramework에서도 Configuration 설정을 통해서 Aggregate 별로 Snapshot 설정이 가능합니다. Snapshot 설정에는 특정 Threshold를 넘어가면 생성되며, Snapshot 적용 예제를 통해 문제점을 완화해보도록 하겠습니다.


1. Command 모듈 AxonConfig 파일을 오픈합니다.


2. AxonConfig 클래스에 내용을 추가합니다.


AxonConfig.java

@Configuration
@AutoConfigureAfter(AxonAutoConfiguration.class)
public class AxonConfig {
    @Bean
    SimpleCommandBus commandBus(TransactionManager transactionManager){
        return  SimpleCommandBus.builder().transactionManager(transactionManager).build();
    }
    @Bean
    public AggregateFactory<AccountAggregate> aggregateFactory(){
        return new GenericAggregateFactory<>(AccountAggregate.class);
    }
    @Bean
    public Snapshotter snapshotter(EventStore eventStore, TransactionManager transactionManager){
        return AggregateSnapshotter
                .builder()
                    .eventStore(eventStore)
                    .aggregateFactories(aggregateFactory())
                    .transactionManager(transactionManager)
                .build();
    }
    @Bean
    public SnapshotTriggerDefinition snapshotTriggerDefinition(EventStore eventStore, TransactionManager transactionManager){
        final int SNAPSHOT_TRHRESHOLD = 5;
        return new EventCountSnapshotTriggerDefinition(snapshotter(eventStore,transactionManager),SNAPSHOT_TRHRESHOLD);
    }

    @Bean
    public Repository<AccountAggregate> accountAggregateRepository(EventStore eventStore, SnapshotTriggerDefinition snapshotTriggerDefinition){
        return EventSourcingRepository
                .builder(AccountAggregate.class)
                    .eventStore(eventStore)
                    .snapshotTriggerDefinition(snapshotTriggerDefinition)
                .build();
    }
}


위 코드는 AccountAggregate 기준으로 Snapshot을 설정하도록 작성된 코드입니다. SnapshotTriggerDefinition을 통하여 Aggregate의 발행된 Event가 5개 이상일 경우 Snapshot을 생성하도록 지정하였습니다. Threshold 값에는 얼마를 지정 해야한다는 기준은 없으며, 비즈니스 로직에 따라 생성 주기를 조절하면 됩니다.


Snapshot 설정을 완료한 다음 Application을 재시작 한다음 다시 API 테스트를 하면 수행 당시에는 Snapshot이 존재하지 않기 때문에 전체를 Loading 합니다. 이때 Event를 적용하는 과정에서 Threshold 값을 넘었기 때문에 EventStore에 Snapshot을 새롭게 생성합니다. 


Aggregate 식별자 시퀀스 번호 

타입

Payload Payload 타입
c65f80c3-9c44-4ca6-a977-72983a675203 8 AccountAggregate   com.cqrs.command.aggregate.AccountAggregate

생성된 Snapshot 데이터 중 일부를 발췌했습니다. 특정 시퀀스 번호에 해당되는 Aggregate에 대한 상태 정보가 기입되었으며, 상태정보는 Payload에 담겨있습니다.


Payload 내용

<com.cqrs.command.aggregate.AccountAggregate>
  <accountID>c65f80c3-9c44-4ca6-a977-72983a675203</accountID>
  <holderID>70f956e3-069c-4666-b0f4-324dfb0a807e</holderID>
  <balance>293</balance>
</com.cqrs.command.aggregate.AccountAggregate>


Snapshot 생성 이후 다시 1원을 인출하게되면, 이전 시퀀스 번호인 8번 Snaphot이 존재하므로 전체 Event를 읽어오지 않고 Snapshot정보를 읽어온 다음 Command 명령을 수행합니다.


o.a.commandhandling.SimpleCommandBus     : Handling command [com.cqrs.command.commands.WithdrawMoneyCommand]
org.axonframework.messaging.Scope        : Clearing out ThreadLocal current Scope, as no Scopes are present
c.c.command.aggregate.AccountAggregate   : handling WithdrawMoneyCommand(accountID=c65f80c3-9c44-4ca6-a977-72983a675203, holderID=70f956e3-069c-4666-b0f4-324dfb0a807e, amount=1)
c.c.command.aggregate.AccountAggregate   : applying WithdrawMoneyEvent(holderID=70f956e3-069c-4666-b0f4-324dfb0a807e, accountID=c65f80c3-9c44-4ca6-a977-72983a675203, amount=1)
c.c.command.aggregate.AccountAggregate   : balance 292
org.axonframework.messaging.Scope        : Clearing out ThreadLocal current Scope, as no Scopes are present


Snapshot 생성 이후 5번의 Event 발생까지는 Snapshot 시점 이전부터 생성된 Event가 재생됩니다. 만약 다시 Threshold를 넘어서게 되면 새로운 Snapshot이 생성되고 그 이후부터는 새로운 Snapshot 이후 Event가 재생됩니다.


4. 성능개선


Aggregate를 매번 로딩하면 이를 복원하는데 드는 비용이 지속 수반됩니다. 따라서 자주 사용하는 Aggregate는 Cache를 적용하면 Loading 비용이 줄어들 것입니다. Axon에서 이를 위해 기본적으로 WeakReferenceCache를 제공하며 이를 적용한 Configuration은 다음과 같습니다.


AxonConfig.java

@Configuration
@AutoConfigureAfter(AxonAutoConfiguration.class)
public class AxonConfig {
    @Bean
    public AggregateFactory<AccountAggregate> aggregateFactory(){
        return new GenericAggregateFactory<>(AccountAggregate.class);
    }
    @Bean
    public Snapshotter snapshotter(EventStore eventStore, TransactionManager transactionManager){
        return AggregateSnapshotter
                .builder()
                    .eventStore(eventStore)
                    .aggregateFactories(aggregateFactory())
                    .transactionManager(transactionManager)
                .build();
    }
    @Bean
    public SnapshotTriggerDefinition snapshotTriggerDefinition(EventStore eventStore, TransactionManager transactionManager){
        final int SNAPSHOT_TRHRESHOLD = 5;
        return new EventCountSnapshotTriggerDefinition(snapshotter(eventStore,transactionManager),SNAPSHOT_TRHRESHOLD);
    }

    @Bean
    public Cache cache(){
        return new WeakReferenceCache();
    }

    @Bean
    public Repository<AccountAggregate> accountAggregateRepository(EventStore eventStore, SnapshotTriggerDefinition snapshotTriggerDefinition, Cache cache){
        return CachingEventSourcingRepository
                .builder(AccountAggregate.class)
                    .eventStore(eventStore)
                    .snapshotTriggerDefinition(snapshotTriggerDefinition)
                    .cache(cache)
                .build();
    }
}

5. 마치며


3개의 포스팅을 통해 Command Application을 구현하는 방법에 대해서 살펴보았습니다. 다음 포스팅은 Aggregate 관련 번외편을 진행할 예정입니다. 따라서 데모 프로젝트를 위한 Application 구현은 이번 포스팅이 마지막입니다.


1. 서론

지난시간에 이어 Aggregate에 명령을 요청하는 API 구현 및 테스트를 진행하고자 합니다. 이번 포스팅에서는 API 레벨 테스트를 진행할 것이며, Axon에서 제공하는 테스트 관련 클래스 소개는 차후에 진행하겠습니다.


2. DTO 구현

EventSourcing & CQRS 예제 프로젝트 개요에서 API 엔드포인트를 도출했습니다. 이를 바탕으로 API 호출시 매핑되는 DTO 클래스 먼저 구현하겠습니다.


1. dto 패키지를 만듭니다. 그리고 dto 클래스 5개를 만듭니다.


2. dto 클래스를 구현합니다.


HolderDTO.java

@Getter
@AllArgsConstructor
@NoArgsConstructor
public class HolderDTO {
    private String holderName;
    private String tel;
    private String address;
}

AccountDTO.java

@Getter
@AllArgsConstructor
@NoArgsConstructor
public class AccountDTO {
    private String holderID;
}

TransactionDTO.java

@Getter
@AllArgsConstructor
@NoArgsConstructor
public class TransactionDTO {
    private String accountID;
    private String holderID;
    private Long amount;
}

DepositDTO.java

public class DepositDTO extends TransactionDTO {}

WithdrawalDTO.java

public class WithdrawalDTO extends TransactionDTO {}


입금과 출금형식이 동일하므로 TransactionDTO에 공통 속성 구현한다음 상속하였습니다.


3. Service 구현

CommandGateway와의 연결을 위한 Service 클래스를 구현합니다.


1. service 패키지 생성 후 service 인터페이스 및 구현 클래스를 생성합니다.


2. 인터페이스 정의 및 클래스를 구현합니다.


TransactionService.java

public interface TransactionService {
    CompletableFuture<String> createHolder(HolderDTO holderDTO);
    CompletableFuture<String> createAccount(AccountDTO accountDTO);
    CompletableFuture<String> depositMoney(DepositDTO transactionDTO);
    CompletableFuture<String> withdrawMoney(WithdrawalDTO transactionDTO);
}

TransactionServiceImpl.java

@Service
@RequiredArgsConstructor
public class TransactionServiceImpl implements TransactionService {
    private final CommandGateway commandGateway;

    @Override
    public CompletableFuture<String> createHolder(HolderDTO holderDTO) {
        return commandGateway.send(new HolderCreationCommand(UUID.randomUUID().toString()
                , holderDTO.getHolderName()
                , holderDTO.getTel()
                , holderDTO.getAddress()));
    }

    @Override
    public CompletableFuture<String> createAccount(AccountDTO accountDTO) {
        return commandGateway.send(new AccountCreationCommand(accountDTO.getHolderID(),UUID.randomUUID().toString()));
    }

    @Override
    public CompletableFuture<String> depositMoney(DepositDTO transactionDTO) {
        return commandGateway.send(new DepositMoneyCommand(transactionDTO.getAccountID(), transactionDTO.getHolderID(), transactionDTO.getAmount()));
    }

    @Override
    public CompletableFuture<String> withdrawMoney(WithdrawalDTO transactionDTO) {
        return commandGateway.send(new WithdrawMoneyCommand(transactionDTO.getAccountID(), transactionDTO.getHolderID(), transactionDTO.getAmount()));
    }
}


Service 구현 코드를 보면 직관적으로 이해할 수 있듯이 CommandGateway를 통해 Command를 생성 합니다. 이는 지난 포스팅에서 다룬 Command 수행 내부 흐름 첫번째 단계에 해당합니다.


참고로 CommandGateway에서 제공되는 API는 크게 두 가지로 첫째는 위 소스코드에서 사용한 send 메소드이고 나머지는 sendAndWait 메소드입니다. send 메소드는 비동기 방식이며, sendAndWait은 동기 방식의 메소드입니다. 동기 방식의 메소드는 default가 응답이 올때까지 대기하며 이는 호출 후 hang 상태가 지속되면 스레드 고갈이 일어날 수 있습니다. 따라서 메소드 파라미터에 timeout을 지정하여 실패 처리할 수 있습니다. 자세한 내용은 Axon 공식 문서를 참고 바랍니다.


4. Controller 구현

Controller를 통해 API 매핑작업을 수행합니다.


1. controller 패키지 만든 후 controller 클래스를 생성합니다.


2. Controller 클래스를 구현합니다.

@RestController
@RequiredArgsConstructor
public class TransactionController {
    private final TransactionService transactionService;

    @PostMapping("/holder")
    public CompletableFuture<String> createHolder(@RequestBody HolderDTO holderDTO){
        return transactionService.createHolder(holderDTO);
    }

    @PostMapping("/account")
    public CompletableFuture<String> createAccount(@RequestBody AccountDTO accountDTO){
        return transactionService.createAccount(accountDTO);
    }

    @PostMapping("/deposit")
    public CompletableFuture<String> deposit(@RequestBody DepositDTO transactionDTO){
        return transactionService.depositMoney(transactionDTO);
    }

    @PostMapping("/withdrawal")
    public CompletableFuture<String> withdraw(@RequestBody WithdrawalDTO transactionDTO){
        return transactionService.withdrawMoney(transactionDTO);
    }
}


Controller 클래스는 단순히 전달받은 DTO를 Service에 전달하는 역할만 수행하므로 자세한 설명은 생략합니다. 이로써 Command Application 기본 코드 작성은 끝났습니다.


5. Log 설정


Command, EventSourcing Handler 메소드가 수행되는 상황을 분석하기 위해서 Logging 설정을 진행합니다.


1. resource 폴더 및 application.yml 파일을 연다음 logging 설정을 추가합니다.


2. Aggregate 코드에 @Slf4j 어노테이션 추가 및 log 정보를 기록합니다.


HolderAggregate.java

@RequiredArgsConstructor
@Aggregate
@Slf4j
public class HolderAggregate {
    @AggregateIdentifier
    private String holderID;
    private String holderName;
    private String tel;
    private String address;

    @CommandHandler
    public HolderAggregate(HolderCreationCommand command) {
        log.debug("handling {}", command);
        apply(new HolderCreationEvent(command.getHolderID(), command.getHolderName(), command.getTel(), command.getAddress()));
    }

    @EventSourcingHandler
    protected void createHolder(HolderCreationEvent event){
        log.debug("applying {}", event);
        this.holderID = event.getHolderID();
        this.holderName = event.getHolderName();
        this.tel = event.getTel();
        this.address = event.getAddress();
    }
}


AccountAggregate.java

@RequiredArgsConstructor
@Aggregate
@Slf4j
public class AccountAggregate {
    @AggregateIdentifier
    private String accountID;
    private String holderID;
    private Long balance;

    @CommandHandler
    public AccountAggregate(AccountCreationCommand command) {
        log.debug("handling {}", command);
        apply(new AccountCreationEvent(command.getHolderID(),command.getAccountID()));
    }
    @EventSourcingHandler
    protected void createAccount(AccountCreationEvent event){
        log.debug("applying {}", event);
        this.accountID = event.getAccountID();
        this.holderID = event.getHolderID();
        this.balance = 0L;
    }
    @CommandHandler
    protected void depositMoney(DepositMoneyCommand command){
        log.debug("handling {}", command);
        if(command.getAmount() <= 0) throw new IllegalStateException("amount >= 0");
        apply(new DepositMoneyEvent(command.getHolderID(), command.getAccountID(), command.getAmount()));
    }
    @EventSourcingHandler
    protected void depositMoney(DepositMoneyEvent event){
        log.debug("applying {}", event);
        this.balance += event.getAmount();
        log.debug("balance {}", this.balance);
    }
    @CommandHandler
    protected void withdrawMoney(WithdrawMoneyCommand command){
        log.debug("handling {}", command);
        if(this.balance - command.getAmount() < 0) throw new IllegalStateException("잔고가 부족합니다.");
        else if(command.getAmount() <= 0 ) throw new IllegalStateException("amount >= 0");
        apply(new WithdrawMoneyEvent(command.getHolderID(), command.getAccountID(), command.getAmount()));
    }
    @EventSourcingHandler
    protected void withdrawMoney(WithdrawMoneyEvent event){
        log.debug("applying {}", event);
        this.balance -= event.getAmount();
        log.debug("balance {}", this.balance);
    }
}

6. API 테스트 코드 작성

Command Application API 테스트를 수행하기 위한 코드를 작성합니다. API 테스트를 위해 Postman을 비롯하여 여러 툴이 있지만, IntelliJhttp 기능을 사용해서 테스트를 진행하도록 하겠습니다.


1. Command 모듈 적절한 위치에 http 확장자로 끝나는 파일을 생성합니다.


2. http 코드를 작성합니다.


POST http://localhost:8080/holder
Content-Type: application/json

{
	"holderName" : "kevin",
	"tel" : "02-1234-5678",
	"address" : "OO시 OO구"
}

###

POST http://localhost:8080/account
Content-Type: application/json

{
  "holderID" : "계정 생성 후 반환되는 UUID"
}

###

POST http://localhost:8080/deposit
Content-Type: application/json

{
  "accountID" : "계좌 생성 후 반환되는 UUID",
  "holderID" : "계정 생성 후 반환되는 UUID",
  "amount" : 300
}

###

POST http://localhost:8080/withdrawal
Content-Type: application/json

{
  "accountID" : "계좌 생성 후 반환되는 UUID",
  "holderID" : "계정 생성 후 반환되는 UUID",
  "amount" : 10
}

###

7. API 테스트 


1. AxonServer가 기동된 상태에서 Command App을 수행합니다. 혹시 Axon Server 기동 방법이 궁금하신 분은 AxonServer 설치 및 실행 포스팅을 참고 바랍니다.


2. http 파일에서 계정 생성 url에 커서를 위치 시킨다음 [Alt + Enter] 키를 누릅니다.


3. Run Localhost:8080 버튼을 눌러 API를 실행합니다.


4. 정상 실행결과 및 반환된 계정 식별자 값을 확인합니다.


또한 위 그림과 같이 Application 로그에도 정상적으로 CommandHanlder 및 EventSourcingHandler 메소드가 수행된 것을 확인할 수 있습니다.


8. 성능 개선


데모 프로젝트에서는 Command 명령 생성과 이를 처리하는 Command Handler를 하나의 App에 모두 구현하였음에도 불구하고 위 Application에서는 Command 발행 시 Axon Server와의 통신을 수행합니다. 이는 AxonServer와 연결시 기본적으로 CommandBus로써 AxonServerCommandBus를 사용하기 때문입니다. 


이를 개선하기 위해서는 Command 처리시 AxonServer 연결없이 명령을 처리하도록 변경이 필요합니다. AxonFramework에서는 SimpleCommandBus 클래스를 제공하며, 설정을 통해 CommandBus 인터페이스 교체가 가능합니다.


설정 변경을 통해 Command Bus를 변경하도록 하겠습니다.


1. Command 모듈에 config 패키지 생성 후 AxonConfig 클래스를 생성합니다.


2. AxonConfig 클래스를 구현합니다.


AxonConfig.java

@Configuration
@AutoConfigureAfter(AxonAutoConfiguration.class)
public class AxonConfig {
    @Bean
    SimpleCommandBus commandBus(TransactionManager transactionManager){
        return  SimpleCommandBus.builder().transactionManager(transactionManager).build();
    }
 }


AxonFramework는 기본적으로 AxonAutoConfiguration 클래스를 통해 Default 속성을 정의합니다. Custom 속성을 추가하기 위해 Axon 기본 설정이 완료된 후 수행될 수 있도록 @AutoConfigureAfter 어노테이션을 추가했습니다.


3. Application 수행 후 테스트하면 CommandBus가 SimpleCommandBus로 교체된 것을 확인할 수 있습니다.

 o.a.commandhandling.SimpleCommandBus     : Handling command [com.cqrs.command.commands.HolderCreationCommand]

9. 마치며

이로써 Command Application의 전반적인 코드 구현을 완성하였습니다. 하지만 위 프로그램은 구조적인 문제점을 갖고 있습니다. 다음 포스팅에서는 해당 프로그램이 가진 문제점과 이를 해결하는 방법에 대해서 다루도록 하겠습니다.


1. 서론 


EventSourcing + CQRS 예제 프로젝트 개요 포스팅을 통해 구현할 프로젝트 소개 및 Command와 Event를 도출했습니다. 이번 시간에는 Command, Event, Aggregate 기본 구조를 구현해보도록 하겠습니다.


3. EventSourcing + CQRS 예제 프로젝트 개요

1. 개요 지금부터 EventSourcing과 CQRS가 적용된 프로젝트를 구현하면서 AxonFramework 사용법을 배워봅니다. 이에 앞서 앞으로 진행할 프로젝트에 대한 설계를 통해 구조를 잡아보겠습니다. 프로그램 요구사항..

cla9.tistory.com


2. Event 구현


Event 클래스는 Command와 Query 둘다 사용되므로 공통 모듈에서 구현하겠습니다.


1. Common 모듈에 존재하는 build.gradle 파일을 엽니다. 이후 롬복 사용 및 공통 모듈 컴파일 시 jar파일 생성을 위하여 다음과 같이 작성합니다.


bootJar { 
    enabled = false 
}
jar {
    enabled = true
}
dependencies{
    compileOnly 'org.projectlombok:lombok'
    annotationProcessor 'org.projectlombok:lombok'
}

2. Common 모듈 패키지 생성을 위해 src > main > java 디렉토리 선택 후 [Alt + Insert] 키를 누릅니다. 이후 package 탭을 선택하고 임의의 package 명을 입력한 다음 OK 버튼을 누릅니다.


3. 생성된 패키지 하위에 Event 클래스 4개를 생성합니다.


4. Event 클래스를 구현합니다.


HolderCreationEvent.java

@AllArgsConstructor
@ToString
@Getter
public class HolderCreationEvent {
    private String holderID;
    private String holderName;
    private String tel;
    private String address;
}


AccountCreationEvent.java

@AllArgsConstructor
@ToString
@Getter
public class AccountCreationEvent {
    private String holderID;
    private String accountID;
}


DepositMoneyEvent.java

@AllArgsConstructor
@ToString
@Getter
public class DepositMoneyEvent {
    private String holderID;
    private String accountID;
    private Long amount;
}


WithdrawMoneyEvent.java

@AllArgsConstructor
@ToString
@Getter
public class WithdrawMoneyEvent {
    private String holderID;
    private String accountID;
    private Long amount;
}

3. Command 구현

만약 Command을 요청하는 App이 실제 처리하는 App과 동일하지 않다면, Command 또한 공통 모듈에 작성하는 것이 바람직합니다. 하지만 데모 프로젝트에서는 Command App에서 모두 처리할 것이므로 Command 모듈내 구현하도록 하겠습니다.


1. Command 모듈내에 위치한 패키지 최하위에 commands 패키지를 추가합니다.


2. 생성된 패키지 하위에 Command 클래스 4개를 생성합니다.


3. Command 클래스를 구현합니다.


HolderCreationCommand.java

@AllArgsConstructor
@ToString
@Getter
public class HolderCreationCommand {
    @TargetAggregateIdentifier
    private String holderID;
    private String holderName;
    private String tel;
    private String address;
}

AccountCreationCommand.java

@AllArgsConstructor
@ToString
@Getter
public class AccountCreationCommand {
    @TargetAggregateIdentifier
    private String holderID;
    private String accountID;
}

DepositMoneyCommand.java

@AllArgsConstructor
@ToString
@Getter
public class DepositMoneyCommand {
    @TargetAggregateIdentifier
    private String accountID;
    private String holderID;
    private Long amount;
}

WithdrawMoneyCommand.java

@AllArgsConstructor
@ToString
@Getter
public class WithdrawMoneyCommand {
    @TargetAggregateIdentifier
    private String accountID;
    private String holderID;
    private Long amount;
}


Event와 달리 Command 클래스에는 @TargetAggregateIdentifier 어노테이션이 붙었습니다. 이는 AxonFramework 모델링의 단위가 Aggregate이고 각 Aggregate마다 고유한 식별자가 부여되어야 하기 때문입니다. 따라서 Command 클래스를 디자인 할때에도 어떤 Aggregate를 대상으로 명령을 수행할 것인지 알아야 하기 때문에 대상 Aggregate의 식별자 지정이 필요합니다.


4. Aggregate 구현

도메인 주도 개발 방법론(DDD)을 배우면 반드시 등장하는 개념이 Aggregate입니다. AxonFramework 에서도 DDD 기반으로 설계되었기에 Aggregate가 필요합니다. 데모 프로젝트에서는 HolderAccount 연관된 Aggregate를 구현하도록 하겠습니다.


1. Command 모듈내 aggregate 패키지를 생성후 Aggregate 클래스 2개를 생성합니다.


2. Aggregate 클래스를 구현합니다.


HolderAggregate.java

@RequiredArgsConstructor
@Aggregate
public class HolderAggregate {
    @AggregateIdentifier
    private String holderID;
    private String holderName;
    private String tel;
    private String address;
}


AccountAggregate.java

@RequiredArgsConstructor
@Aggregate
public class AccountAggregate {
    @AggregateIdentifier
    private String accountID;
    private String holderID;
    private Long balance;
}    


Aggregate 클래스에는 클래스 위에 Aggregate임을 알려주는 Annotation을 추가합니다. 또한 Aggregate 별로 식별자가 반드시 존재해야되기 때문에 유일성을 갖는 대표키 속성에 @AggregateIdentifier을 추가합니다.


AxonFramework 에서는 모든 명령(Command)과 이벤트(Event)가 Aggregate에서 발생합니다. 따라서 Aggregate에 대한 명령과 이벤트를 처리할 수 있는 Handler 메소드 작성이 필요합니다. 또한 기본적으로 Event Sourcing 패턴을 사용하기 때문에 명령이 발생한 Event를 적용하는 단계가 필요합니다.


Handler는 대개 Aggregation 클래스에서 정의하며, 외부 클래스에서 별도 정의도 가능합니다. 데모에서는 Aggregate에서 정의하는 방법을 사용할 것이며 외부 정의 방식은 Axon 공식 문서를 참조 바랍니다.


AxonFramework를 사용함에 있어 주로 사용하는 Handler Annotation은 다음과 같습니다.


  • @CommandHandler : Aggregate에 대한 명령이 발생되었을 때 호출되는 메소드임을 알려주는 마커 역할
  • @EventSourcingHandler : CommandHandler에서 발생한 이벤트를 적용하는 메소드임을 알려주는 마커 역할
  • @EventHandler : Query 모델 혹은 이벤트 발생시 해당 이벤트를 적용하는 메소드임을 알려주는 마커 역할

HolderAggregation 클래스를 대상으로 계정 생성 명령(HolderCreationCommand)과 이로인해 발생하는 계정 생성 이벤트(HolderCreationEvent) 처리하는 Handler 메소드를 작성하면 다음과 같습니다.


HolderAggregation.java

@RequiredArgsConstructor
@Aggregate
public class HolderAggregate {
    @AggregateIdentifier
    private String holderID;
    private String holderName;
    private String tel;
    private String address;

    @CommandHandler
    public HolderAggregate(HolderCreationCommand command) {
        apply(new HolderCreationEvent(command.getHolderID(), command.getHolderName(), command.getTel(), command.getAddress()));
    }

    @EventSourcingHandler
    protected void createAccount(HolderCreationEvent event){
        this.holderID = event.getHolderID();
        this.holderName = event.getHolderName();
        this.tel = event.getTel();
        this.address = event.getAddress();
    }
}


소스코드를 보면 @CommandHandler@EventSourcingHandler 어노테이션이 추가된 것을 확인할 수 있습니다.


먼저 CommandHandler 메소드부터 살펴보겠습니다. 위 코드에서 CommandHandler는 생성자에 추가되었습니다. 이는 계정 생성 명령은 곧 HolderAggregate의 생성을 의미하는 것이기 때문입니다. 해당 메소드 안에 applyAggregateLifeCycle 클래스의 static 메소드이며, 해당 메소드를 통해서 이벤트를 발행합니다.


EventSourcingHandler 메소드는 CommandHandler에서 기존에 발행된 이벤트 및 현재 발생한 Command 이벤트를 적용하는 역할을 수행합니다.


위 그림은 HolderCreationCommand 명령이 발생되었을 때, 수행되는 내부 흐름을 간략하게 표현했습니다.


  1. 사용자로부터 Command 명령을 CommandGateway로 전달하면, 메시지 변환 과정(GenericCommandMessage)을 거쳐 CommandBus로 전달합니다.
  2. CommandBus는 Command 명령을 Axon Server로 전송합니다.
  3. AxonServer에서 명령을 Command Bus를 통해 해당 Command를 처리할 App에게 전달합니다.
  4. UnitOfWork(4~7 단계)를 수행합니다. 이 과정에서 Chain으로 연결된 handler 들을 거치면서 대상 Aggregate에 대하여 EventStore로부터 과거 이벤트들을 Loading 하여 최신 상태로 만듭니다. 이후 해당 Command와 연결된 Handler 메소드를 Reflection을 활용하여 호출합니다.
  5. CommandHandler 메소드를 호출하는 과정에서 apply 메소드 호출을 통해 이벤트(HolderCreationEvent)를 발행합니다.
  6. 발행된 Event는 내부 로직을 거치면서 Event 처리를 수행할 Handler를 매핑한 후 EventSourcingHandler 메소드를 Reflection을 활용하여 호출합니다.
  7. EventSourcingHandler 호출이 완료되면, EventBus를 통해 Event 발행을 요청합니다.(publish)
  8. EventBus는 이벤트를 Axon Server에 전달합니다.
  9. EventStore인 Axon Server에서는 전달받은 Event를 저장소에 기록합니다.
  10. 메시지 라우팅 기능을 담당하는 Axon Server는 연결된 App을 대상으로 Event를 전파합니다.

(※ AxonServer와 App간의 연결은 grpc를 사용합니다.)

위와 같이 간단하게 Handler 메소드 두개 작성했을 뿐인데, 내부 로직은 복잡합니다.


이번에는 AccountAggregate 클래스를 구현해보도록 하겠습니다.


AccountAggregate.java

@RequiredArgsConstructor
@Aggregate
public class AccountAggregate {
    @AggregateIdentifier
    private String accountID;
    private String holderID;
    private Long balance;

    @CommandHandler
    public AccountAggregate(AccountCreationCommand command) {
        apply(new AccountCreationEvent(command.getHolderID(),command.getAccountID()));
    }
    @EventSourcingHandler
    protected void createAccount(AccountCreationEvent event){
        this.accountID = event.getAccountID();
        this.holderID = event.getHolderID();
        this.balance = 0L;
    }
    @CommandHandler
    protected void depositMoney(DepositMoneyCommand command){
        if(command.getAmount() <= 0) throw new IllegalStateException("amount >= 0");
        apply(new DepositMoneyEvent(command.getHolderID(), command.getAccountID(), command.getAmount()));
    }
    @EventSourcingHandler
    protected void depositMoney(DepositMoneyEvent event){
        this.balance += event.getAmount();
    }
    @CommandHandler
    protected void withdrawMoney(WithdrawMoneyCommand command){
        if(this.balance - command.getAmount() < 0) throw new IllegalStateException("잔고가 부족합니다.");
        else if(command.getAmount() <= 0 ) throw new IllegalStateException("amount >= 0");
        apply(new WithdrawMoneyEvent(command.getHolderID(), command.getAccountID(), command.getAmount()));
    }
    @EventSourcingHandler
    protected void withdrawMoney(WithdrawMoneyEvent event){
        this.balance -= event.getAmount();
    }
}


코드를 보면 모든 예외 처리 및 유효성 검증CommandHandler에서 하고 있습니다. 이는 EventStore에 적재된 모든 Event는 재생해야할 대상이기 때문에 EventSourcingHandler에서는 Replay만 수행합니다. 따라서 CommandHandler에서 사전 Exception 처리 및 유효성 검증을 통해서 검증된 Event만을 발행해야합니다.


5. Axon Server 라우팅 기능(Command)

지금까지 AxonFramework를 사용하는 Client 입장에서 동작 원리를 살펴봤습니다. 이번에는 Server 입장에서 메시지 라우팅이 어떻게 이루어지는지 살펴보도록 하겠습니다.


상황 1. Command를 처리하는 Handler가 하나만 Axon Server에 등록된 경우


Application 기동시 AxonServer와 연결을 시도합니다. 연결이 완료되면, 해당 App은 자신이 처리가능한 Command Handler 정보를 Server에 등록합니다. 


이때 다른 App에서 Command 명령을 요청하게되면 AxonServer에서는 해당 Command를 수행할 수 있는 App을 알기 때문에 해당 App으로 Command 명령을 전달합니다.


상황2. 동일한 Command를 처리하는 Handler가 복수개 등록된 경우


동일한 Command A를 처리할 수 있는 Handler 메소드를 포함하는 App이 복수개로 등록되었을 경우 내부 흐름은 다음과 같습니다.


Axon Server에서는 Command가 도착할 경우 어떤 App에서 수행해야할지를 결정 해야합니다. 따라서 이를 위해 라우팅 테이블에 두 App의 정보를 등록합니다.


라우팅 테이블에는 어떤 노드들이 Server와 연결되어있고, 해당 노드들이 어떤 Command를 처리할 수 있는지에 대한 정보가 담겨있습니다. 내부 아키텍처는 Consistenet Hashing 기법을 사용하고 있으며, 관련 설명은 charsyam 님 블로그를 참고바랍니다.


이러한 상황에서 새로운 App에서 A Command를 요청했다면, 해당 요청 속에 포함된 라우팅 키를 찾아 라우팅 테이블에서 적합한 App을 선정하여 호출하게 됩니다. 그렇기에 Client Side 모델 데이터가 Sharding 되어있거나 고가용성을 위해 Cluster로 App을 구축했더라도 Command 명령은 정확히 하나의 App Command Handler에만 전달됩니다.


라우팅 키는 @TargetAggregateIdentifier 혹은 @RoutingKey 어노테이션을 Command에 포함시에 자동으로 생성됩니다.


6. 마치며

이번 포스팅에서는 Event, Command, Aggregate 모델을 구현했습니다. 다음 시간에는 API 구현 및 테스트를 통해서 실제 동작하는 과정에대해 알아보도록 하겠습니다.


Tip)


1. AxonServer에 저장된 Event 내역은 DashBoard에서 Search 항목을 누르면 조회할 수 있습니다. 


2. Dashboard Commands 탭에서는 등록된 Command Handler 정보 및 현재 수행중인 Command 발생 빈도를 확인할 수 있습니다.


3. Command 명령이 발생하면 내부적으로는 몇차례 Command 메시지 변환 과정을 거쳐 부가적인 정보가 추가됩니다. 


1단계

Command :
"CreateHolderCommand(
  holderID='1f2cf247-afe7-46d6-bc6d-d588643d6643', 
  holderName= 'kevin', 
  tel='1234-5678', 
  address='서울시')"
callback: 
FailureLoggingCallback@12115

2단계 (GenericMessage 변환후 메시지)

commandMessage:
"GenericCommandMessage{
	payload={
	CreateHolderCommand(
  		holderID='1f2cf247-afe7-46d6-bc6d-d588643d6643', 
  		holderName= 'kevin', 
		tel='1234-5678', 
		address='서울시'),
	metadata={},
	messageIdentifier = '040ffa0c-5d2d-4588-a04c-8051867d4057',
	commandName ='com.cqrs.command.commands.CreateHolderCommand}'"
commandCallback: 
FailureLoggingCallback@12115


기본 Command 정보 외 message 식별자 및 Command 패키지 정보 등이 포함되어 있는 것을 확인할 수 있습니다. 참고로 해당 메시지는 CommandGateway의 Send API를 사용했을 때의 메시지 내용입니다.

1. 서론

이번 시간에는 지난 포스팅에 이어서 AxonFramework 구성AxonServer 연동에 대해 다루도록 하겠습니다. 진행하기 앞서 몇가지 사전 작업이 필요합니다.


2. AxonFramework 설정


1. Command 모듈 build.gradle 파일을 엽니다. 이후 아래와 같이 의존성을 추가합니다.


추가된 의존성 중 AxonFramework와 직접 연관된 항목은 다음과 같습니다.

ext{
    axonVersion = "4.2.1"
}

dependencies{
    implementation group: 'org.axonframework', name: 'axon-spring-boot-starter', version: "$axonVersion"
    implementation group: 'org.axonframework', name: 'axon-configuration', version: "$axonVersion"
}

2. lombok 사용을 위해 Annotation Processing을 활성화 합니다.

(File > Settings > Build, Execution, Deployment > Compiler > Annotation Processors)


3. 환경설정을 위해 resources 폴더 밑에 application.yml 파일을 생성합니다. 이후 다음과 같이 작성합니다.


server:
  port: 8080

spring:
  application:
    name: eventsourcing-cqrs-command
  datasource:
    platform: postgres
    url: jdbc:postgresql://localhost:5432/command
    username: command
    password: command
    driverClassName: org.postgresql.Driver
  jpa:
    hibernate:
      ddl-auto: update

axon:
  serializer:
    general: xstream
  axonserver:
    servers: localhost:8124


4. Axon Server 연동 테스트를 위해 CommandApplication 클래스에 CommandHandler 메소드를 추가합니다.

(※ 연동 테스트 이후 해당 메소드는 삭제합니다.)


5. Command 모듈을 실행시킵니다. App이 정상적으로 실행되고, AxonServerCommandBus가 할당된 것을 확인합니다.


6. Axon Server 대시보드(http://localhost:8024) Overview 화면에서 Command App과 연결된 토폴로지를 확인합니다.


7. Query 모듈 설정을 위해 build.gradle 파일을 엽니다. 이후 Command 모듈 build.gradle과 동일하게 의존성을 추가합니다.

(※ 만약 Read Model을 MongoDB로 사용할 경우 Mongo DB 관련 의존성을 추가합니다.)


8. Query 모듈 resources 폴더 밑에 application.yml 파일을 생성합니다. 이후 다음과 같이 작성합니다.

(※ Command 모듈과 조금씩 다른 부분에 주의합니다.)


server:
  port: 9090

spring:
  application:
    name: eventsourcing-cqrs-query
  datasource:
    platform: postgres
    url: jdbc:postgresql://localhost:5432/query
    username: query
    password: query
    driverClassName: org.postgresql.Driver
  jpa:
    hibernate:
      ddl-auto: update

axon:
  serializer:
    general: xstream
  axonserver:
    servers: localhost:8124

9. Axon Server 연동 테스트를 위해 QueryApplication 클래스에 EventHandler 메소드를 추가합니다.

(※ Command와 마찬가지로 연동 테스트 이후 해당 메소드는 삭제합니다.)


10. Query 모듈을 실행합니다. App이 정상적으로 실행되고, AxonServer 연결과 이벤트 추적을 위한 TrackingEventProcessor가 할당된 것을 확인합니다.


11. Axon Server 대시보드(http://localhost:8024) Overview 화면에서 기존에 연결된 Command App과 새로 연결된 Query App 토폴로지를 확인합니다.


12. 테스트를 위해 Command, Query 모듈에 작성한 핸들러 메소드를 삭제합니다.


3. 마치며

이번 포스팅을 통해서 AxonFramework의 기본 설정 및 Axon Server와의 연동을 살펴보았습니다. 하지만 중간에 등장한 CommandHandler, EventHandler, CommandBus, TrackingEventProcessor 등의 용어는 아직 생소합니다. 다음 포스팅부터는 본격적으로 Command, Query 프로그램 작성하면서 위 개념등을 살펴보겠습니다.

1. 서론


CQRS 구성을 위해 일반적으로 Command, Query 두가지 Application을 구성합니다. 이때 Application 사이 매개체 역할을 Event가 담당합니다. 따라서 Event 정보를 알기 위해서는 Event 정보가 두 App에 모두 포함되어야 합니다.


일반적인 프로젝트 구조라면 동일한 소스 코드가 두 App에 모두 존재해야되므로 Event의 변경사항이 있을 때 양쪽 Application의 구조를 바꿔야합니다. 더군다나 Axon에서는 Event 클래스의 패키지 구조가 동일해야되는 제약사항이 존재합니다. 따라서 이러한 문제를 해결하기 위한 다양한 방법중 Gradle을 활용해서 MultiProject 구성을 하고자 합니다. 


즉 Event 클래스만 모은 공통 모듈을 작성하고, Command, Query에서 이를 참조하도록 구성합니다. 이렇게 별도 모듈로 분리함으로서 변경 사항 발생시 공통 모듈에만 변경을 가하면 양쪽 App에 적용되므로 소스 관리가 용이해집니다.


자세한 내용은 Gradle 공식 문서를 참조하시기 바라며, 이번 포스팅에서는 기본적인 Gradle Multi Project 구성 방법에 대해서 알아보겠습니다.


참고 블로그

와이케이 마구잡이님 블로그

jojoldu님 블로그


2. Gradle 프로젝트 생성


1. IntellJ에서 Create New Project 를 클릭합니다.


2. Spring 프로젝트를 만들기 위해서 Spring Initializr를 선택합니다. 이후 Java SDK 버전 선택한 다음 Next 버튼을 눌러 다음 단계로 진행합니다.


3. Gradle 프로젝트 생성을 위해 Type을 Gradle Project로 설정합니다. 이후 Group과 Artifact를 본인 프로젝트 구성에 맞게 기입하니다. 마지막으로 Java version을 PC에 설치된 Java 버전과 동일하게 설정 후 Next 버튼을 선택합니다.


4. 의존성은 나중에 별도 추가할 예정이므로 Next 버튼을 눌러 다음 단계로 이동합니다.


5. Project 이름 설정 후, Finish 버튼을 선택합니다.


6. Gradle 설정 화면에서 특별하게 변경해야할 사항이 없다면 기본 설정 상태에서 OK 버튼을 선택합니다.


7. 의존성이 정상적으로 추가되면 아래 이미지 하단과같이 sync가 정상적으로 이루어짐을 확인할 수 있습니다. 지금 생성한 프로젝트는 root 프로젝트이므로 src 폴더 전체를 선택 후 삭제합니다.


3. Multi Module 구성하기


1. 프로젝트내 모듈은 3가지(Command, Query, Common)입니다. 따라서 이를 구성하기 위해서 root 프로젝트 내 settings.gradle 파일을 연 후에 아래 이미지와 같이 sub module명을 기입합니다.


2. 이제부터 프로젝트 구성을 위해서 구조 변경이 필요합니다. 먼저 root 프로젝트에 있는 build.gradle 파일을 엽니다. 이후 AS-IS로 되어있는 구조를 TO-BE 형태로 변경합니다.


AS-IS

plugins {
    id 'org.springframework.boot' version '2.2.2.RELEASE'
    id 'io.spring.dependency-management' version '1.0.8.RELEASE'
    id 'java'
}

group = 'com.cqrs'
version = '0.0.1-SNAPSHOT'
sourceCompatibility = '11'

repositories {
    mavenCentral()
}

dependencies {
    implementation 'org.springframework.boot:spring-boot-starter'
    testImplementation('org.springframework.boot:spring-boot-starter-test') {
        exclude group: 'org.junit.vintage', module: 'junit-vintage-engine'
    }
}

test {
    useJUnitPlatform()
}


TO-BE

buildscript {
    ext {
        springBootVersion = '2.2.2.RELEASE'
    }
    repositories {
        mavenCentral()
    }
    dependencies {
        classpath("org.springframework.boot:spring-boot-gradle-plugin:${springBootVersion}")
    }
}

allprojects {
    group = 'com.cqrs'
    version = '0.0.1-SNAPSHOT'
}

subprojects {
    apply plugin: 'org.springframework.boot'
    apply plugin: 'io.spring.dependency-management'
    apply plugin: 'java'

    sourceCompatibility = '11'

    repositories {
        mavenCentral()
    }

    dependencies {
        testImplementation('org.springframework.boot:spring-boot-starter-test') {
            exclude group: 'org.junit.vintage', module: 'junit-vintage-engine'
        }
    }

    task initSourceFolders {
        sourceSets*.java.srcDirs*.each {
            if (!it.exists()) {
                it.mkdirs()
            }
        }
        sourceSets*.resources.srcDirs*.each {
            if (!it.exists()) {
                it.mkdirs()
            }
        }
    }
}

project(':command') {
    dependencies {
        compile project(':common')
    }
}

project(':query') {
    dependencies {
        compile project(':common')
    }
}


변경한 build.script 내용을 설명하면 다음과 같습니다.


buildscript 블록 : 나머지 스크립트를 빌드하는 과정에서 필요한 외부 라이브러리를 classpath에 추가하는 기능을 담당합니다. subprojects 내에서 플러그인 적용(apply plugin)이 가능한 이유 또한 buildscript를 통해 라이브러리를 classpath에 추가시켰기 때문입니다.


allprojects 블록 :  root 프로젝트(demo)와 하위 프로젝트(command, query, common)에 모두 적용되는 빌드 스크립트 기준을 작성합니다.


subprojects 블록 : 하위 프로젝트(command, query, common)에만 적용되는 빌드 스크립트 기준을 작성합니다.

  • sourceCompatibility : java 버전을 명시합니다.
  • repositories : 저장소 설정을 담당합니다. 
  • initSourceFolders task : sub module별로 기초 디렉터리가 존재하지 않으면, 자동 생성해주도록 설정합니다.


projects 블록 : Command, Query App은 빌드시에 공통 모듈(Common)이 포함되어야 함으로 빌드시에 추가하도록 설정합니다.

(※ : 가 들어간 이유는 Root 프로젝트 기준으로 각 모듈은 한단계 아래 계층에 존재하기 때문에 이를 구별하기 위함입니다.)


3. intellij 우측 gradle 탭을 엽니다. 이후 root 프로젝트 > Tasks > build > build를 더블클릭하여 build를 시도합니다. build 수행하면 root 프로젝트에 src 폴더를 지웠기 때문에 build 실패가 발생하지만, 좌측탭에 command, common, query 폴더가 생긴 것을 확인할 수 있습니다.


4. sub module 폴더 내에 build.gradle 파일을 생성합니다.


5. Command, Query App에서는 Spring Web MVC를 사용하기 때문에 build.gradle에 의존성을 추가합니다.


6. Command 모듈에서 패키지 생성을 위해 src > main > java 디렉토리 선택 후 [Alt + Insert] 키를 누릅니다. 이후 package 탭을 선택합니다.


7. 임의의 package 명을 입력한 후 OK 버튼을 누릅니다.


8. 생성된 package 하위에 App 실행을 위한 main 클래스를 작성합니다.


9. App을 구동하여 정상 작동하는지 확인합니다.


10. 5~9번 작업을 query 모듈에도 반복합니다.


위와 같이 정상적으로 수행된다면 Multi Project 기초 구성은 끝났습니다.


4. 마치며

이번 포스팅에서는 각 모듈별 기초적인 의존성 추가 및 모듈 구성을 했습니다. 다음 포스팅에서는 데모 프로젝트 진행을 위해서 각 모듈별 필요한 의존성 추가 및 코드 구현을 본격적으로 하겠습니다.


1. 개요


지금부터 EventSourcing과 CQRS가 적용된 프로젝트를 구현하면서 AxonFramework 사용법을 배워봅니다.

이에 앞서 앞으로 진행할 프로젝트에 대한 설계를 통해 구조를 잡아보겠습니다.


프로그램 요구사항 


  • 계정 생성시 소유주, 전화번호, 주소를 입력한다.
  • 계정 생성이 완료되면, 계정 ID가 발급된다.
  • 계좌 생성시, 계정 ID를 입력한다.
  • 계좌 생성이 완료되면 고유한 계좌 번호를 반환한다.
  • 계좌번호를 통해서 입금 가능하다.
  • 계좌번호를 통해서 출금 가능하다.
  • 인출과정에서 잔액이 부족한경우 "잔액이 부족합니다." 메시지를 출력한다.
  • 소유자가 보유한 전체 계좌 개수 및 잔액 조회가 가능하다.

2. 프로그램 설계


앞으로 구현할 프로그램은 간단한 은행 입출금 관련 데모입니다. 짧은 요구사항이지만 도메인이 복잡해진다면 계좌 관리(Account)거래(Transacation)는 별도 Bounded Context로 분리할 수 있습니다. 하지만 데모 프로젝트에서는 편의상 두 도메인을 하나의 Bounded Context에 구현하겠습니다.


CQRS 


AxonFramework는 기본적으로 CQRS 아키텍처를 따르므로, 데모도 마찬가지로 해당 구조를 기반으로 설계했습니다. 즉 Command 와 Query App을 분리하고 각 App별로 DB를 사용하도록 구성했습니다.


편의상 두 App의 DB는 Postgresql로 통일하였으며, 각기 다른 스키마 사용을 통해 두 DB를 논리적으로 분리했습니다. Command DB는 AxonFramework에서 내부적으로 사용하는 saga, token, association_value 데이터를 관리합니다.

(※ Read 모델은 MongoDB로 구성하는 등의 Polyglot 구조 변경 가능합니다.)


또한 이미 앞선 장을 통해서 EventStore 및 메시지 라우팅을 담당하는 AxonServer를 사용하고 있으므로 이는 고려하지 않겠습니다.


다이어그램


데모에서 사용되는 구조는 다음과 같습니다. Command 모델은 소유주(holder)와 계좌(accont)로 나뉘어 Aggregation을 만들었습니다. 반면 Query 모델은 소유주의 전체 계좌의 총액을 보여주도록 Materialized View 를 ERD로 표현했습니다.


Command 


Aggregate


Query


Materialized View
summary


Command, Event 도출


이벤트 주도 개발 방법에서 가장 중요한 것은 이벤트 설계입니다. 이때 Event Storming 전략을 사용하여 Command, Event 등을 도출합니다.

(※ Event Storming 단계에서 포스트잇을 사용하는데, 비슷한 느낌을 주기 위해서 이미지를 사용했습니다.)


계정 생성

계좌 생성

입금

출금


서비스 EndPoint 설계


다음은 Controller 매핑되는 API EndPoint를 설계하겠습니다.

참고로 Command App은 8080 , Query App은 9090 Port를 사용했습니다.


계정 생성

POST : localhost:8080/holder
{  
    "holderName" : 소유주,
    "tel" : 전화번호,
    "address" : 주소
}

계좌 생성

POST : localhost:8080/account
{
    "holderID" : 계정 ID
}


입금

POST : localhost:8080/deposit
{
    "accountID" : 계좌번호,
    "holderID" : 계정 ID,
    "amount":입금액
}


출금

POST : localhost:8080/withdrawal
{
    "accountID" : 계좌번호,
    "holderID" : 계정 ID,
    "amount":출금액
}


계좌 정보 조회

GET : localhost:9090/account/info/{accountID}

3. 테스트 시나리오


마지막으로 실제 App 수행시 진행할 테스트 시나리오를 다음과 같이 작성했습니다.


  1. 고객 Kevin이 계정을 생성한다. (소유주 : Kevin, 전화번호 : 02-1234-5678, 주소 : 서울시)
  2. Kevin이 계좌를 개설한다.(소유주 ID : 1번 과정을 통해 생성된 UUID)
  3. Kevin계좌에 1000원을 입금한다(계좌 ID : 2번 과정을 통해 생성된 UUID, 입금액 : 1000)
  4. Kevin 계좌에서 100원을 인출한다(계좌 ID : 2번 과정을 통해 생성된 UUID, 출금액 : 100)
  5. Kevin 계좌에서 200원을 인출한다(계좌 ID : 2번 과정을 통해 생성된 UUID, 출금액 : 200)
  6. Kevin 전체 계좌 잔액 내역을 조회한다.
  7. Kevin 계좌에서 800원을 인출한다(계좌 ID : 2번 과정을 통해 생성된 UUID, 출금액 : 800)
  8. "잔액이 부족합니다." 메시지를 확인한다.

4. 마치며


구현할 프로젝트에 대한 기본적인 설계를 마칩니다. 다음 포스팅에서는 프로젝트 생성을 위해 Gradle을 이용한 Multi Project 생성 방법에 대해서 다루겠습니다.

1. 서론


Axon Server는 이벤트 저장소인 EventStore, 어플리케이션 간의 Message 전달하는 역할을 수행합니다.

하지만 AxonFramework를 도입하는데 있어 필수 사항은 아닙니다. AxonIQ에서는 EventStore와 Message Broker를 다른 제품군으로 대체할 수 있도록 지원합니다.


따라서 비즈니스 환경에 맞게 취사선택이 가능합니다.


AxonIQ에서 제공하는 외부 모듈은 다음과 같으며, 예제 혹은 소스 파일은 깃헙에서 확인하실 수 있습니다.


  • Kafka
  • JGroups
  • Spring Cloud
  • Kotlin
  • Mongo
  • AMQP
  • Tracing

저는 AxonFramework + AxonServer를 사용하여 포스팅을 진행하겠습니다.


2. AxonServer 설치


1. AxonIQ 홈페이지에 접속후에 Download 버튼을 클릭합니다.


2. 메일 주소 입력 후에 Download 버튼을 클릭합니다.


3. AxonQuickStart.zip 파일을 원하는 위치로 다운로드 후 압축을 풀어줍니다.


4. 압축푼 경로 기준으로 axonquickstart-4.2.2\AxonServer 위치로 이동합니다.


5. 아래 표시된 파일이 우리가 구동해야할 AxonServer 입니다. 생각보다 너무 간단하죠?


6. jar 파일 실행을 위해 도스창을 열도록 하겠습니다. [WINDOW + R] 키를 동시에 누른 후 cmd를 입력합니다. 그리고 확인 버튼을 눌러줍니다.


7. AxonServer 파일 위치로 이동하기 위해서 탐색기 상단의 주소를 복사합니다.


8. 도스창 cd 명령어를 이용하여 Axonserver 위치로 이동합니다.


9. jar 명령어를 사용하여 Axonserver를 구동합니다.


10. 아래와 같은 화면이 나온다면 정상적으로 실행된 것입니다.


참고사항(기본 설정 시, Default 포트 매핑)

 - 메시지 라우팅 : 8124

 - Dashboard : 8024


11. 정상 수행 확인을 위해 브라우저를 열고, 대시보드 페이지로 접속합니다.


3. 마치며


AxonFramework를 사용하기 위한 기초 단계 작업을 마쳤습니다.

다음 포스팅부터는 에제 프로젝트 실습을 통해 하나하나씩 개념을 익혀보도록 하겠습니다.


Tip)

AxonServer 위치에 axonserver.properties 파일 생성하게 되면 default로 제공되는 속성을 변경할 수 있습니다.

변경 가능한 속성은 Axon 공식 문서를 참고하시기 바랍니다.


참고로 저는 Event 테스트 후 데이터 삭제를 위해 axoniq.axonserver.devmode.enabled=true 설정하여 사용하고 있습니다.


개발 모드 적용 후 AxonServer를 기동하게되면, 위 화면과 같이 Development Mode가 활성화되며 Reset Event Store 버튼이 생긴 것을 확인할 수 있습니다.

1. 개요


앞으로 진행될 포스팅은 MSA에 관심 많은 분을 대상으로 DDD, CQRS 및 Event Sourcing 내용을 알고 있다고 가정하고, Spring 환경에서 AxonFramework를 활용해 개념 구현하는 방법에 대해 소개하고자 합니다. 


만약 CQRS와 Event Sourcing에 대해서 궁금하다면 아래 블로그 및 Spring Camp 2017 영상을 참고하시면 좋을것 같습니다.


CQRS 소개

CQRS 


이벤트 소싱 소개

- 이벤트 소싱(이론부) 영상

- 이벤트 소싱(구현부) 영상

- 이벤트 소싱 소개 블로그


EventSourcing, CQRS 관련하여 Java 진영에서 사용되는 프레임워크를 검색한 결과, 크게 AxonFramework랑 Eventuate 두 가지를 주로 사용되고 있었습니다.


저는 그 중 대중적이고 Spring Boot에 친화적인(?) AxonFramework를 선정하여 공부한 흔적을 남겨보고자 합니다. 포스팅 중간 AxonIQ 기술 블로그 및 웨비나 자료 첨부는 원저작자에게 사용허가를 받았음을 알립니다.


2. Axon Framework 소개


출처 : https://youtu.be/GEN0jRkyEtU


Axon Framework는 2010년 최초 프로젝트가 시작되었으며, 2015년 이전까지는 관심도가 미비하였지만 이후 MSA가 열풍을 불게되면서 다운로드 수가 폭발적으로 증가하였습니다. 지금은 대략 월간 10만건 정도의 다운로드 수를 기록하고 있으며, 앞으로 점점 더 증가할 것으로 기대하고 있습니다.


해당 제품은 오픈소스로써 네덜란드에서 설립된 AxonIQ 회사에서 개발을 주도하고 있습니다. 주력 제품으로는 DDD, EventSourcing, CQRS를 구현할 수 있는 AxonFramework와 EventStore, 마이크로 서비스간 메시지 Routing을 담당하는 Axon Server 입니다.

(※ Axon Server는 Enterprise 버전이 별도로 있으며, 구매시 Cluster 구성 및 Security 설정 등이 가능합니다.)


출처 : https://axoniq.io/


프레임워크의 아키텍처는 대략 아래와 같습니다.


출처 : https://docs.axoniq.io/reference-guide/architecture-overview


기본적으로 CQRS 구조를 따르고 있습니다. 즉 외부로부터 명령(Command)이 들어오면, 해당 명령에 대한 이력을 EventStore에 저장하고 동시에 Event를 발생시킵니다.


발생된 이벤트는 EventHandler를 통하여 Read Model에 반영되고, 사용자 입장에서는 Read Model에 대한 Query를 통하여 데이터를 읽는 구조입니다.

(※ 사용자 편의에 따라 Command와 Query Model은 동일 DBMS에 설정할 수도 분리할 수도 있으며, 종류 또한 다르게 구성할 수 있습니다.)


앞으로 IntelliJ IDE를 사용해서 Spring Boot 기반 AxonFramework을 활용하여 EventSourcing, CQRS, Saga 등을 구현하는 방법에 대해서 포스팅을 진행하려고 합니다.


AxonFramework가 DDD(Domain Driven Development), EDD(Event Driven Development)에 기반하고 있으나 샘플코드를 간략하게 작성하기 위해서 DDD스러움은 배제하고(개발 실력, 도메인 지식 부족으로 인한 getter 남용 등....) Axon 제공 기능에 집중하여 소개하도록 하겠습니다.


향후 다룰 주제

  • AxonServer 기본 사용법
  • Gradle을 활용한 Multi Project 설정
  • AxonFramework 프로젝트 기본 설정
  • AxonFramework 데모 프로젝트 구현(계좌 입출금)
  • 기본 아키텍처 소개(Command, Query, Event)
  • Replay
  • Event Tracking Architecture
  • EventStore
  • Version
  • Saga

+ Recent posts