서론


이번 포스팅에서 왜 Hateoas를 적용해야하는지에 대해서 다루지 않습니다. 이와 관련된 자세한 이응준님의 그런 REST API로 괜찮은가 발표 세션을 꼭 보시기를 권장드리며, 해당 내용을 알고 계시다는 전제하에 포스팅을 작성하겠습니다.


이번에 다룰 내용은 Rest API 작성을 위해 필요한 Hateoas를 기존에 생성한 Page 객체에 적용하는 방법과 PagedResourceAssembler를 Customizing하는 방법을 알아보겠습니다.


1. 기존 Page 객체 이슈


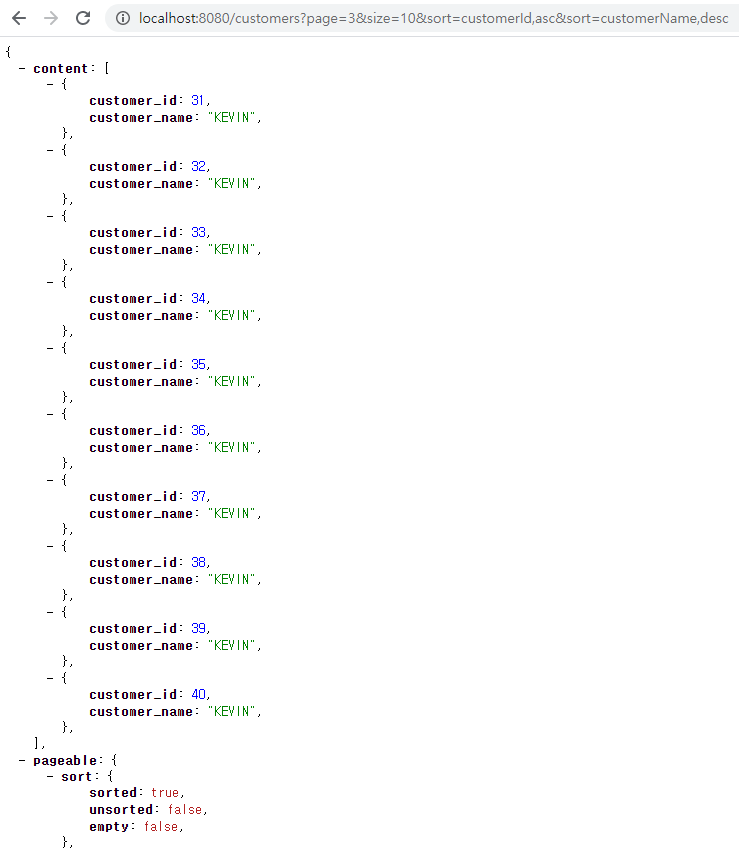
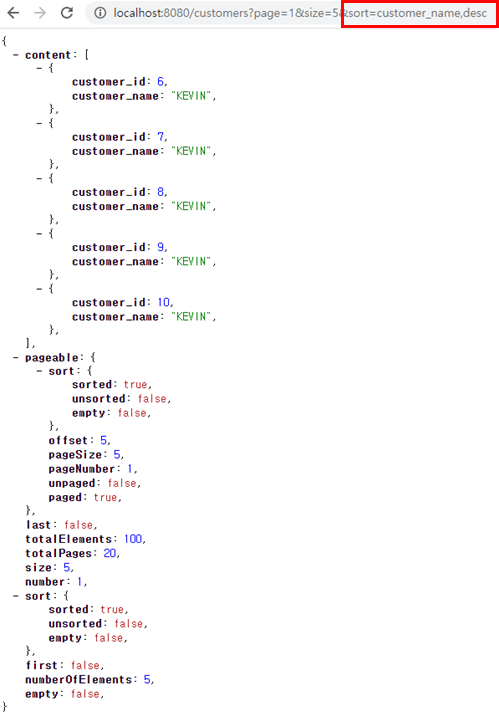
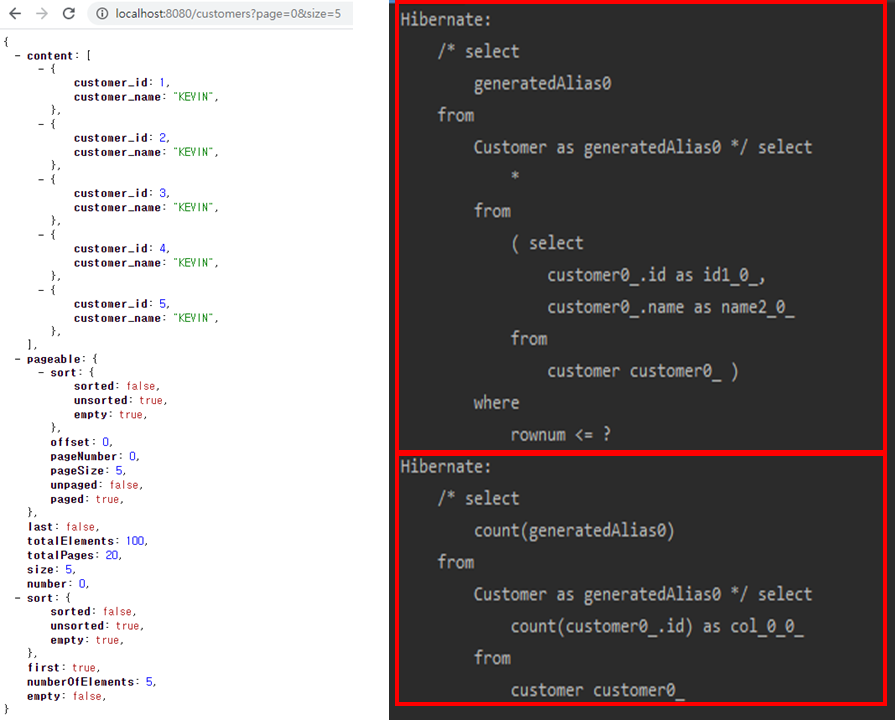
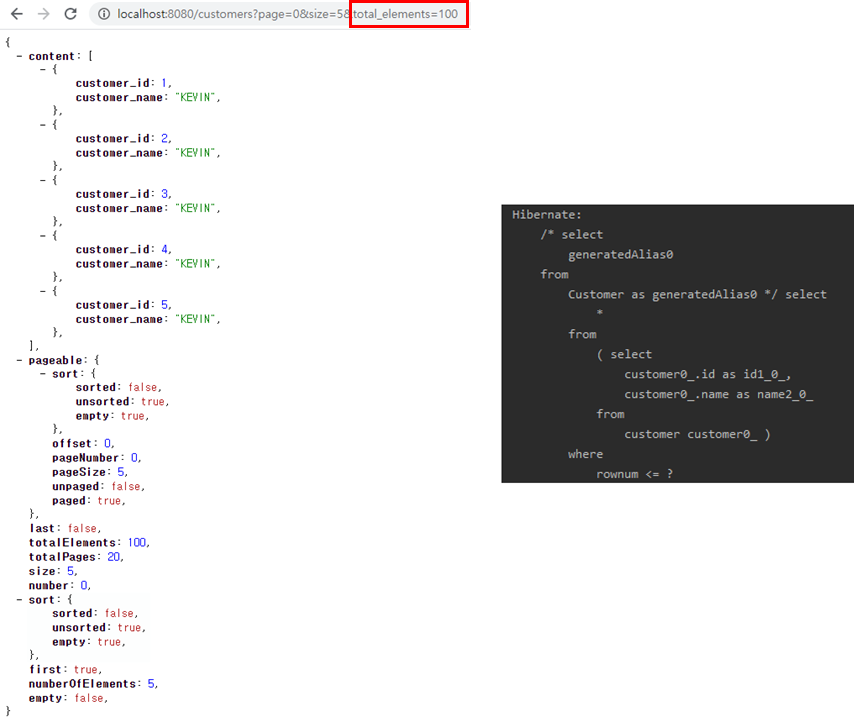
위 그림은 이전 포스팅에서 예제 프로그램 API 호출 결과입니다. 해당 API는 원하는 요청에 대한 결과를 확인할 수 있습니다. 하지만 데이터를 통해서 어떠한 행위들이 가능한지 혹은 메시지가 정확히 어떠한 의미를 포함하고 있는지는 API 결과를 통해 알 수 없습니다.


다시말해 해당 API 결과를 보고서는 customer_id를 통해 어떠한 API를 추가적으로 호출할 수 있는지 어떤 상태 변화가 가능한지 알 수 없습니다.


그렇다면 Hateoas가 적용된 API의 모습은 어떨까요?


[
  {
    "id": 1,
    "node_id": "MDU6SXNzdWUx",
    "url": "https://api.github.com/repos/octocat/Hello-World/issues/1347",
    "repository_url": "https://api.github.com/repos/octocat/Hello-World",
    "labels_url": "https://api.github.com/repos/octocat/Hello-World/issues/1347/labels{/name}",
    "comments_url": "https://api.github.com/repos/octocat/Hello-World/issues/1347/comments",
    "events_url": "https://api.github.com/repos/octocat/Hello-World/issues/1347/events",
    "html_url": "https://github.com/octocat/Hello-World/issues/1347",
    "number": 1347,
    "state": "open",
    "title": "Found a bug",
    "body": "I'm having a problem with this.",
    "user": {
      "login": "octocat",
      "id": 1,
      "node_id": "MDQ6VXNlcjE=",
      "avatar_url": "https://github.com/images/error/octocat_happy.gif",
      "gravatar_id": "",
      "url": "https://api.github.com/users/octocat",
      "html_url": "https://github.com/octocat",
      "followers_url": "https://api.github.com/users/octocat/followers",
      "following_url": "https://api.github.com/users/octocat/following{/other_user}",
      "gists_url": "https://api.github.com/users/octocat/gists{/gist_id}",
      "starred_url": "https://api.github.com/users/octocat/starred{/owner}{/repo}",
      "subscriptions_url": "https://api.github.com/users/octocat/subscriptions",
      "organizations_url": "https://api.github.com/users/octocat/orgs",
      "repos_url": "https://api.github.com/users/octocat/repos",
      "events_url": "https://api.github.com/users/octocat/events{/privacy}",
      "received_events_url": "https://api.github.com/users/octocat/received_events",
      "type": "User",
      "site_admin": false
    },
    "labels": [
      {
        "id": 208045946,
        "node_id": "MDU6TGFiZWwyMDgwNDU5NDY=",
        "url": "https://api.github.com/repos/octocat/Hello-World/labels/bug",
        "name": "bug",
        "description": "Something isn't working",
        "color": "f29513",
        "default": true
      }
    ],
    "assignee": {
      "login": "octocat",
      "id": 1,
      "node_id": "MDQ6VXNlcjE=",
      "avatar_url": "https://github.com/images/error/octocat_happy.gif",
      "gravatar_id": "",
      "url": "https://api.github.com/users/octocat",
      "html_url": "https://github.com/octocat",
      "followers_url": "https://api.github.com/users/octocat/followers",
      "following_url": "https://api.github.com/users/octocat/following{/other_user}",
      "gists_url": "https://api.github.com/users/octocat/gists{/gist_id}",
      "starred_url": "https://api.github.com/users/octocat/starred{/owner}{/repo}",
      "subscriptions_url": "https://api.github.com/users/octocat/subscriptions",
      "organizations_url": "https://api.github.com/users/octocat/orgs",
      "repos_url": "https://api.github.com/users/octocat/repos",
      "events_url": "https://api.github.com/users/octocat/events{/privacy}",
      "received_events_url": "https://api.github.com/users/octocat/received_events",
      "type": "User",
      "site_admin": false
    },
    "assignees": [
      {
        "login": "octocat",
        "id": 1,
        "node_id": "MDQ6VXNlcjE=",
        "avatar_url": "https://github.com/images/error/octocat_happy.gif",
        "gravatar_id": "",
        "url": "https://api.github.com/users/octocat",
        "html_url": "https://github.com/octocat",
        "followers_url": "https://api.github.com/users/octocat/followers",
        "following_url": "https://api.github.com/users/octocat/following{/other_user}",
        "gists_url": "https://api.github.com/users/octocat/gists{/gist_id}",
        "starred_url": "https://api.github.com/users/octocat/starred{/owner}{/repo}",
        "subscriptions_url": "https://api.github.com/users/octocat/subscriptions",
        "organizations_url": "https://api.github.com/users/octocat/orgs",
        "repos_url": "https://api.github.com/users/octocat/repos",
        "events_url": "https://api.github.com/users/octocat/events{/privacy}",
        "received_events_url": "https://api.github.com/users/octocat/received_events",
        "type": "User",
        "site_admin": false
      }
    ],
    "milestone": {
      "url": "https://api.github.com/repos/octocat/Hello-World/milestones/1",
      "html_url": "https://github.com/octocat/Hello-World/milestones/v1.0",
      "labels_url": "https://api.github.com/repos/octocat/Hello-World/milestones/1/labels",
      "id": 1002604,
      "node_id": "MDk6TWlsZXN0b25lMTAwMjYwNA==",
      "number": 1,
      "state": "open",
      "title": "v1.0",
      "description": "Tracking milestone for version 1.0",
      "creator": {
        "login": "octocat",
        "id": 1,
        "node_id": "MDQ6VXNlcjE=",
        "avatar_url": "https://github.com/images/error/octocat_happy.gif",
        "gravatar_id": "",
        "url": "https://api.github.com/users/octocat",
        "html_url": "https://github.com/octocat",
        "followers_url": "https://api.github.com/users/octocat/followers",
        "following_url": "https://api.github.com/users/octocat/following{/other_user}",
        "gists_url": "https://api.github.com/users/octocat/gists{/gist_id}",
        "starred_url": "https://api.github.com/users/octocat/starred{/owner}{/repo}",
        "subscriptions_url": "https://api.github.com/users/octocat/subscriptions",
        "organizations_url": "https://api.github.com/users/octocat/orgs",
        "repos_url": "https://api.github.com/users/octocat/repos",
        "events_url": "https://api.github.com/users/octocat/events{/privacy}",
        "received_events_url": "https://api.github.com/users/octocat/received_events",
        "type": "User",
        "site_admin": false
      },
      "open_issues": 4,
      "closed_issues": 8,
      "created_at": "2011-04-10T20:09:31Z",
      "updated_at": "2014-03-03T18:58:10Z",
      "closed_at": "2013-02-12T13:22:01Z",
      "due_on": "2012-10-09T23:39:01Z"
    },
    "locked": true,
    "active_lock_reason": "too heated",
    "comments": 0,
    "pull_request": {
      "url": "https://api.github.com/repos/octocat/Hello-World/pulls/1347",
      "html_url": "https://github.com/octocat/Hello-World/pull/1347",
      "diff_url": "https://github.com/octocat/Hello-World/pull/1347.diff",
      "patch_url": "https://github.com/octocat/Hello-World/pull/1347.patch"
    },
    "closed_at": null,
    "created_at": "2011-04-22T13:33:48Z",
    "updated_at": "2011-04-22T13:33:48Z",
    "repository": {
      "id": 1296269,
      "node_id": "MDEwOlJlcG9zaXRvcnkxMjk2MjY5",
      "name": "Hello-World",
      "full_name": "octocat/Hello-World",
      "owner": {
        "login": "octocat",
        "id": 1,
        "node_id": "MDQ6VXNlcjE=",
        "avatar_url": "https://github.com/images/error/octocat_happy.gif",
        "gravatar_id": "",
        "url": "https://api.github.com/users/octocat",
        "html_url": "https://github.com/octocat",
        "followers_url": "https://api.github.com/users/octocat/followers",
        "following_url": "https://api.github.com/users/octocat/following{/other_user}",
        "gists_url": "https://api.github.com/users/octocat/gists{/gist_id}",
        "starred_url": "https://api.github.com/users/octocat/starred{/owner}{/repo}",
        "subscriptions_url": "https://api.github.com/users/octocat/subscriptions",
        "organizations_url": "https://api.github.com/users/octocat/orgs",
        "repos_url": "https://api.github.com/users/octocat/repos",
        "events_url": "https://api.github.com/users/octocat/events{/privacy}",
        "received_events_url": "https://api.github.com/users/octocat/received_events",
        "type": "User",
        "site_admin": false
      },
      "private": false,
      "html_url": "https://github.com/octocat/Hello-World",
      "description": "This your first repo!",
      "fork": false,
      "url": "https://api.github.com/repos/octocat/Hello-World",
      "archive_url": "http://api.github.com/repos/octocat/Hello-World/{archive_format}{/ref}",
      "assignees_url": "http://api.github.com/repos/octocat/Hello-World/assignees{/user}",
      "blobs_url": "http://api.github.com/repos/octocat/Hello-World/git/blobs{/sha}",
      "branches_url": "http://api.github.com/repos/octocat/Hello-World/branches{/branch}",
      "collaborators_url": "http://api.github.com/repos/octocat/Hello-World/collaborators{/collaborator}",
      "comments_url": "http://api.github.com/repos/octocat/Hello-World/comments{/number}",
      "commits_url": "http://api.github.com/repos/octocat/Hello-World/commits{/sha}",
      "compare_url": "http://api.github.com/repos/octocat/Hello-World/compare/{base}...{head}",
      "contents_url": "http://api.github.com/repos/octocat/Hello-World/contents/{+path}",
      "contributors_url": "http://api.github.com/repos/octocat/Hello-World/contributors",
      "deployments_url": "http://api.github.com/repos/octocat/Hello-World/deployments",
      "downloads_url": "http://api.github.com/repos/octocat/Hello-World/downloads",
      "events_url": "http://api.github.com/repos/octocat/Hello-World/events",
      "forks_url": "http://api.github.com/repos/octocat/Hello-World/forks",
      "git_commits_url": "http://api.github.com/repos/octocat/Hello-World/git/commits{/sha}",
      "git_refs_url": "http://api.github.com/repos/octocat/Hello-World/git/refs{/sha}",
      "git_tags_url": "http://api.github.com/repos/octocat/Hello-World/git/tags{/sha}",
      "git_url": "git:github.com/octocat/Hello-World.git",
      "issue_comment_url": "http://api.github.com/repos/octocat/Hello-World/issues/comments{/number}",
      "issue_events_url": "http://api.github.com/repos/octocat/Hello-World/issues/events{/number}",
      "issues_url": "http://api.github.com/repos/octocat/Hello-World/issues{/number}",
      "keys_url": "http://api.github.com/repos/octocat/Hello-World/keys{/key_id}",
      "labels_url": "http://api.github.com/repos/octocat/Hello-World/labels{/name}",
      "languages_url": "http://api.github.com/repos/octocat/Hello-World/languages",
      "merges_url": "http://api.github.com/repos/octocat/Hello-World/merges",
      "milestones_url": "http://api.github.com/repos/octocat/Hello-World/milestones{/number}",
      "notifications_url": "http://api.github.com/repos/octocat/Hello-World/notifications{?since,all,participating}",
      "pulls_url": "http://api.github.com/repos/octocat/Hello-World/pulls{/number}",
      "releases_url": "http://api.github.com/repos/octocat/Hello-World/releases{/id}",
      "ssh_url": "git@github.com:octocat/Hello-World.git",
      "stargazers_url": "http://api.github.com/repos/octocat/Hello-World/stargazers",
      "statuses_url": "http://api.github.com/repos/octocat/Hello-World/statuses/{sha}",
      "subscribers_url": "http://api.github.com/repos/octocat/Hello-World/subscribers",
      "subscription_url": "http://api.github.com/repos/octocat/Hello-World/subscription",
      "tags_url": "http://api.github.com/repos/octocat/Hello-World/tags",
      "teams_url": "http://api.github.com/repos/octocat/Hello-World/teams",
      "trees_url": "http://api.github.com/repos/octocat/Hello-World/git/trees{/sha}",
      "clone_url": "https://github.com/octocat/Hello-World.git",
      "mirror_url": "git:git.example.com/octocat/Hello-World",
      "hooks_url": "http://api.github.com/repos/octocat/Hello-World/hooks",
      "svn_url": "https://svn.github.com/octocat/Hello-World",
      "homepage": "https://github.com",
      "language": null,
      "forks_count": 9,
      "stargazers_count": 80,
      "watchers_count": 80,
      "size": 108,
      "default_branch": "master",
      "open_issues_count": 0,
      "is_template": true,
      "topics": [
        "octocat",
        "atom",
        "electron",
        "api"
      ],
      "has_issues": true,
      "has_projects": true,
      "has_wiki": true,
      "has_pages": false,
      "has_downloads": true,
      "archived": false,
      "disabled": false,
      "visibility": "public",
      "pushed_at": "2011-01-26T19:06:43Z",
      "created_at": "2011-01-26T19:01:12Z",
      "updated_at": "2011-01-26T19:14:43Z",
      "permissions": {
        "admin": false,
        "push": false,
        "pull": true
      },
      "allow_rebase_merge": true,
      "template_repository": null,
      "temp_clone_token": "ABTLWHOULUVAXGTRYU7OC2876QJ2O",
      "allow_squash_merge": true,
      "delete_branch_on_merge": true,
      "allow_merge_commit": true,
      "subscribers_count": 42,
      "network_count": 0
    }
  }
]


위 API는 Github의 Issue API 결과입니다. 주요 데이터에 대하여 자신의 URL과 다음 상태 변이에 대한 URL 링크를 같이 제공하여 Hateoas를 준수하고 있습니다. 따라서 Client는 서버로부터 받은 링크를 통해 상태를 변화할 뿐 Client 소스에 하드코딩되어 있을 필요가 없습니다.


Spring에서는 Hateoas 기능을 손쉽게 적용가능하기 위한 Spring Hateoas 프로젝트가 있습니다. 해당 프로젝트를 적용하여, 기존 프로그램 예제를 확장해보도록 하겠습니다.


2. Hateoas 적용


build.gradle


(...중략...)
dependencies {
    implementation 'org.springframework.boot:spring-boot-starter-hateoas'
    (...중략...)
}


위와같이 dependency에 hateoas를 추가합니다.


2-1. Controller


@RestController
@RequiredArgsConstructor
public class CustomerController {
    private final CustomerService service;
    private final PagedResourcesAssembler<CustomerDTO> assembler;

    @GetMapping("/customers")
    public ResponseEntity<PagedModel<EntityModel<CustomerDTO>>> getCustomer(PageableDTO pageableDTO){
        Page<CustomerDTO> customers = service.getCustomer(pageableDTO);
        PagedModel<EntityModel<CustomerDTO>> entityModels = assembler.toModel(customers);
        return ResponseEntity.ok(entityModels);
    }
}


Controller에서 Page 모델을 기본적으로 제공되는 PagedResourcesAssembler를 통해 PagedModel 객체로 변환하는 코드를 추가하였습니다.
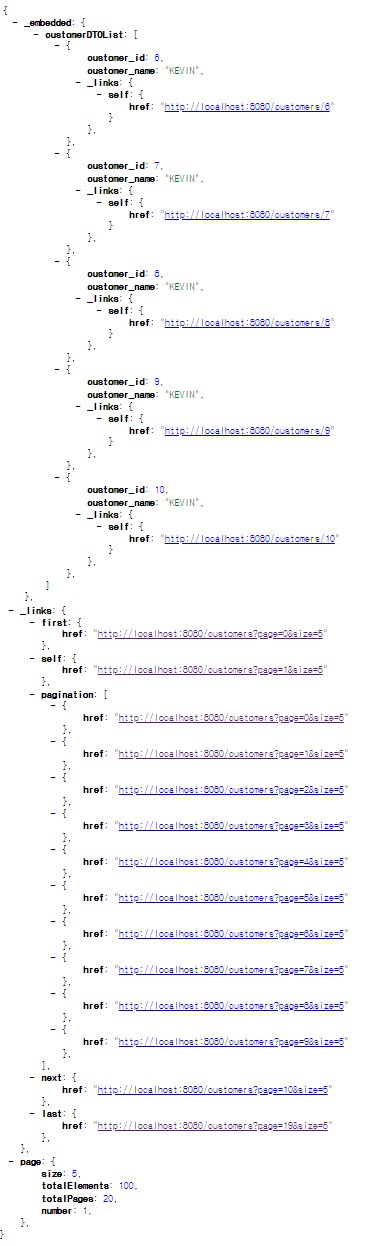


2-2. 실행 결과


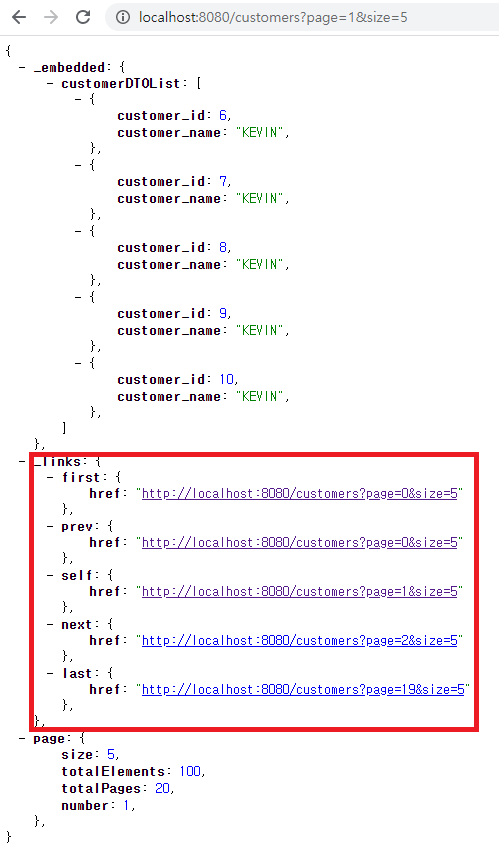
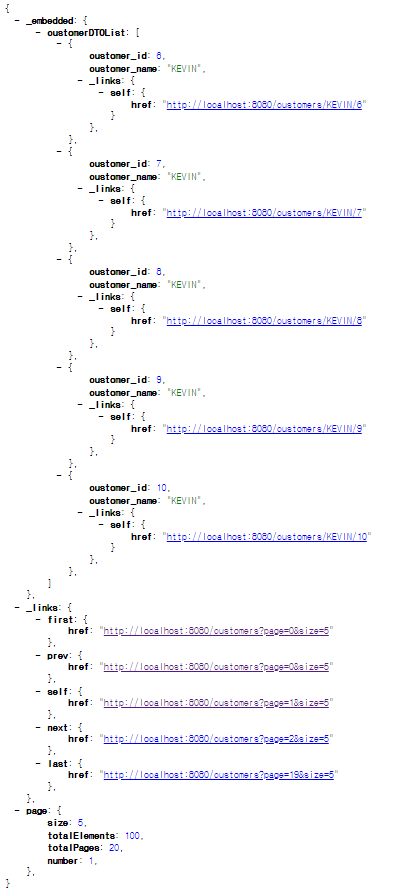
PagedResourcedAssembler 적용 후 결과를 보면, self 링크를 포함하여 다음 상태 전이를 위한 API가 기본적으로 제공되는 것을 확인할 수 있습니다.


하지만 위 API에서는 각각의 customerDTO 각 원소에 대한 상태 변이 URL은 제공되지 않았습니다. 이를 추가해보겠습니다.


3. PagedModelUtil


public class LinkResource<T> extends EntityModel<T> {
    public static <T> EntityModel<T> of(WebMvcLinkBuilder builder, T model, Function<T,?> resourceFunc){
        return EntityModel.of(model, getSelfLink(builder, model, resourceFunc));
    }

    private static<T> Link getSelfLink(WebMvcLinkBuilder builder, T data, Function<T, ?> resourceFunc){
        WebMvcLinkBuilder slash = builder.slash(resourceFunc.apply(data));
        return slash.withSelfRel();
    }
}


EntityModel을 생성할 때, Link를 주입하도록 LinkResource 클래스를 생성합니다.


public class PagedModelUtil {
    public static <T> PagedModel<EntityModel<T>> getEntityModels(PagedResourcesAssembler<T> assembler,
                                                                 Page<T> page,
                                                                 Class<?> clazz,
                                                                 Function<T, ?> selfLinkFunc ){
        WebMvcLinkBuilder webMvcLinkBuilder = linkTo(clazz);
        return assembler.toModel(page, model -> LinkResource.of(webMvcLinkBuilder, model, selfLinkFunc::apply));
    }

    public static <T> PagedModel<EntityModel<T>> getEntityModels(PagedResourcesAssembler<T> assembler,
                                                                 Page<T> page,
                                                                 WebMvcLinkBuilder builder,
                                                                 Function<T, ?> selfLinkFunc ){
        return assembler.toModel(page, model -> LinkResource.of(builder, model, selfLinkFunc::apply));
    }
}


LinkResource를 기반으로 전체 Page 모델을 순회하면서 Link를 주입하고, 이를 PagedModel 객체로 컨버팅하는 Util 클래스를 생성합니다.


@RestController
@RequiredArgsConstructor
public class CustomerController {
    private final CustomerService service;
    private final PagedResourcesAssembler<CustomerDTO> assembler;

    @GetMapping("/customers")
    public ResponseEntity<PagedModel<EntityModel<CustomerDTO>>> getCustomer(PageableDTO pageableDTO){
        Page<CustomerDTO> customers = service.getCustomer(pageableDTO);

        PagedModel<EntityModel<CustomerDTO>> entityModels = PagedModelUtil.getEntityModels(assembler, customers,
                linkTo(methodOn(this.getClass()).getCustomer(null)),
                CustomerDTO::getCustomerId);
        return ResponseEntity.ok(entityModels);
    }
}


Controller 클래스에서는 해당 Util 클래스 함수 호출을 통해 PagedModel로 변경하도록 코드를 변경헀습니다.

여기서 두번째 및 세번째 인자가 각 DTO별로 호출할 메소드 및 ID 값에 해당합니다.


위 예제에서는 getCustomer 메소드를 두번째 인자로 전달했기 때문에 @GetMapping 어노테이션으로 전달한 customers 가 URL에 추가가 될 것입니다. 또한, customers URL 뒤에올 ID 값으로 customerDTO에 속한 id 값을 넘겨줌으로써 URL이 완성될 것입니다.


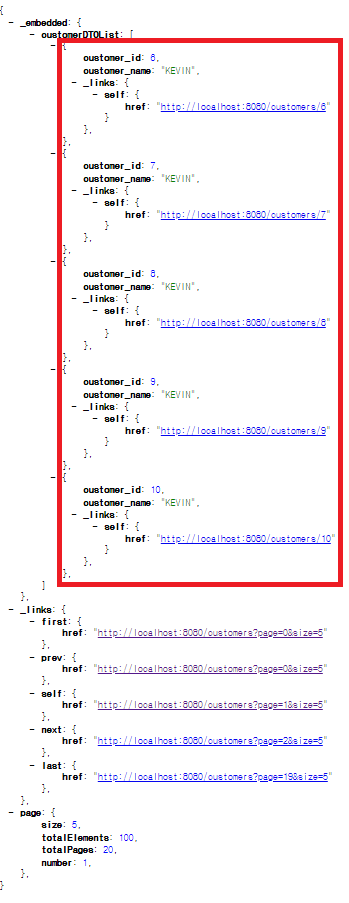
따라서, 위 코드를 통해서 각 DTO 별로 추가되는 URL은 http://localhost:8080/customers/{id}가 될 것입니다.


@RestController
@RequiredArgsConstructor
public class CustomerController {
    private final CustomerService service;
    private final PagedResourcesAssembler<CustomerDTO> assembler;

    @GetMapping("/customers")
    public ResponseEntity<PagedModel<EntityModel<CustomerDTO>>> getCustomer(PageableDTO pageableDTO){
        Page<CustomerDTO> customers = service.getCustomer(pageableDTO);

        PagedModel<EntityModel<CustomerDTO>> entityModels = PagedModelUtil.getEntityModels(assembler, customers,
                linkTo(methodOn(this.getClass()).getCustomer(null)),
                v-> v.getCustomerName() + "/" + v.getCustomerId());
        return ResponseEntity.ok(entityModels);
    }
}


만약 URL을 변경하고 싶다면, 위와같이 두번째 인자 및 세번째 Function을 새로 정의하여 변경 가능합니다.


4. PagedResourceAssembler 커스터마이징


지금까지 Hateoas 적용과 각 DTO 별로 Self 링크를 적용하는 방법에 대해서 살펴봤습니다. 기본적으로 제공되는 PagedResourceAssembler에는 첫페이지, 이전 페이지, 현재 페이지, 다음 페이지 및 마지막 페이지 정보가 담겨있습니다.


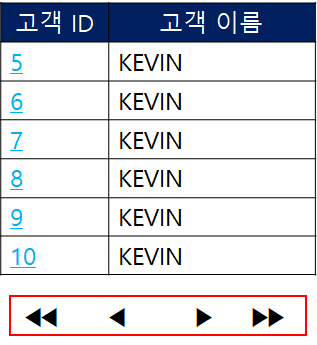
이는 해당 API가 게시판에 노출되는 API라면 위와 같은 모습에 사용될 수 있는 Link 정보를 담고 있습니다.


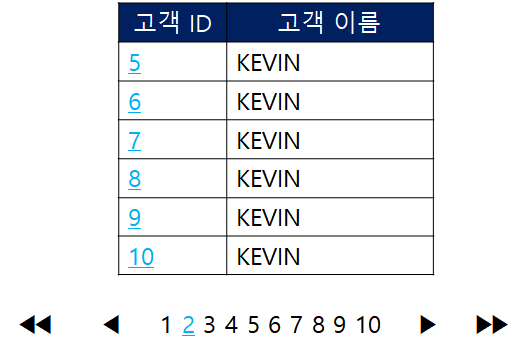
만약 사용자가 원하는 게시판의 형태가 위와 같다면, 기본 제공되는 PagedResourcesAssembler는 이를 표현할 수 없습니다. 따라서 Customizing이 필요합니다.


4-1. CustomPagedResourceAssembler


public class CustomPagedResourceAssembler<T> extends PagedResourcesAssembler<T> {
    private final HateoasPageableHandlerMethodArgumentResolver pageableResolver;
    private final Optional<UriComponents> baseUri;
    private final int PAGE_SIZE;
    private final int DEFAULT_PAGE_SIZE = 10;

    public CustomPagedResourceAssembler(HateoasPageableHandlerMethodArgumentResolver pageableResolver, @Nullable  Integer pageSize) {
        super(pageableResolver,null);
        this.pageableResolver = pageableResolver;
        baseUri = Optional.empty();
        this.PAGE_SIZE = pageSize == null ? DEFAULT_PAGE_SIZE : pageSize;
    }

    @Override
    public PagedModel<EntityModel<T>> toModel(Page<T> entity) {
        return toModel(entity, EntityModel::of);
    }

    @Override
    public <R extends RepresentationModel<?>> PagedModel<R> toModel(Page<T> page, RepresentationModelAssembler<T, R> assembler) {
        Assert.notNull(page, "Page must not be null!");
        Assert.notNull(assembler, "ResourceAssembler must not be null!");

        List<R> resources = new ArrayList<>(page.getNumberOfElements());

        for (T element : page) {
            resources.add(assembler.toModel(element));
        }

        PagedModel<R> resource = createPagedModel(resources, asPageMetadata(page), page);
        return addPaginationLinks(resource, page, Optional.empty());
    }

    private PagedModel.PageMetadata asPageMetadata(Page<?> page) {

        Assert.notNull(page, "Page must not be null!");
        int number = page.getNumber();
        return new PagedModel.PageMetadata(page.getSize(), number, page.getTotalElements(), page.getTotalPages());
    }

    private <R> PagedModel<R> addPaginationLinks(PagedModel<R> resources, Page<?> page, Optional<Link> link) {

        UriTemplate base = getUriTemplate(link);
        boolean isNavigable = page.hasPrevious() || page.hasNext();

        int currIndex = page.getNumber();
        int lastIndex = page.getTotalPages() == 0 ? 0 : page.getTotalPages() - 1;
        int baseIndex = (currIndex / this.PAGE_SIZE) * this.PAGE_SIZE;
        int prevIndex = baseIndex - this.PAGE_SIZE;
        int nextIndex = baseIndex + this.PAGE_SIZE;
        int size = page.getSize();
        Sort sort = page.getSort();

        if(lastIndex < currIndex)
            throw new IndexOutOfBoundsException("Page total size must not be less than page size");

        if (isNavigable) {
            resources.add(createLink(base, PageRequest.of(0, size, sort), IanaLinkRelations.FIRST));
        }

        Link selfLink = link.map(it -> it.withSelfRel()).orElseGet(() -> createLink(base, page.getPageable(), IanaLinkRelations.SELF));

        resources.add(selfLink);

        if (prevIndex >= 0) {
            resources.add(createLink(base,
                    PageRequest.of(prevIndex, size, sort),
                    IanaLinkRelations.PREV));
        }

        for(int i = 0; i < this.PAGE_SIZE; i++){
            if(baseIndex + i <= lastIndex){
                resources.add(createLink(base, PageRequest.of(baseIndex + i, size, sort), LinkRelation.of("pagination")));
            }
        }

        if(nextIndex < lastIndex){
            resources.add(createLink(base, PageRequest.of(nextIndex, size, sort), IanaLinkRelations.NEXT));
        }

        if (isNavigable) {
            resources.add(createLink(base, PageRequest.of(lastIndex, size, sort), IanaLinkRelations.LAST));
        }

        return resources;
    }

    private UriTemplate getUriTemplate(Optional<Link> baseLink) {
        return UriTemplate.of(baseLink.map(Link::getHref).orElseGet(this::baseUriOrCurrentRequest));
    }

    private String baseUriOrCurrentRequest() {
        return baseUri.map(Object::toString).orElseGet(CustomPagedResourceAssembler::currentRequest);
    }

    private static String currentRequest() {
        return ServletUriComponentsBuilder.fromCurrentRequest().build().toString();
    }

    private Link createLink(UriTemplate base, Pageable pageable, LinkRelation relation) {
        UriComponentsBuilder builder = fromUri(base.expand());
        pageableResolver.enhance(builder, getMethodParameter(), pageable);
        return Link.of(UriTemplate.of(builder.build().toString()), relation);
    }
}


위 코드는 기존 PagedResourcesAssembler를 상속받아 구현하였습니다. 가장 핵심이 되는 부분은 addPaginationLinks 메소드이며, 해당 메소드를 통해 페이지의 인덱스 정보를 pagination 링크아래에 배치하도록 표현했습니다.


@Configuration
public class AppConfig implements WebMvcConfigurer {

    ...(중략)...

    @Bean
    public CustomPagedResourceAssembler<?> customPagedResourceAssembler(){
        return new CustomPagedResourceAssembler<>(new HateoasPageableHandlerMethodArgumentResolver(),10);
    }
}


이후 해당 클래스를 Bean으로 등록시켜 줍니다. 생성자의 두번째 파라미터는 Page 사이즈를 결정하며, 해당 값의 변경을 통해 노출되는 URL 크기가 달라집니다.


4-2 Controller 


@RestController
@RequiredArgsConstructor
public class CustomerController {
    private final CustomerService service;
    private final CustomPagedResourceAssembler<CustomerDTO> assembler;

    @GetMapping("/customers")
    public ResponseEntity<PagedModel<EntityModel<CustomerDTO>>> getCustomer(PageableDTO pageableDTO){
        Page<CustomerDTO> customers = service.getCustomer(pageableDTO);

        PagedModel<EntityModel<CustomerDTO>> entityModels = PagedModelUtil.getEntityModels(assembler, customers,
                linkTo(methodOn(this.getClass()).getCustomer(null)),
                CustomerDTO::getCustomerId);
        return ResponseEntity.ok(entityModels);
    }
}


Bean으로 등록한 CustomPagedResourceAssembler로 주입받도록 코드를 수정했습니다.


4-3 결과


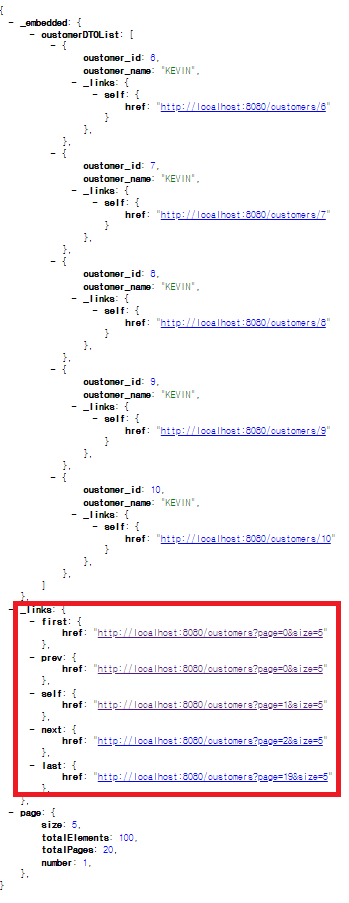
애플리케이션 구동 후 해당 URL을 호출하면, 정상적으로 페이지 URL이 표시되는 것을 확인할 수 있습니다.


마치며


Page 객체에 Hateoas를 적용하는 방법에 대해서 살펴봤습니다. Rest API 설계를 위해서는 Hateoas 적용뿐만 아니라 Self-descriptive-messages를 적용하기 위해 IANA 등록 혹은 Profile 링크를 추가해야합니다.


Profile 링크를 적용하기 위해서 RestDocs 혹은 Swagger 등을 활용할 수 있으니 참고 바랍니다.


'JAVA > JPA' 카테고리의 다른 글

4. JPA Cache 적용하기  (0) 2020.08.05
2. JPA Sort 조건 개선  (2) 2020.07.30
1. JPA 페이징 쿼리 개선  (0) 2020.07.29

서론


이전 포스팅에서 다룬 예제를 확장하여 진행하겠습니다. 이번 포스팅에서는 JPA Sort에 대해서 다루도록 하겠습니다.


문제상황


http://localhost:8080/customers?page=3&size=10&sort=customerId,asc


예제 프로그램 수행후 다음과 같은 URL을 호출하면 page, size, sort 파라미터가 Pageable 객체로 컨버팅 되어 정상적으로 프로그램이 페이징과 정렬이 수행되는 것을 확인할 수 있습니다.


http://localhost:8080/customers?page=3&size=10&sort=customerId,asc&sort=customerName,desc


만약 여러 Column의 정렬을 수행하고 싶다면, 위와 같이 여러개의 sort 파라미터를 추가하면 정상 수행되는 것을 확인할 수 있습니다.


하지만 위 sort 조건은 @Entity 클래스에 정의한 필드명과 정확히 동일해야합니다. 만약 예제와 같이 동일 컬럼에 대하여 리턴 값은 SnakeCase인 customer_id 일경우 Client 로직에서는 전달받은 값 이외에 @Entitiy 클래스 필드명을 관리해야합니다. 만약 Entitiy에 정의되어있지 않은 필드명을 전달하게된다면, 에러가 발생합니다.


Client 로직에서 도메인 객체 필드명에 의존하는 것은 바람직해 보이지 않습니다. 따라서 Enum과 DTO를 활용해서 Sort 조건이 도메인 객체와 직접연관되지 않도록 설정해봅시다.


Pageable 구현


기존에는 파라미터 객체를 Pageable로 Controller 파라미터로 주입받았습니다. 이때 도메인 객체 필드명을 Sort 인자에 정확히 명시해야하는 문제가 있었습니다. 따라서 방법을 바꾸어 별도 PageableDTO에 파라미터 인자를 주입받고 이를 처리하겠습니다.


1. Pair 클래스


@Getter
@Builder(access = AccessLevel.PRIVATE)
@ToString
public class Pair<T, U> {
    private T first;
    private U second;

    public static <T, U> Pair of(T first, U second) {
        return Pair.builder()
                .first(first)
                .second(second)
                .build();
    }
}


먼저 컬럼명과 정렬 상태를 담을 Pair 클래스를 생성합니다.


2. Sort 상태를 표현하는 Enum 구현


public enum SortOption {
    ASC,
    DESC
}


3. PageableDTO


@Getter
@Builder
@ToString
@NoArgsConstructor
@AllArgsConstructor
public class PageableDTO {
    private Integer page;
    private Integer size;
    private Integer totalElements;
    private List<Pair<String, SortOption>> sorts;
}


Page 관련 정보와 Sort 정보를 담을 DTO를 선언합니다.


4.  HandlerMethodArgumentResolver 클래스 구현


public class PageableArgumentResolver implements HandlerMethodArgumentResolver {
    private final String PAGE = "page";
    private final String SIZE = "size";
    private final String TOTAL_ELEMENTS = "total_elements";

    @Override
    public boolean supportsParameter(MethodParameter parameter) {
        return parameter.getParameterType().equals(PageableDTO.class);
    }

    @Override
    public Object resolveArgument(MethodParameter parameter, ModelAndViewContainer mavContainer, NativeWebRequest webRequest, WebDataBinderFactory binderFactory) throws Exception {
        List<Pair<String, SortOption>> sorts = new ArrayList<>();
        final var sortArr = webRequest.getParameterMap().get("sort");

        if(sortArr != null){
            for(var v : sortArr){
                String[] keywords = v.split(",");
                sorts.add(Pair.of(keywords[0], (keywords.length < 2 || keywords[1].equals("asc")) ? SortOption.ASC : SortOption.DESC));
            }
        }

        return PageableDTO.builder()
                .page(getValue(webRequest.getParameter(PAGE)))
                .size(getValue(webRequest.getParameter(SIZE)))
                .totalElements(getValue(webRequest.getParameter(TOTAL_ELEMENTS)))
                .sorts(sorts)
                .build();
    }

    private Integer getValue(String param) {
        return param != null ? Integer.parseInt(param) : null;
    }
}


@Configuration
public class AppConfig implements WebMvcConfigurer {

    @Override
    public void addArgumentResolvers(List<HandlerMethodArgumentResolver> resolvers) {
        resolvers.add(new PageableArgumentResolver());
    }
}


위 클래스는 Custom HandlerMethodArgumentResolver입니다. 별도로 이를 구현한 이유는 PageableDTO에 정렬 정보를 담기 위해서는 배열형태로 넘어오는 Sort 정보를 @ModelAttribute를 통해 주입받을 수 없기 때문입니다. 


따라서, 별도 HandlerMethodArgumentResolver를 구현하여 파라미터 값에서 관심있는 값들을 가져와 가공하여 DTO를 생성받아 주입할 수 있도록 구현하여 기존 resolver 목록에 추가했습니다.


만약 HandlerMethodArgumentResolver를 사용하고 싶지 않다면, MultiValueMap을 통해 주입받은 후 별도 Factory 메소드를 사용해 DTO를 코드상에서 변경시키는 것도 한 방법입니다.


5. 도메인 컬럼 매핑 Layer 구현


public class MetaModelUtil {
    public static String getColumn(Path<?> path){
        return path.getMetadata().getName();
    }
}


public enum CustomerMetaType {
    CUSTOMER_ID(getColumn(customer.customerId)),
    CUSTOMER_NAME(getColumn(customer.customerName));

    private String name;
    CustomerMetaType(String name) {
        this.name = name;
    }

    public String getName() {
        return name;
    }
}


Client에서 존재하는 SnakeCase의 컬럼명과 실제 @Entity 클래스 컬럼명을 매핑하기 위하여 Enum을 사용했습니다. @Entity로 부터 생성되는 컬럼명을 얻어오기 위해서는 QueryDsl의 Q클래스를 활용하거나 JPA Meta모델을 활용하는 방법이 있습니다.


대개 JPA를 쓰면서 QueryDsl을 같이 쓰기 때문에 별도 JPA Meta모델을 추출하기 보다는 QueryDsl의 MetaModel을 활용하여 매핑하였습니다.


6. DomainSpec 클래스 구현


6-1 Sort 전략 클래스 생성


public interface SortStrategy<T extends Enum<T>> {
    Sort.Order getSortOrder(T domainKey, SortOption order);
}
public class CustomerSortStrategy implements SortStrategy<CustomerMetaType> {
    @Override
    public Sort.Order getSortOrder(CustomerMetaType domainKey, SortOption order) {
        Sort.Order sortOrder = null;
        switch (domainKey){
            case CUSTOMER_ID:
            case CUSTOMER_NAME:
                final var column = domainKey.getName();
                sortOrder = (order == SortOption.ASC) ? Sort.Order.asc(column) : Sort.Order.desc(column);
        }
        return sortOrder;
    }
}


엔티티별로 정렬을 구현할 전략을 설정할 수 있는 객체를 생성합니다. 위 switch 구문에서 CUSTOMER_ID를 제거하면 Client로부터 넘어오는 customer_id는 해당되지 않으므로 Null이 반환되고 에러가 발생하게 될 것입니다. 따라서 Strategy에 지정한 구문여부에 따라서 정렬 대상을 한정할 수 있습니다.


6-2. DomainSpec 클래스 생성


public class DomainSpec<T extends Enum<T>, U> {
    private final Class<T> clazz;
    @Getter @Setter
    private int defaultPage = 0;
    @Getter @Setter
    private int defaultSize = 20;
    private SortStrategy<T> sortStrategy;

    public DomainSpec(Class<T> clazz, SortStrategy<T> sortStrategy) {
        this.clazz = clazz;
        this.sortStrategy = sortStrategy;
    }

    public DomainSpec(Class<T> clazz, SortStrategy<T> sortStrategy, int defaultPage, int defaultSize) {
        this.clazz = clazz;
        this.defaultPage = defaultPage;
        this.defaultSize = defaultSize;
        this.sortStrategy = sortStrategy;
    }

    public void changeSortStrategy(SortStrategy<T> sortStrategy) {
        this.sortStrategy = sortStrategy;
    }

    public Pageable getPageable(PageableDTO dto) {
        Integer page = dto.getPage();
        Integer size = dto.getSize();
        Pageable pageable;

        if (dto.getSorts().size() < 1) {
            pageable = PageRequest.of(page == null ? defaultPage : page, size == null ? defaultSize : size);
        } else {
            List<Sort.Order> sorts = getSortOrders(dto.getSorts());
            pageable = PageRequest.of(page == null ? defaultPage : page, size == null ? defaultSize : size, Sort.by(sorts));
        }

        return pageable;
    }

    private List<Sort.Order> getSortOrders(List<Pair<String, SortOption>> sorts) {
        Assert.notNull(this.sortStrategy,"There is no sort strategy");

        List<Sort.Order> orders = new ArrayList<>();
        for (var o : sorts) {
            T column;
            try {
                column = Enum.valueOf(this.clazz, o.getFirst().toUpperCase());
            } catch (IllegalArgumentException e) {
                throw new IllegalArgumentException("Sort option error");
            }

            final Sort.Order order = sortStrategy.getSortOrder(column, o.getSecond());
            Assert.notNull(order, "sort option error");

            orders.add(order);
        }
        return orders;
    }
}


정렬을 포함한 Pageable 객체를 얻어오기 위한 클래스입니다. SortStrategy를 통해 전달받은 구현체에 정렬 방법을 위임합니다.


7. Service 구현


@Service
public class CustomerService {
    private final CustomerRepository repository;
    private DomainSpec<CustomerMetaType, Customer> spec;

    public CustomerService(CustomerRepository repository) {
        this.repository = repository;
        this.spec = new DomainSpec<>(CustomerMetaType.class, new CustomerSortStrategy());
    }

    public Page<CustomerDTO> getCustomer(PageableDTO pageableDTO) {
        final var pageable = spec.getPageable(pageableDTO);

        final var customers = repository.findAll(pageable, pageableDTO.getTotalElements());
        return customers.map(CustomerDTO::of);
    }
}


정렬 조건을 포함한 Pageable 객체를 CustomerSpec에서 가져올 수 있도록 구성하였습니다.


8. Controller 구현


@RestController
@RequiredArgsConstructor
public class CustomerController {
    private final CustomerService service;

    @GetMapping("/customers")
    public ResponseEntity<Page<CustomerDTO>> getCustomer(PageableDTO pageableDTO){
        Page<CustomerDTO> customers = service.getCustomer(pageableDTO);
        return ResponseEntity.ok(customers);
    }
}


Pageable 객체를 바로 전달받는 것이 아니라, HandlerMethodArgumentResolver를 통해 PageableDTO를 주입받아 이를 서비스 객체로 넘기도록 코드를 수정하였습니다.


9. 실행 결과


프로그램을 실행시키면, 기존과는 다르게 customer_name과 같이 도메인 엔티티 컬럼명에 종속적이지 않고 컬럼명을 지정할 수 있습니다. 또한, 컬럼 정렬 대상을 제한하여 보다 무분별한 정렬이 발생되지 않도록 강제할 수 있습니다. 


마치며


이번 포스팅에서는 JPA에서 정렬 조건을 제한하는 방법과 엔티티 컬럼명에 의존하지 않도록 매핑 Layer를 두는 방법에 대해서 알아봤습니다.


위 구조를 조금 확장하면, Specification이나 BooleanBuilder 등을 활용하여 SQL Where 조건절에 추가하는 도메인 코드 로직을 구성할 수 있습니다.


hellozin님 블로그님 포스팅에 이와 관련된 내용이 있으니 참고하면 좋을 것 같습니다.


JPA Specification으로 쿼리 조건 처리하기

해당 코드는 Github에서 확인할 수 있습니다. Spring Data에서 Specification은 DB 쿼리의 조건을 Spec으로 작성해 Repository method에 적용하거나 몇가지 Spec을 조합해서 사용할 수 있게 도와줍니다. 간단한 예

velog.io


'JAVA > JPA' 카테고리의 다른 글

4. JPA Cache 적용하기  (0) 2020.08.05
3. JPA Hateoas 적용하기  (8) 2020.08.01
1. JPA 페이징 쿼리 개선  (0) 2020.07.29

서론


Pageable 객체를 사용하면 JPA에서 손쉽게 페이징 처리를 할 수 있습니다. 하지만 기본적으로 제공되는 findAll 메소드를 통해 페이징 처리를 요청하면, 매 요청시마다 전체 갯수를 구하기 위한 Count SQL이 수행되는 것을 볼 수 있습니다.


조회 조건이 달라지지 않는 이상 매번 동일한 결과 건수가 보장될텐데, 매번 Count SQL이 수행되는 것은 꽤나 비효율 적입니다. 더불어 Count SQL을 수행하면, 페이징되는 데이터 뿐만 아니라 전체 데이터를 DBMS 메모리에 로딩해서 집계 해야하기 때문에 반복 수행시 성능 이슈가 발생할 수 있습니다. 

 
물론 한번 메모리에 데이터가 로딩되면 그 이후에는 Count SQL 속도가 처음보다는 빠릅니다. 하지만 RDBMS(Oracle 기준)는 DMA(Direct Memorry Access)로 데이터에 즉시 접근할 수 없고 Latch를 획득해야하는 과정이 수반되기 때문에 여전히 Overhead가 존재합니다.

이번 포스팅에서는 CustomRepository 구현을 통해 전체 개수를 알고 있는 상황이라면, Count SQL을 요청하지 않도록 findAll 메소드를 구현하겠습니다.


1. Entity


@Entity
@Table
@Getter
public class Customer {
    @Id
    @GeneratedValue
    @Column(name = "id")
    private Long customerId;
    @Column(name = "name")
    private String customerName;
}


예제를 위해 엔티티는 위와같이 간단히 설정하였습니다. 조회를 위해 사전에 해당 테이블에 100건의 데이터 입력 하였다고 가정하고 진행하겠습니다.


2. 반환 DTO


@Builder(access = AccessLevel.PRIVATE)
@Getter
@JsonNaming(PropertyNamingStrategy.SnakeCaseStrategy.class)
public class CustomerDTO {
    private Long customerId;
    private String customerName;

    public static CustomerDTO of(Customer customer){
        return CustomerDTO.builder()
                .customerId(customer.getCustomerId())
                .customerName(customer.getCustomerName())
                .build();
    }
}


반환되는 DTO는 위와같이 구현했습니다. 


3. Repository 구현


@NoRepositoryBean
public interface BaseRepository<T, ID extends Serializable> extends JpaRepository<T,ID> {
    Page<T> findAll(Pageable pageable, Integer totalElements);
    Page<T> findAll(Specification<T> spec, Pageable pageable, Integer totalElements);
    Page<T> findAll(Specification<T> spec, Pageable pageable, Integer totalElements, Sort sort);
}


CustomRepository 구현을 위해 JpaRepository를 상속받는 새로운 Repository를 생성합니다. 

여기서 totalElements는 조건에 해당되는 전체 레코드 갯수로 Client가 전체 레코드 갯수를 파라미터로 전달하게 되면, 해당 값을 Page 객체에 삽입 후 Count SQL을 수행하지 않습니다. 반면 값이 전달되지 않으면 Count SQL을 수행합니다.


따라서, Count SQL 수행 여부는 파라미터로 전달되는 totalElements의 유무에 따라 결정됩니다.


public class BaseRepositoryImpl<T,ID extends Serializable> extends SimpleJpaRepository<T, ID> 
        implements BaseRepository<T,ID> {

    public BaseRepositoryImpl(JpaEntityInformation<T, ?> entityInformation, EntityManager entityManager) {
        super(entityInformation, entityManager);
    }

    @Override
    public Page<T> findAll(Pageable pageable, Integer totalElements) {
        return findAll(null, pageable, totalElements, Sort.unsorted());
    }

    @Override
    public Page<T> findAll(Specification<T> spec, Pageable pageable, Integer totalElements) {
       return findAll(spec, pageable, totalElements, Sort.unsorted());
    }

    @Override
    public Page<T> findAll(Specification<T> spec, Pageable pageable, Integer totalElements, Sort sort) {
        TypedQuery<T> query = getQuery(spec, sort);

        int pageNumber = pageable.getPageNumber();
        int pageSize = pageable.getPageSize();

        if(totalElements == null){
            return findAll(spec, pageable);
        }

        if(pageNumber < 0){
            throw new IllegalArgumentException("page number must not be less than zero");
        }

        if(pageSize < 1){
            throw new IllegalArgumentException("pageSize must not be less than one");
        }

        if(totalElements < pageNumber * pageSize){
            throw new IllegalArgumentException("totalElements must not be less than pageNumber * pageSize");
        }

        int offset = (int) pageable.getOffset();
        query.setFirstResult(offset);
        query.setMaxResults(pageable.getPageSize());

        return  new PageImpl<>(query.getResultList(), PageRequest.of(pageNumber, pageSize), totalElements);
    }
}


위 코드는 실제 Repository 구현 코드입니다. 전달받은 파라미터에 대하여 유효성 검증 후 로직에 따라 처리합니다.

만약 totalElements 값이 null이 아니라면 마지막 줄과 같이 Page 객체에 전달받은 값을 그대로 넣습니다.


public interface CustomerRepository extends BaseRepository<Customer, Long> {}


실제 사용하는 Repository에는 JpaRepository가 아닌 CustomRepository를 상속받도록 지정합니다.


@SpringBootApplication
@EnableJpaRepositories(repositoryBaseClass = BaseRepositoryImpl.class)
public class PagingDemoApplication {
    public static void main(String[] args) {
        SpringApplication.run(PagingDemoApplication.class, args);
    }
}


마지막으로 등록한 Repository를 사용하기 위해서는 Configuration 클래스에 @EnableJpaRepositories 어노테이션으로 CustomRepository를 등록합니다.


Service


@Service
@RequiredArgsConstructor
public class CustomerService {
    private final CustomerRepository repository;

    public Page<CustomerDTO> getCustomer(Pageable pageable, Integer totalElements) {
        Page<Customer> customers = repository.findAll(pageable, totalElements);
        return customers.map(CustomerDTO::of);
    }
}


CustomRepository의 메소드를 호출하며, 리턴된 페이지객체에 대해서 DTO로 변환하는 로직을 추가하였습니다.


Controller


@RestController
@RequiredArgsConstructor
public class CustomerController {
    private final CustomerService service;

    @GetMapping("/customers")
    public ResponseEntity<Page<CustomerDTO>> getCustomer(Pageable pageable,
                                                         @RequestParam(required = false, name = "total_elements")Integer totalElements){
        Page<CustomerDTO> customers = service.getCustomer(pageable, totalElements);
        return ResponseEntity.ok(customers);
    }
}


파라미터로 Pageable 객체이외에 totalElements를 전달받아 Service로 전달하는 역할을 수행합니다.


결과


1. totalElements 인자를 입력하지 않았을 경우


위와 같이 Count SQL이 수행되는 것을 확인할 수 있습니다.


2. totalElements 입력 결과


페이징 처리 SQL 수행 후 리턴받은 Page 객체에 전달받은 totalElements 값이 추가되었음을 확인할 수 있습니다.


마치며


이번 포스팅에서 JPA 페이징 수행시 Count SQL을 제거하는 방법에 대해서 살펴보았습니다. 기존에는 매번 Count SQL을 수행하여 Index가 벗어났는지 등을 Server에서 확인하였다면, 지금은 totalElements에 대한 책임이 Client 측에 일부 있습니다. 따라서 조회 조건이 달라진다면, totalElements 값을 전달하지 않는 처리가 Client에서 구현되어야 합니다.


약간의 복잡함은 있지만 비효율적인 Count SQL을 반복수행하는 것을 줄임으로 성능 향상을 꾀할 수 있습니다.


다음 포스팅에서는 Sort와 조회조건처리 관련하여 다루도록 하겠습니다.

'JAVA > JPA' 카테고리의 다른 글

4. JPA Cache 적용하기  (0) 2020.08.05
3. JPA Hateoas 적용하기  (8) 2020.08.01
2. JPA Sort 조건 개선  (2) 2020.07.30

서론


쿠버네티스 클러스터에 존재하는 Pod 서비스를 외부로 노출시키기 위한 가장 원시적인 방법은 NodePort를 이용하는 것입니다. 하지만 NodePort는 인스턴스의 IP가 변경되면 해당 서비스에도 이를 반영해야합니다. 따라서 Cloud 벤더에서는 LoadBalancer나 Ingress 타입을 통해 서비스를 노출할 수 있도록 지원합니다.


이번 포스팅에서는 온 프레미스 환경에서 LoadBalancer 타입을 지원하기 위한 MetalLB를 설치하는 방법을 다루고자 합니다.


문제 상황


1. nginx Deployment를 하나 생성합니다. (kubectl create deploy nginx --image=nginx)


2. 생성한 Deployment를 LoadBalancer 타입으로 서비스를 노출시킵니다.

( kubectl expose deploy nginx --port 80 --type LoadBalancer)


3.  서비스의 상태를 모니터링합니다. (watch kubectl get svc)


아무리 기다려도 해당 Service 오브젝트의 External-IP는 Pending 상태입니다. 이는 LoadBalancer가 존재하지 않기 때문입니다.


4.  Service와 Deployment 오브젝트를 제거합니다.

 - kubectl delete svc nginx

 - kubectl delete depoly nginx


Metal LB 설치


MetalLB 공식 홈페이지 설치 가이드대로 차근차근 설치하겠습니다.


1. MetalLB를 위한 네임스페이스를 생성합니다.

(kubectl apply -f https://raw.githubusercontent.com/metallb/metallb/v0.9.3/manifests/namespace.yaml)


2. MetalLB Components를 생성합니다.

(kubectl apply -f https://raw.githubusercontent.com/metallb/metallb/v0.9.3/manifests/metallb.yaml)


3. Secret을 생성합니다.

(kubectl create secret generic -n metallb-system memberlist --from-literal=secretkey="$(openssl rand -base64 128)")


4. 라우팅 처리를 위한 ConfigMap을 생성합니다.


apiVersion: v1
kind: ConfigMap
metadata:
  namespace: metallb-system
  name: config
data:
  config: |
    address-pools:
    - name: default
      protocol: layer2
      addresses:
      - 192.168.72.102-192.168.72.103


5. 기존과 마찬가지로 nginx를 Deploy한 다음 LoadBalancer 타입으로 노출시킨 결과 이전과는 다르게 nginx Service 오브젝트의 External IP가 할당된 것을 확인할 수 있습니다.


서론


이전 포스팅을 통해 VirtualBox에서 쿠버네티스 클러스터를 구축하는 방법을 살펴봤습니다. 이번 포스팅에서는 클러스터내 Pod 끼리 디스크를 공유해야하는 경우 사용되는 Persistent Volume 유형 중 NFS를 구성하는 방법에 대해서 살펴보겠습니다.


쿠버네티스 Persistent Volume 지원 항목

  • GCEPersistentDisk
  • AWSElasticBlockStore
  • AzureFile
  • AzureDisk
  • CSI
  • FC (파이버 채널)
  • FlexVolume
  • Flocker
  • NFS
  • iSCSI
  • RBD (Ceph Block Device)
  • CephFS
  • Cinder (OpenStack 블록 스토리지)
  • Glusterfs
  • VsphereVolume
  • Quobyte Volumes
  • HostPath (단일 노드 테스트 전용 – 로컬 스토리지는 어떤 방식으로도 지원되지 않으며 다중-노드 클러스터에서 작동하지 않음)
  • Portworx Volumes
  • ScaleIO Volumes
  • StorageOS


1. NFS 서버 설치


NFS 구축을 위해서는 서버를 먼저 설치해야합니다. 보통 별도 서버를 띄운다음에 구축하는 것이 보편적이지만 편의상 Work1 노드에 NFS 서버를 구축하겠습니다.


1.  Work1 노드에서 root 계정으로 접속합니다.


2.  update를 수행합니다.


3.  NFS 서버를 위한 패키지 프로그램을 설치합니다.


4.  공유 폴더를 새로 만듭니다. (mkdir /home/share/nfs -p)


5. 폴더 권한을 부여합니다. (chmod 777 /home/share/nfs)


6. exports 파일을 엽니다. (vi /etc/exports)


7. 공유폴더의 허용 host 및 권한을 설정합니다.

( /home/share/nfs       192.168.72.101(rw,sync,no_subtree_check) 192.168.72.102(rw,sync,no_subtree_check) 192.168.72.103(rw,sync,no_subtree_check) )


8. nfs-server를 재기동합니다.(service nfs-server restart)


9. nfs-server 상태를 확인합니다.(systemctl status nfs-server.service)


10. mount 목록을 확인하여 정상 반영되었는지 체크합니다. (showmount -e 127.0.0.1)


11.  공유 폴더를 /mnt로 마운트 시킵니다. (mount -t nfs 192.168.72.102:/home/share/nfs /mnt)


12. 정상적으로 마운트되었는지 확인하기 위해 공유 폴더에 테스트 파일을 만듭니다.

(echo test >> /home/share/nfs/test.txt)


13.  마운트 위치에있는 파일을 읽어 정상 동작 여부를 확인합니다. (cat /mnt/test.txt)


14. 임시 파일을 삭제합니다. (rm /mnt/test.txt)


15. Master 노드의 root 계정으로 접속합니다.


16. update를 수행합니다. (apt update)


17. NFS 관련 패키지 프로그램을 설치합니다.(apt install nfs-common nfs-kernel-server portmap)


18. Work2 노드에서 root 계정으로 접속합니다.


19. update를 수행합니다.


20. NFS 관련 패키지 프로그램을 설치합니다.(apt install nfs-common nfs-kernel-server portmap)


2. Persistent Volume 테스트


쿠버네티스 공식 홈페이지에 있는 예제를 활용하여 NFS를 활용한 공유디스크 설정 테스트를 진행합니다.


1. PersistentVolume 테스트를 위한 yaml 파일을 생성합니다.


2.  아래 내용을 복사 & 붙여넣기 합니다.


apiVersion: v1
kind: PersistentVolume
metadata:
  name: my-pv
spec:
  capacity:
    storage: 10Mi
  volumeMode: Filesystem
  accessModes:
    - ReadWriteOnce
  persistentVolumeReclaimPolicy: Recycle
  nfs:
    path: /home/share/nfs
    server: 192.168.72.102


3. PersistentVolume을 생성합니다. (kubectl create -f pv.yaml)


4. PersistentVolume 상태를 확인합니다.


위와같이 Status가 Available이면 정상입니다.


5. 초기화를 위해 PersistentVolume을 삭제합니다. (kubectl delete -f pv.yaml)


마치며


Stateful 애플리케이션을 사용하기 위해서는 Volume 설정이 필요합니다. NFS는 Persistent Volume을 지원하는 한 종류로서 공유 디스크 할당이 가능합니다.


다음 포스팅에서는 LoadBalancer를 위한 MetalLB 설치과정을 다루겠습니다.

서론


이전 포스팅에서 Ubuntu 설치 및 클러스터 구성을 위한 환경 설정을 진행했습니다. 이번 포스팅에서는 본격적으로 Docker 및 쿠버네티스를 설치하는 과정을 다루겠습니다.


1. Docker 설치


1. root 계정으로 접속합니다. (sudo -i)


2. Docker를 설치합니다. (apt install docker.io)


3. Docker 상태를 확인합니다. (docker ps)


4. nginx 이미지를 실행해서 정상적으로 동작하는지 확인해봅니다.

(docker run -d -p 80:80 --rm --name nginx nginx)


5.  Safari를 실행하여 nginx 도커 이미지가 정상적으로 기동되었는지 확인합니다.


6. 생성한 Docker 컨테이너를 정리합니다. (docker stop nginx)


7. nginx 이미지를 삭제합니다. (docker rmi nginx)


2. 쿠버네티스 설치


쿠버네티스 공식 홈페이지에서 제공하는 방법으로 설치를 진행합니다. 


설치에 앞서 공식홈페이지에서 요구하는 요구사항을 살펴봅시다.


  • 2 GB or more of RAM per machine (any less will leave little room for your apps)
  • 2 CPUs or more
  • Full network connectivity between all machines in the cluster (public or private network is fine)
  • Unique hostname, MAC address, and product_uuid for every node. See here for more details.
  • Certain ports are open on your machines. See here for more details.
  • Swap disabled. You MUST disable swap in order for the kubelet to work properly


여기서 마지막 줄을 보면, Swap을 비활성화 해야됩니다. 그 이유는 Swap 기능은 본래 가용된 메모리보다 더 큰 메모리 할당을 가능하도록 하기 위함인데, 쿠버네티스 철학은 주어진 인스턴스의 자원을 100% 가깝게 사용하는 것이 목표이기 때문에 부합되지 않습니다. 따라서 성능을 제대로 사용하기 위해서 Swap 기능을 비활성화 해야합니다.


1. Swap 중지하기 (swapoff -a)


2. 재부팅되면 초기화 되므로 완전하게 중지시킵니다. (sed -i '/ swap / s/^\(.*\)$/#\1/g' /etc/fstab)


3. 공식 홈페이지에 있는 Kubeadm 설치 명령어를 복사합니다.


명령어

sudo apt-get update && sudo apt-get install -y apt-transport-https curl
curl -s https://packages.cloud.google.com/apt/doc/apt-key.gpg | sudo apt-key add -
cat <<EOF | sudo tee /etc/apt/sources.list.d/kubernetes.list
deb https://apt.kubernetes.io/ kubernetes-xenial main
EOF
sudo apt-get update
sudo apt-get install -y kubelet kubeadm kubectl
sudo apt-mark hold kubelet kubeadm kubectl


4.  명령어 실행을 위하여 shell 파일을 만듭니다. (vi kubeadm-install.sh)


5. 공식 홈페이지에서 복사한 명령어를 붙여넣기 합니다.


위 명령어를 통해서 kubeadm kubelect kubectl이 설치됩니다.


6. Shell 파일을 실행합니다. (sh kubeadm-install.sh)


7. kubeadm이 정상적으로 설치되었는지 확인합니다. (kubeadm version)


8. 마스터 노드를 중지합니다. (halt)


3. 클러스터 구축


1. 쿠버네티스 VM 복사 전에 스냅샷을 찍습니다.( 나중에 문제생길 시 롤백 용도)


2. Worker 노드 복사를 위해 Master VM 선택 후 마우스 오른쪽 클릭 > 복제 버튼을 클릭합니다.


3.  복제할 가상머신의 이름과 저장 경로를 설정합니다.


4. MAC 주소 정책에서 모든 네트워크 어댑터의 새 MAC 주소 생성 버튼을 클릭합니다. 이후 다음 버튼을 클릭합니다.


5. 완전한 복제를 선택후 다음 버튼을 클릭합니다.


6. 복제 버튼을 클릭합니다.


7. 1~6 번과정을 동일하게 반복하여 Work2 가상 머신을 생성합니다.


8. work1 가상 머신을 기동 후 터미널을 엽니다.


9. root로 접속합니다. (sudo -i)


10. hostname을 변경합니다. (hostnamectl set-hostname node01)


11.  고정 IP 설정을 위해 설정 파일 위치로 이동합니다.


12.  설정 파일을 오픈합니다.


13. node01의 IP를 변경합니다. (AS-IS 192.168.72.101, TO-BE : 192.168.72.102)


14. reboot을 수행합니다. (reboot)


15. reboot 이후 hostname이 변경되었음을 확인합니다.


16. work1 가상머신과 동일한 작업을 위해 work2 머신을 기동합니다.


17.  터미널을 엽니다.


18. root로 접속합니다. (sudo -i)


19. hostname을 변경합니다. (hostnamectl set-hostname node02)


20. 고정 IP 설정을 위해 설정 파일 위치로 이동합니다.


21. 설정 파일을 오픈합니다.


22. node02의 IP를 변경합니다. (AS-IS 192.168.72.101, TO-BE : 192.168.72.103)


23. 재부팅을 수행합니다.


24. reboot 이후 hostname이 변경되었음을 확인합니다.


25. Master 가상 머신을 기동합니다.


26. Ping을 수행하여 정상적으로 수행되는지 확인합니다.

(※ Master 뿐만 아니라 Work1, Work2 가상 머신에서도 Ping을 수행하여 패킷이 정상 수신되는지 확인합니다.)


27. Master 노드에서 root 계정으로 접속합니다.

(※ 반드시 Master에서만 수행해야합니다.)


28. kubeadm init 명령어를 수행합니다.

(※ 해당 명령어를 통해 kube-apiserver, scheduler 등이 설치됩니다.)


29. 정상적으로 설치되었으면 아래와 같은 화면이 표시됩니다.


위 화면에서 두가지 작업이 추가됩니다.

먼저 mkdir 부터 시작하는 영역은 kubectl을 통해 Kube API Server와 통신하기 위한 클라이언트 설정입니다.


아래 kubeadm join에 해당하는 영역은 Worker 노드에서 Master 노드 클러스터에 합류하기 위한 명령어입니다.


30. 아래 영역을 드래그하여 복사합니다. 이후 터미널 상단에 위치한 새탭 버튼을 클릭합니다.


31.  새탭에서 복사한 명령어를 수행합니다.

(※ root가 아닌 admin 계정으로 kubectl을 수행할 것이므로 계정이 올바른지 확인합니다.)


32. 이전 탭에서 클러스터 조인 명령어를 복사합니다.


33. Work1 노드, Work2 노드에서 root 계정으로 접속합니다.


34. Work1 노드에서 복사한 명령어를 실행합니다.


35. 아래와 같은 메시지가 나오면 정상적으로 등록된 것입니다.


36. Work2 노드에서도 동일한 명령어를 수행하여 클러스터 Join을 수행합니다.


37. Work2 노드에서 Join이 정상적으로 등록되었는지 확인합니다.


38. Master 노드 kadmin 계정에서 cluster가 정상적으로 구축되었는지 확인합니다. (kubectl get nodes)


위와 같이 3개 노드와 메시지가 표시된다면 정상입니다.

다만 STATUS가 NotReady 상태인 이유는 Pod Network가 구성되지 않았기 때문입니다.


4. Overlay Network 설치


쿠버네티스 공식 홈페이지에 있는 CNI 중 Weave net을 설치하겠습니다.


1. 위 공식 문서 링크를 클릭하여 Weave Net 탭을 선택하여 명령어를 복사합니다.


2. Master 노드에서 해당 명령어를 실행시킵니다.

(kubectl apply -f "https://cloud.weave.works/k8s/net?k8s-version=$(kubectl version | base64 | tr -d '\n')")


3. node 상태를 살펴보면 STATUS가 Ready로 변경된 것을 확인할 수 있습니다. (kubectl get nodes)


4. 쿠버네티스 클러스터가 정상적으로 설치되었는지 확인하기 위해 nginx Deployment를 실행해봅니다.

(kubectl create deploy nginx-deploy --image=nginx)


5. Pod 상태를 확인하여 STATUS Running으로 되어있으면 정상적으로 동작하는 것입니다.

(kubectl get pods -o wide)


6.  실행시킨 Deployment를 종료시킵니다.

(kubectl delete deploy nginx-deploy)


마치며


지금까지 VirtualBox에서 쿠버네티스 클러스터를 구축하는 방법에 대해서 살펴봤습니다. 다음 포스팅에서는 공유 디스크 환경을 구성하는 NFS를 설정하여 PersistentVolume을 구성할 수 있도록 환경을 구성하는 방법을 살펴보겠습니다.


서론


이전 포스팅을 통해 Ubuntu 이미지 다운로드 및 VirtualBox 기본 환경 설정을 구성하였습니다. 이번 포스팅에서는 K8S 클러스터 설치를 위한 기본 구성을 진행하겠습니다.


1. Ubuntu 설치


1. VM 기동을 위해 머신 선택 후 시작 버튼을 누릅니다.


2. 언어 설정 이후에 Ubuntu 설치 버튼을 클릭합니다.


3. 별다른 설정없이 계속하기 버튼을 클릭합니다.


4. 계속하기 버튼을 선택합니다.


5. 지금 설치 버튼을 클릭합니다.


6. 계속 하기 버튼을 누릅니다.


7. 지역 선택 후 계속 하기 버튼을 클릭합니다.


8. 컴퓨터 정보 입력 후 계속하기 버튼을 클릭합니다.


9. 설치가 완료될 때 까지 기다립니다.


10. 설치가 완료되면 지금 다시 시작 버튼을 누릅니다.


11. 아래와 같은 화면이 출력된다면, Enter키를 누르면 서버가 재시작됩니다.


Ubuntu 환경 설정


1. VM 재시작 이후 로그인합니다.


2. 건너뛰기 버튼을 클릭합니다.


3. 다음 버튼을 클릭합니다.


4. 완료 버튼을 눌러 최초 시작 환경 구성을 종료합니다.


5. 소프트웨어 업데이터 창이 뜬다면 지금 설치를 눌러 업데이트를 진행합니다.


6. 환경 구성을 위해 목록창을 열고 터미널을 입력하여 터미널 창을 띄웁니다.


7. root 계정으로 작업하기 위해 sudo -i 명령어를 입력합니다.


8. root 계정의 비밀번호를 변경합니다. (passwd)


9. update를 진행합니다. (apt update)


10.  openssh-server를 설치합니다. (apt install openssh-server)


11. ifconfig 명령어를 보기 위해 net-tools를 설치합니다. (apt install net-tools)


12. 학습 목적이므로 모든 방화벽을 해제합니다. (ufw disable)


13. 방화벽 상태를 확인합니다. (ufw status verbose)


14. Vim을 설치합니다. (apt-get install vim)


15. 편의 기능인 클립보드 및 공유폴더 기능을 사용하기 위해 장치 > 게스트 확장 CD 이미지 삽입 버튼을 클릭합니다.


16. 실행 버튼을 클릭합니다.


17.  인증 필요시 비밀번호 입력 후 인증 버튼을 클릭합니다.


18. 클립보드 공유를 위해 장치 > 클립보드 공유 > 양방향 버튼을 클릭합니다.


19. 지금부터 네트워크 설정을 하겠습니다. 먼저 hosts 파일을 열어 master 노드와 worker 노드의 IP 목록을 입력한 다음 저장합니다.


20. hostname을 변경합니다. (hostnamectl set-hostname master)


21. ip 목록을 확인합니다. (ifconfig)


위 그림에서 enp0s3에 등록된 ip는 Bridge Adaptor로 등록된 IP이며, PC에서 SSH를 통해 접속 가능합니다. 

확인을 위해 개인 PC에서 Putty를 통해 해당 IP로 접속시도하면 정상적으로 커넥션이 맺어지는 것을 확인할 수 있습니다.


22. Host Only Ethernet 설정을 위해 설정 파일이 있는 폴더로 이동합니다. (cd /etc/netplan/)


23. 설정 파일을 열어 고정 IP 설정을 진행합니다.


24. 고정 IP 설정을 적용합니다. (netplan apply)


25. IP 설정이 정상적으로 되었는지 확인합니다. (hostname -I)


26. hostname 변경 적용을 위해 reboot을 진행합니다.(reboot)


27. reboot 이후에 hostname이 변경되었음을 확인합니다.


마치며


Docker 및 쿠버네티스 설치를 위한 기초 설정 작업을 마쳤습니다. 다음 포스팅에서는 Docker & Kubernetes 설치 과정을 다루어보겠습니다.


서론


쿠버네티스를 처음 공부할 때 난해한 부분이 클러스터 설치라고 생각합니다. 물론 GCP, AWS와 같은 클라우드에서 제공하는 쿠버네티스 클러스터를 활용하거나 Katakoda와 같은 웹사이트를 통해 접할 수도 있지만, 직접 VM으로 클러스터를 구축하는 경험도 중요하다고 생각합니다.


향후 몇개의 포스팅을 통해 VirtualBox를 통해 3개(1 Master, 2 Worker)의 K8S 클러스터를 구축방법을 다루어보고자 합니다. 쿠버네티스는 Kubeadm을 활용하여 설치할 계획이며, 학습 목적이므로 Ansible이나 기타 자동화 툴 도입이나 상세 설정 없이 설치하는 과정을 설명합니다.


PC 환경은 램 16GB 이상을 권장드리며, 공유기가 있다는 전제하에 네트워크 구성은 Bridge Adaptor를 통해 구성하오니 내용 참고 바랍니다.

(※ 공유기가 없는 환경이라면 NAT 네트워크를 구성하여 진행 가능합니다.)


앞으로 다룰 내용


1. VirtualBox Ubuntu 설치

2. Docker 설치

3. 쿠버네티스 클러스터 구성

4. NFS 구성

5. metallb 설치

6. ingress-nginx 설치


이번 포스팅은 첫 번째로 VirtualBox를 사용하여 이미지 설치를 위한 기초 설정을 다루겠습니다.


1. VirtualBox 설치


VirtualBox 공식 홈페이지에 접속하여 프로그램을 다운로드 후 설치를 진행합니다.

설치시 특별한 설정 없이 다음버튼을 눌러 진행하면 되므로 설치 과정은 생략하겠습니다.


2. Ubuntu 이미지 다운로드


1. Ubuntu 공식 홈페이지에 접속하여 Desktop 다운로드 버튼을 누릅니다.


2. 이미지를 다운로드 받습니다. 만약 이미지 다운로드가 되지 않는다면, Download Now 링크를 클릭합니다.


3. VirtualBox 설정


1. VirtualBox를 실행시킵니다.


2. 상단의 머신 > 새로 만들기 버튼을 선택합니다.


3. 이미지의 이름을 지정합니다. 


4. VM 이미지 설치 위치를 저장하기 위해 머신폴더 > 기타를 선택합니다.


5. 설치 위치를 선택한 다음 폴더 선택 버튼을 누릅니다.


6. 종류와 버전을 선택한 다음 다음 버튼을 누릅니다.


7. 컴퓨터 사양을 고려하여 메모리를 할당(2GB 이상) 후 다음버튼을 누릅니다.


8. 가상디스크를 만들기 위해 만들기 버튼을 클릭합니다.


9. 기본 설정을 유지한채 다음 버튼을 클릭합니다.


10. 동적 할당을 선택 후 다음 버튼을 클릭합니다.


11.  PC 사양을 고려하여 이미지 할당 크기를 지정한 다음 저장 위치를 지정합니다. 완료 후 만들기 버튼을 클릭합니다.


12. Network 및 기타 설정을 위해 생성된 머신 선택 > 마우스 오른쪽 클릭 > 설정 버튼을 누릅니다.


13. CPU 설정을 위해 시스템 > 프로세서 탭에서 CPU 개수를 2개로 설정합니다.


14. Ubuntu 이미지를 설정하기 위해서 저장소 > 비어 있음 > 디스크 버튼 > Choose a disk file... 버튼을 클릭합니다.


15. 다운로드 받은 Ubuntu 이미지를 선택한 다음 열기 버튼을 누릅니다.


16. Ubuntu 이미지로 설정된 것을 확인합니다.


17. 네트워크 > 어댑터1에서 이름을 어댑터 브리지로 선택합니다.


18. Host 네트워크 설정을 위해 어댑터 2 > 네트워크 어댑터 사용하기 클릭 > 호스트 전용 어댑터를 선택합니다.


확인 버튼을 눌러 종료합니다.


마치며


Ubuntu 설치를 위한 기본적인 설정은 마무리 되었습니다.

다음 포스팅에서는 Ubuntu 설치 및 기본적인 환경 구성을 진행하겠습니다.

+ Recent posts